Segnali di Analisi Tecnica Pacific Edge Ltd. (PEB) Gratuiti
Segnale Pacific Edge Ltd. (PEB) con analisi tecnica su 14 Aug
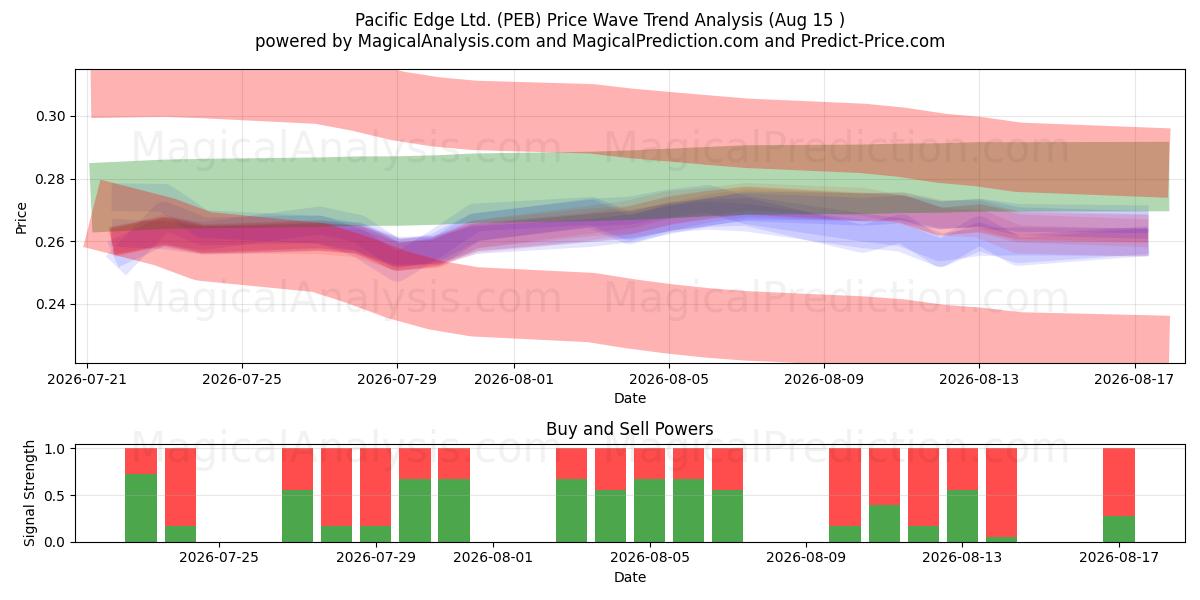
I 256 segnali sono stati categorizzati in quattro strategie distinte, ognuna composta da 64 segnali. Immergiamoci nei dettagli di ciascuna strategia:
Strategia 1:
Segnali di Acquisto:
Segnali di Vendita:
Segnali Neutri:
Risultato: Questa strategia porta a una posizione .
Strategia 2:
Segnali di Acquisto:
Segnali di Vendita:
Segnali Neutri:
Risultato: Questa strategia porta a una posizione .
Strategia 3:
Segnali di Acquisto:
Segnali di Vendita:
Segnali Neutri:
Risultato: Questa strategia porta a una posizione .
Strategia 4:
Segnali di Acquisto:
Segnali di Vendita:
Segnali Neutri:
Risultato: Questa strategia porta a una posizione .
Strategia Generale:
Segnali di Acquisto: 9
Segnali di Vendita: 7
Segnali Neutri: 83
Risultato: Questa strategia porta a una posizione Neutro.
Avviso! Si prega di esercitare cautela e considerazione approfondita prima di prendere decisioni finanziarie. È importante notare che i nostri segnali si basano esclusivamente sulle variazioni quotidiane dei prezzi e non tengono conto di fattori esterni come notizie, sentiment di mercato o sviluppi aziendali. Raccomandiamo vivamente di considerare tutti i fattori rilevanti e di condurre la propria ricerca.
Consigli Utili: Per prendere le decisioni più informate sui tuoi investimenti in Pacific Edge Ltd. (PEB), ti consigliamo vivamente di visitare il sito dei segnali dei modelli AI "magicalprediction". Offrono segnali gratuiti e se uno di essi è in linea con i nostri, è probabile che sia un indicatore affidabile, come abbiamo osservato nel tempo.
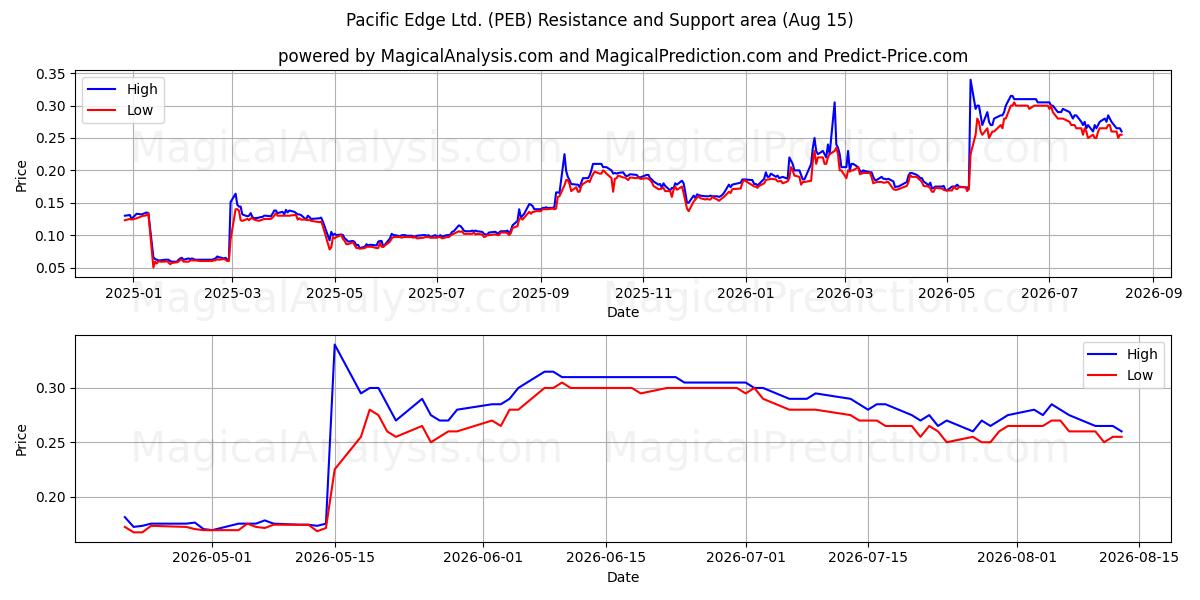
Secondo Livello di Supporto: 0.225
Se il primo livello di supporto viene violato, il secondo livello di supporto a 0.225 diventa un punto critico. La rottura di questo livello indicherebbe una maggiore pressione al ribasso, probabilmente causata dal sentiment di mercato o da fattori esterni.
Terzo Livello di Supporto: 0.21
Se il secondo livello di supporto viene rotto e il prezzo continua a scendere, ciò segnala un cambiamento significativo del mercato. Rimanere al di sotto di 0.21 confermerebbe una tendenza ribassista persistente, con i trader che probabilmente mirano a questo terzo livello come prossimo punto di supporto chiave.
Questi livelli di supporto dovrebbero essere considerati attentamente nel contesto delle tendenze e degli indicatori di mercato più ampi. Rimanere all'erta e analizzare continuamente il mercato ti permetterà di prendere decisioni informate mentre fai trading con Pacific Edge Ltd. (PEB). Prestare attenzione a questi livelli di supporto ti aiuterà ad adattarti alla natura dinamica del mercato e a fare scelte di trading più intelligenti. È fondamentale monitorare attentamente questi livelli di resistenza e considerarli nel contesto delle tendenze e degli indicatori di mercato più ampi. Per prendere decisioni informate quando fai trading con Pacific Edge Ltd. (PEB), rimani vigile e analizza continuamente il mercato. Concentrarsi su questi livelli di resistenza, insieme alle dinamiche di mercato più ampie, ti aiuterà a prendere decisioni di trading più intelligenti e ad adattarti alle condizioni di mercato in cambiamento.
Grafico di analisi tecnica Pacific Edge Ltd. (PEB)
Livelli di supporto e resistenza Pacific Edge Ltd. (PEB)
| Nome | Level1 | Level2 | Level3 | Level4 | Level5 |
|---|---|---|---|---|---|
| Resistenza | 0.305 | -- | -- | -- | -- |
| Supporto | 0.25 | 0.225 | 0.21 | 0.196 | 0.137 |
Lista dei segnali Pacific Edge Ltd. (PEB) per 14 Aug
| Overall Signals |
|---|
Pattern a candele Pacific Edge Ltd. (PEB) su 14 Aug
Analisi tecnica Pacific Edge Ltd. (PEB) negli ultimi giorni
| # | Date | Overal Signals | ALL Signals |
|---|---|---|---|
| 1 | 14 Aug | N | EMA Price Cross 1EMA Price Cross 2EMA Price Cross 4KAMA 1KAMA 2KAMA 3KAMA 4EMA Crossover 4WMA Crossover 3MIDPOINT Slope 2MIDPOINT Slope 4T3 Slope 1TEMA Price 2TRIMA Slope 1TRIMA Slope 2MOM Crossover 1MOM Crossover 2PLUS_DI Threshold 1PLUS_DI Threshold 2ROC Threshold 1ROC Threshold 2ROCR Threshold 2ROCR Threshold 3WILLR Exit OversoldWILLR Exit OverboughtBOP Smoothed ThresholdMACD Crossover 2BBANDS Breakout 1Stochastic RSI SignalADXR with DI+/DI-Daily Pivot Point 1CMO Divergence 1 |
| 2 | 13 Aug | S | EMA Price Cross 1EMA Price Cross 2EMA Price Cross 4KAMA 2KAMA 3KAMA 4TEMA Price 1TEMA Price 2TEMA Price 3TRIMA Slope 1CCI Crossover 1CCI Crossover 2MOM Crossover 2PLUS_DI Threshold 1PLUS_DI Threshold 2ROCR Threshold 3BOP Smoothed ThresholdMACD Crossover 2BBANDS Breakout 1Stochastic RSI SignalUltimate OscillatorOBV CrossoverVolume SpikeDaily Pivot Point 1Elder's Force Index |
| 3 | 12 Aug | B | DEMA 1DEMA 2DEMA 3KAMA 1KAMA 2KAMA 3KAMA 4MIDPOINT Slope 1MIDPOINT Slope 2MIDPOINT Slope 3TEMA Price 1TEMA Price 2TEMA Price 3TRIMA Slope 1AROONOSC 3MOM Crossover 2PLUS_DI Threshold 1PLUS_DI Threshold 2ROC Threshold 2ROCR Threshold 1ROCR Threshold 3WILLR Exit OversoldWILLR Exit OverboughtBOP Smoothed ThresholdMACD Crossover 1MACD Crossover 2Vortex IndicatorCMO Divergence 1 |
| 4 | 11 Aug | S | KAMA 2KAMA 3KAMA 4WMA Crossover 2TEMA Price 3AROONOSC 1MOM Crossover 1MOM Crossover 2PLUS_DI Threshold 1PLUS_DI Threshold 2ROC Threshold 2ROCR Threshold 2ROCR Threshold 3BOP Smoothed ThresholdStochastic RSI Signal |
| 5 | 10 Aug | N | DEMA 1EMA Price Cross 1EMA Price Cross 2EMA Price Cross 4KAMA 2KAMA 3KAMA 4EMA Crossover 1EMA Crossover 2WMA Crossover 1MIDPOINT Slope 1MIDPOINT Slope 2MIDPOINT Slope 4TEMA Price 1TEMA Price 2MOM Crossover 1MOM Crossover 2PLUS_DI Threshold 1PLUS_DI Threshold 2ROCR Threshold 1ROCR Threshold 2ROCR Threshold 3BOP Smoothed ThresholdBBANDS Breakout 1Stochastic RSI SignalOBV CrossoverEngulfing PatternVolume SpikeDaily Pivot Point 1Elder's Force IndexCMO Divergence 1 |
| 6 | 07 Aug | S | KAMA 4WMA Crossover 3MIDPOINT Slope 1MIDPOINT Slope 4T3 Slope 1TEMA Price 3TRIMA Slope 2CCI Crossover 1MOM Crossover 1ROC Threshold 1ROCR Threshold 2BOP Smoothed ThresholdCMO Divergence 1 |
| 7 | 06 Aug | B | KAMA 4MIDPOINT Slope 2T3 Slope 1TEMA Price 3TRIMA Slope 2AROONOSC 2AROONOSC 3TRIX Crossover 2BOP Smoothed ThresholdChaikin AD CrossoverChaikin ADOSC Zero CrossCMO Divergence 1 |
| 8 | 05 Aug | B | DEMA 2EMA Price Cross 1EMA Price Cross 2EMA Price Cross 4KAMA 4EMA Crossover 2MIDPOINT Slope 2T3 Slope 1TEMA Price 2TEMA Price 3TRIMA Slope 1MOM Crossover 1PLUS_DI Threshold 1PLUS_DI Threshold 2ROC Threshold 1ROCR Threshold 2BOP Smoothed ThresholdMACD Crossover 2STOCH Normal Zone CrossBBANDS Breakout 1Percentage Price OscillatorCMO Divergence 1 |
| 9 | 04 Aug | B | EMA Price Cross 1EMA Price Cross 2EMA Price Cross 4KAMA 2KAMA 3KAMA 4MIDPOINT Slope 1MIDPOINT Slope 4T3 Slope 1TEMA Price 1TEMA Price 3TRIMA Slope 1AROONOSC 1PLUS_DI Threshold 1PLUS_DI Threshold 2ROC Threshold 2BOP Smoothed ThresholdStochastic RSI SignalEngulfing PatternDaily Pivot Point 1 |
| 10 | 03 Aug | S | DEMA 2KAMA 4WMA Crossover 2MIDPOINT Slope 1MIDPOINT Slope 4TEMA Price 2TEMA Price 3TRIMA Slope 1PLUS_DI Threshold 1PLUS_DI Threshold 2TRIX Crossover 1WILLR Exit OversoldBOP Smoothed ThresholdVortex IndicatorCMO Divergence 1 |
| 11 | 31 Jul | B | DEMA 1DEMA 2EMA Price Cross 1EMA Price Cross 2KAMA 1KAMA 4EMA Crossover 1WMA Crossover 1MIDPOINT Slope 1MIDPOINT Slope 3TEMA Price 1TEMA Price 2TEMA Price 3TRIMA Slope 3CCI Crossover 2PLUS_DI Threshold 1PLUS_DI Threshold 2ROCR Threshold 1BOP Smoothed ThresholdSTOCH Normal Zone CrossOBV CrossoverChaikin AD CrossoverChaikin ADOSC Zero CrossDEMA with ATR 2Volume SpikeDaily Pivot Point 1Elder's Force IndexCMO Divergence 1CMO Divergence 2 |
| 12 | 30 Jul | B | DEMA 1EMA Price Cross 4KAMA 2KAMA 3KAMA 4TEMA Price 1TEMA Price 2TEMA Price 3TRIMA Slope 1TRIMA Slope 2TRIMA Slope 3CCI Crossover 1PLUS_DI Threshold 1PLUS_DI Threshold 2RSI Exit OversoldBOP Smoothed ThresholdMACD Crossover 1Stochastic RSI SignalCMO Divergence 1 |
| 13 | 29 Jul | N | DEMA 1DEMA 2DEMA 3KAMA 1KAMA 2KAMA 3KAMA 4MIDPOINT Slope 1MIDPOINT Slope 4TEMA Price 1TEMA Price 2TRIMA Slope 2TRIMA Slope 3PLUS_DI Threshold 1PLUS_DI Threshold 2WILLR Exit OversoldWILLR Exit OverboughtBOP Smoothed ThresholdMACD Crossover 1STOCH Normal Zone CrossIchimoku 3CMO Divergence 1 |
| 14 | 28 Jul | S | DEMA 3KAMA 2KAMA 3KAMA 4WMA Crossover 1TEMA Price 3TRIMA Slope 2TRIMA Slope 3PLUS_DI Threshold 1PLUS_DI Threshold 2BOP Smoothed ThresholdStochastic RSI Signal |
| 15 | 27 Jul | S | KAMA 2KAMA 3KAMA 4WMA Crossover 1TEMA Price 2TEMA Price 3TRIMA Slope 2TRIMA Slope 3AROONOSC 1AROONOSC 3CCI Crossover 3PLUS_DI Threshold 1PLUS_DI Threshold 2BOP Smoothed ThresholdMACD Crossover 1Hammer / Hanging Man |
| 16 | 24 Jul | S | DEMA 3EMA Price Cross 4KAMA 2KAMA 3KAMA 4MIDPOINT Slope 2TRIMA Slope 1TRIMA Slope 2TRIMA Slope 3PLUS_DI Threshold 1PLUS_DI Threshold 2WILLR Exit OversoldWILLR Exit OverboughtStochastic RSI SignalElder's Force Index |
| 17 | 23 Jul | S | DEMA 1DEMA 2DEMA 3EMA Price Cross 4KAMA 2KAMA 3KAMA 4TEMA Price 1TEMA Price 2TEMA Price 3TRIMA Slope 1TRIMA Slope 2TRIMA Slope 3CCI Crossover 1CCI Crossover 2CCI Crossover 3PLUS_DI Threshold 1PLUS_DI Threshold 2RSI Exit OversoldBOP Smoothed ThresholdBBANDS Breakout 2Stochastic RSI SignalMoney Flow IndexVolume SpikeDaily Pivot Point 1Elder's Force Index |
| 18 | 22 Jul | B | DEMA 1DEMA 2DEMA 3KAMA 1KAMA 2KAMA 3KAMA 4MIDPOINT Slope 1MIDPOINT Slope 2MIDPOINT Slope 3MIDPOINT Slope 4T3 Slope 1TEMA Price 2TEMA Price 3TRIMA Slope 1TRIMA Slope 2TRIMA Slope 3CMO Crossover 1PLUS_DI Threshold 1PLUS_DI Threshold 2BOP Smoothed ThresholdKeltner Channel 1Donchian ChannelDaily Pivot Point 1CMO Divergence 1 |
| 19 | 21 Jul | S | DEMA 2DEMA 3KAMA 1KAMA 2KAMA 3KAMA 4MIDPOINT Slope 3MIDPOINT Slope 4TEMA Price 3TRIMA Slope 1TRIMA Slope 2TRIMA Slope 3PLUS_DI Threshold 1PLUS_DI Threshold 2BOP Smoothed ThresholdSTOCH Normal Zone CrossCMO Divergence 1 |
| 20 | 20 Jul | S | DEMA 2DEMA 3KAMA 1KAMA 2KAMA 3KAMA 4WMA Crossover 1MIDPOINT Slope 2MIDPOINT Slope 3MIDPOINT Slope 4TEMA Price 1TEMA Price 3TRIMA Slope 2TRIMA Slope 3SAR CrossoverPLUS_DI Threshold 1PLUS_DI Threshold 2WILLR Exit OversoldWILLR Exit OverboughtBOP Smoothed ThresholdOBV CrossoverChaikin AD CrossoverChaikin ADOSC Zero CrossVolume SpikeDaily Pivot Point 1Elder's Force IndexCMO Divergence 1 |
| 21 | 17 Jul | S | DEMA 3KAMA 2KAMA 3KAMA 4WMA Crossover 1WMA Crossover 4TEMA Price 2TEMA Price 3TRIMA Slope 2TRIMA Slope 3CCI Crossover 1PLUS_DI Threshold 1PLUS_DI Threshold 2ROCR Threshold 1 |
| 22 | 16 Jul | S | DEMA 1DEMA 3KAMA 2KAMA 3KAMA 4TEMA Price 1TEMA Price 2TRIMA Slope 1TRIMA Slope 2TRIMA Slope 3CCI Crossover 3PLUS_DI Threshold 1PLUS_DI Threshold 2RSI Exit OversoldBBANDS Breakout 2Stochastic RSI SignalOBV CrossoverChaikin AD CrossoverSchaff Trend Cycle |
| 23 | 15 Jul | N | DEMA 2DEMA 3KAMA 1KAMA 2KAMA 3KAMA 4T3 Slope 2TEMA Price 3TRIMA Slope 1TRIMA Slope 2TRIMA Slope 3PLUS_DI Threshold 1PLUS_DI Threshold 2BOP Smoothed ThresholdChaikin AD CrossoverCMO Divergence 1 |
| 24 | 14 Jul | S | DEMA 1DEMA 2DEMA 3KAMA 1KAMA 2KAMA 3KAMA 4MIDPOINT Slope 2MIDPOINT Slope 4T3 Slope 1T3 Slope 2TEMA Price 3TRIMA Slope 2PLUS_DI Threshold 1BOP Smoothed ThresholdOBV CrossoverDonchian ChannelDaily Pivot Point 1CMO Divergence 1 |
| 25 | 13 Jul | S | DEMA 3KAMA 1KAMA 2KAMA 3KAMA 4EMA Crossover 3T3 Slope 2TEMA Price 3TRIMA Slope 1TRIMA Slope 2TRIMA Slope 3CCI Crossover 3PLUS_DI Threshold 1WILLR Exit OversoldWILLR Exit OverboughtBOP Smoothed ThresholdIchimoku 1Ichimoku 2 |
| 26 | 09 Jul | S | DEMA 1DEMA 3KAMA 2KAMA 4T3 Slope 1T3 Slope 2TEMA Price 1TEMA Price 2TRIMA Slope 1TRIMA Slope 2PLUS_DI Threshold 1RSI Exit OversoldBOP Smoothed ThresholdBBANDS Breakout 2Stochastic RSI SignalOBV CrossoverVolume SpikeDaily Pivot Point 1 |
| 27 | 08 Jul | N | DEMA 1DEMA 2DEMA 3KAMA 1KAMA 2KAMA 3KAMA 4MIDPOINT Slope 1MIDPOINT Slope 2MIDPOINT Slope 3MIDPOINT Slope 4T3 Slope 1T3 Slope 2TEMA Price 1TEMA Price 2TEMA Price 3TRIMA Slope 1AROONOSC 3PLUS_DI Threshold 1WILLR Exit OversoldWILLR Exit OverboughtBOP Smoothed ThresholdSTOCH Normal Zone CrossIchimoku 2Daily Pivot Point 1CMO Divergence 1 |
| 28 | 07 Jul | S | DEMA 1DEMA 2DEMA 3KAMA 1KAMA 2KAMA 3KAMA 4MIDPOINT Slope 1MIDPOINT Slope 2MIDPOINT Slope 3T3 Slope 1T3 Slope 2TEMA Price 2TEMA Price 3TRIMA Slope 1TRIMA Slope 2TRIMA Slope 3AROONOSC 1ADX +DI/-DI CrossoverPLUS_DI Threshold 1ROC Threshold 2BOP Smoothed ThresholdSTOCH Normal Zone CrossOBV CrossoverHammer / Hanging ManVortex IndicatorCMO Divergence 1 |
| 29 | 06 Jul | S | DEMA 2DEMA 3EMA Price Cross 3KAMA 1KAMA 2KAMA 4MIDPOINT Slope 1MIDPOINT Slope 2MIDPOINT Slope 3T3 Slope 2TEMA Price 3TRIMA Slope 1TRIMA Slope 2AROONOSC 4MOM Crossover 2PLUS_DI Threshold 1ROC Threshold 1ROCR Threshold 3ROCR Threshold 4BOP Smoothed ThresholdDaily Pivot Point 1CMO Divergence 1Coppock Curve |
| 30 | 03 Jul | S | DEMA 3MIDPOINT Slope 1MIDPOINT Slope 4T3 Slope 2TEMA Price 2TEMA Price 3TRIMA Slope 1PLUS_DI Threshold 2ROCR Threshold 1BOP Smoothed ThresholdCMO Divergence 1 |
Previsioni degli utenti per Pacific Edge Ltd. (PEB)
Qual è la tua previsione?
In this section, you can easily predict without user registration. See also other users predictions.
