إشارات التحليل الفني المجانية Bactiguard Holding AB Series B (BACTI-B)
إشارة Bactiguard Holding AB Series B (BACTI-B) مع التحليل الفني على 30 Jul
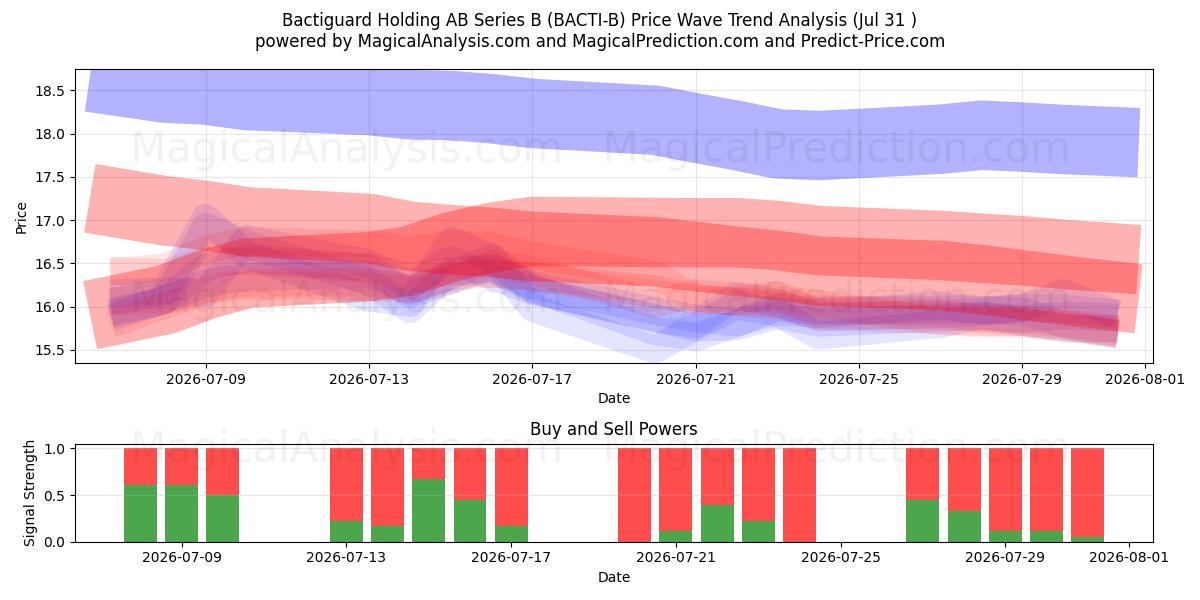
تم تصنيف الـ 256 إشارة إلى أربع استراتيجيات متميزة، كل منها يتكون من 64 إشارة. دعنا نغوص في تفاصيل كل استراتيجية:
الاستراتيجية 1:
إشارات شراء:
إشارات بيع:
إشارات محايدة:
النتيجة: هذه الاستراتيجية تؤدي إلى موقف.
الاستراتيجية 2:
إشارات شراء:
إشارات بيع:
إشارات محايدة:
النتيجة: هذه الاستراتيجية تؤدي إلى موقف.
الاستراتيجية 3:
إشارات شراء:
إشارات بيع:
إشارات محايدة:
النتيجة: هذه الاستراتيجية تؤدي إلى موقف.
الاستراتيجية 4:
إشارات شراء:
إشارات بيع:
إشارات محايدة:
النتيجة: هذه الاستراتيجية تؤدي إلى موقف.
الاستراتيجية العامة:
إشارات شراء: 2
إشارات بيع: 8
إشارات محايدة: 89
النتيجة: هذه الاستراتيجية تؤدي إلى بيع موقف.
تنبيه! يرجى توخي الحذر والدراسة الشاملة قبل اتخاذ أي قرارات مالية. من المهم ملاحظة أن إشاراتنا تعتمد فقط على التغيرات السعرية اليومية ولا تأخذ في الاعتبار العوامل الخارجية مثل الأخبار أو مشاعر السوق أو تطورات الشركات. نوصي بشدة بمراعاة جميع العوامل ذات الصلة وإجراء بحثك الخاص.
نصائح مفيدة: لتحقيق أقصى استفادة من قراراتك المتعلقة باستثماراتك في Bactiguard Holding AB Series B (BACTI-B)، نوصي بشدة بزيارة موقع "magicalprediction" لنماذج الإشارات الذكية. حيث يوفرون إشارات مجانية، وإذا تطابقت إحداها مع إشاراتنا، فمن المحتمل أن تكون مؤشرًا موثوقًا، كما لاحظنا على مر الزمن.
النتيجة: عند النظر إلى التحليل الفني لـ Bactiguard Holding AB Series B (BACTI-B) في ، هناك ميل نحو إشارة بيع استنادًا إلى البيانات التاريخية والتحليل. ومع ذلك، من الضروري تذكر أن هذه الإشارات ليست ضمانات. تأكد من النظر بعناية في ظروف السوق العامة وضبط قراراتك بما يتماشى مع أهداف استثمارك المحددة.
استنادًا إلى الإشارات والتوقعات المذكورة أعلاه، نوصي بالاستراتيجيات التالية:
Bactiguard Holding AB Series B (BACTI-B) استراتيجية التداول لمن هم في مواقع شراء (مراكز طويلة): إذا كنت حاليًا في موقع شراء (طويل)، يُنصح بتحديد الوقت المثالي للخروج من موقعك استنادًا إلى مجموعة من الإشارات الفنية. قد يختار أولئك الذين يتحملون مخاطر عالية الانتظار ومراقبة تحركات السوق خلال الأيام القليلة القادمة.
Bactiguard Holding AB Series B (BACTI-B) استراتيجية التداول لمن هم في مواقع بيع (مراكز قصيرة): إذا كنت في موقع بيع (قصير)، فقد يكون الاحتفاظ بموقعك هو الاستراتيجية الصحيحة، كما تشير إليه توافق تحليلاتنا الفنية. ومع ذلك، كن حذرًا وراقب تطورات السوق عن كثب.
للمراكز الجديدة: إذا لم تكن مستثمرًا حاليًا أو تفكر في التحول إلى موقع بيع (قصير)، يُوصى بتقييم الجانب السلبي المحتمل لـ 9.76% استنادًا إلى أدنى نطاق سعري متوقع. تأكد من أن هذا يتماشى مع تحمل المخاطر والأهداف الخاصة بك من خلال إجراء بحث شامل قبل دخول موقع قصير.
في جميع سيناريوهات التداول، تعتبر استراتيجية وقف الخسارة المحددة جيدًا أمرًا حيويًا لإدارة المخاطر السلبية المحتملة بشكل فعال.
نصيحة مفيدة: للتوقعات طويلة الأمد، نوصي باستخدام موقع "Predict-price"، الذي يقدم توقعات قصيرة وطويلة الأجل دون تكلفة. يمكن أن تدعم هذه المورد اتخاذ قرارات مستنيرة بشأن استثماراتك في **Bactiguard Holding AB Series B (BACTI-B)**.
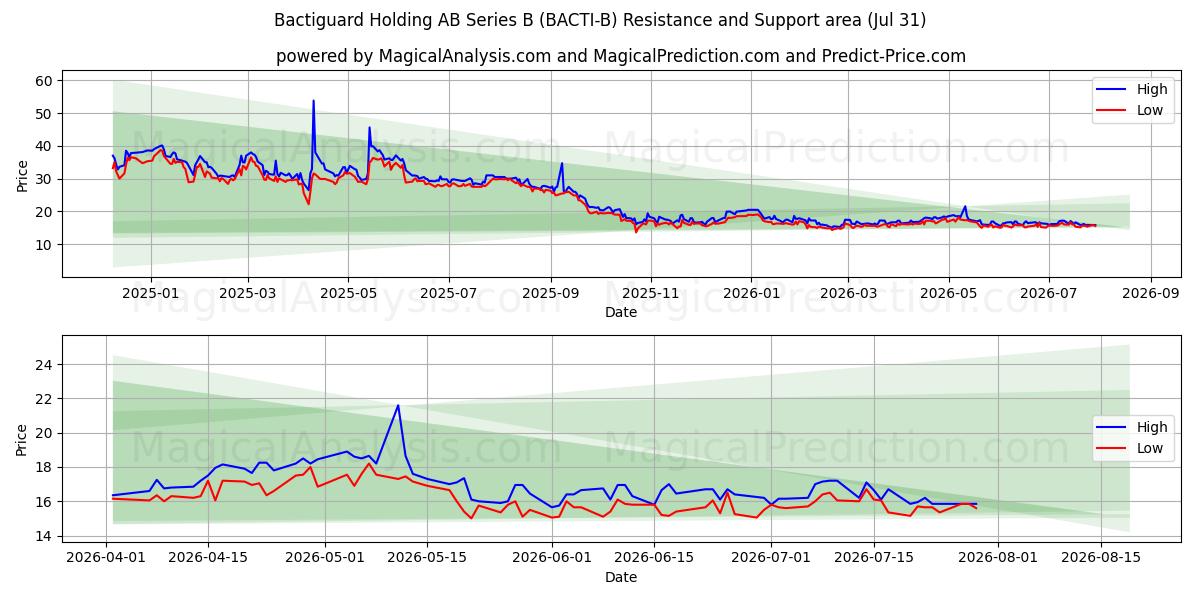
Bactiguard Holding AB Series B (BACTI-B) تحليل السعر ومستويات الدعم:
في وضعنا الحالي في Bactiguard Holding AB Series B (BACTI-B)، نجد أنفسنا في موقف قصير، نتوقع اتجاهًا نزوليًا محتملًا. فهم مستويات الدعم الرئيسية أمر ضروري، حيث تعتبر نقاط مرجعية حيوية للمتداولين والمستثمرين لاتخاذ قرارات مستنيرة.أول مستوى دعم: 15.5
نراقب عن كثب السعر عند 15.5، أول مستوى دعم. إذا استمر الاتجاه النزولي، فإن اختراق هذا المستوى سيشير إلى ضغط بيع قوي، مما يشير إلى احتمال مزيد من انخفاض الأسعار.
ثاني مستوى دعم: 14.35
إذا تم كسر أول مستوى دعم، يصبح ثاني مستوى دعم عند 14.35 أمرًا حيويًا. إن الاختراق هنا سيشير إلى زخم نزولي أقوى، على الأرجح مدفوعًا بمشاعر السوق أو العوامل الخارجية.
ثالث مستوى دعم: 13.6
إذا تم كسر ثاني مستوى دعم واستمر السعر في الانخفاض، فإن هذا يشير إلى تحول كبير في السوق. البقاء تحت 13.6 سيؤكد اتجاهًا نزوليًا مستمرًا، ومن المحتمل أن يستهدف المتداولون هذا المستوى الثالث كنقطة دعم تالية.
يجب أخذ هذه مستويات الدعم بعين الاعتبار بعناية في سياق اتجاهات السوق والمؤشرات الأوسع. من خلال البقاء متيقظًا وتحليل السوق باستمرار، يمكنك اتخاذ قرارات مستنيرة أثناء تداول Bactiguard Holding AB Series B (BACTI-B). ستساعدك هذه المستويات على التكيف مع الطبيعة الديناميكية للسوق واتخاذ خيارات تداول أكثر ذكاءً.
مخطط التحليل الفني Bactiguard Holding AB Series B (BACTI-B)
مستويات الدعم والمقاومة Bactiguard Holding AB Series B (BACTI-B)
| اسم | Level1 | Level2 | Level3 | Level4 | Level5 |
|---|---|---|---|---|---|
| مقاومة | 18.65 | 19 | 19.45 | 34.7 | -- |
| دعم | 15.5 | 14.35 | 13.6 | -- | -- |
قائمة إشارات Bactiguard Holding AB Series B (BACTI-B) لـ 30 Jul
| Overall Signals |
|---|
أنماط الشموع Bactiguard Holding AB Series B (BACTI-B) على 30 Jul
التحليل الفني لـ Bactiguard Holding AB Series B (BACTI-B) على مدى الأيام الماضية
| # | Date | Overal Signals | ALL Signals |
|---|---|---|---|
| 1 | 30 Jul | S | KAMA 2KAMA 3KAMA 4WMA Crossover 1MIDPOINT Slope 3TEMA Price 3TRIMA Slope 3PLUS_DI Threshold 1PLUS_DI Threshold 2ROCR Threshold 1BOP Smoothed ThresholdHammer / Hanging ManDaily Pivot Point 1 |
| 2 | 29 Jul | S | KAMA 2KAMA 3KAMA 4WMA Crossover 1MIDPOINT Slope 3T3 Slope 2TEMA Price 2TRIMA Slope 3PLUS_DI Threshold 1PLUS_DI Threshold 2ROC Threshold 1ROCR Threshold 2BOP Smoothed ThresholdMACD Crossover 1 |
| 3 | 28 Jul | S | KAMA 3KAMA 4T3 Slope 2TRIMA Slope 3PLUS_DI Threshold 1PLUS_DI Threshold 2ROC Threshold 2ROCR Threshold 4BOP Smoothed ThresholdSTOCH Normal Zone Cross |
| 4 | 27 Jul | S | KAMA 3KAMA 4T3 Slope 2TRIMA Slope 2PLUS_DI Threshold 1PLUS_DI Threshold 2ROCR Threshold 1BOP Smoothed ThresholdSTOCH Normal Zone CrossDaily Pivot Point 1 |
| 5 | 24 Jul | N | KAMA 2KAMA 3KAMA 4WMA Crossover 1WMA Crossover 4T3 Slope 2TEMA Price 3TRIMA Slope 2MOM Crossover 2ROC Threshold 2ROCR Threshold 3ROCR Threshold 4BOP Smoothed ThresholdStochastic RSI SignalPercentage Price OscillatorIchimoku 1Daily Pivot Point 1Coppock Curve |
| 6 | 23 Jul | S | KAMA 3KAMA 4WMA Crossover 1MIDPOINT Slope 2MIDPOINT Slope 3MIDPOINT Slope 4TRIMA Slope 2ROC Threshold 1ROCR Threshold 3ROCR Threshold 4BOP Smoothed ThresholdSTOCH Normal Zone CrossMoney Flow Index |
| 7 | 22 Jul | N | KAMA 4MIDPOINT Slope 2T3 Slope 1TRIMA Slope 1CCI Crossover 1CCI Crossover 2MOM Crossover 2PLUS_DI Threshold 1PLUS_DI Threshold 2TRIX Crossover 2BOP Smoothed Threshold |
| 8 | 21 Jul | N | KAMA 3KAMA 4WMA Crossover 3MIDPOINT Slope 1T3 Slope 1TEMA Price 3TRIMA Slope 1AROONOSC 2PLUS_DI Threshold 1PLUS_DI Threshold 2TRIX Crossover 1BOP Smoothed ThresholdStochastic RSI Signal |
| 9 | 20 Jul | S | DEMA 1DEMA 2DEMA 3KAMA 1KAMA 2KAMA 3KAMA 4EMA Crossover 2EMA Crossover 3WMA Crossover 1MIDPOINT Slope 1MIDPOINT Slope 2MIDPOINT Slope 3T3 Slope 1TEMA Price 1TEMA Price 2TEMA Price 3TRIMA Slope 1SAR CrossoverAROONOSC 1AROONOSC 3MOM Crossover 1MOM Crossover 2ROC Threshold 1ROC Threshold 2ROCR Threshold 2ROCR Threshold 3WILLR Exit OversoldWILLR Exit OverboughtBOP Smoothed ThresholdMACD Crossover 2STOCH Normal Zone CrossEngulfing PatternDEMA with ATR 2DEMA with ATR 3Volume SpikeDaily Pivot Point 1Vortex IndicatorCMO Divergence 1CMO Divergence 2 |
| 10 | 17 Jul | S | EMA Price Cross 1EMA Price Cross 2EMA Price Cross 3EMA Price Cross 4KAMA 4EMA Crossover 1WMA Crossover 2MIDPOINT Slope 3TEMA Price 1TEMA Price 2TEMA Price 3TRIMA Slope 1ROCR Threshold 3ROCR Threshold 4BOP Smoothed ThresholdMACD Crossover 1BBANDS Breakout 1Ichimoku 2Ichimoku 3Rolling VWAP |
| 11 | 16 Jul | S | WMA Crossover 1T3 Slope 2CCI Crossover 1CCI Crossover 2ROCR Threshold 1BOP Smoothed ThresholdSTOCH Normal Zone CrossHammer / Hanging ManVolume Spike |
| 12 | 15 Jul | N | DEMA 1DEMA 2DEMA 3EMA Price Cross 1EMA Price Cross 2EMA Price Cross 3EMA Price Cross 4KAMA 1KAMA 2KAMA 3EMA Crossover 1WMA Crossover 4T3 Slope 2TEMA Price 1TEMA Price 2TEMA Price 3TRIMA Slope 2MOM Crossover 1MOM Crossover 2PLUS_DI Threshold 1ROC Threshold 1ROC Threshold 2ROCR Threshold 1ROCR Threshold 2ROCR Threshold 3ROCR Threshold 4WILLR Exit OverboughtBOP Smoothed ThresholdMACD Crossover 1BBANDS Breakout 1Stochastic RSI SignalPercentage Price OscillatorIchimoku 2Rolling VWAP |
| 13 | 14 Jul | B | DEMA 1KAMA 4EMA Crossover 1MIDPOINT Slope 1T3 Slope 2TEMA Price 2TEMA Price 3TRIMA Slope 1MOM Crossover 1PLUS_DI Threshold 1PLUS_DI Threshold 2ROCR Threshold 2BOP Smoothed ThresholdMACD Crossover 1BBANDS Breakout 1Percentage Price OscillatorIchimoku 2CMO Divergence 1 |
| 14 | 13 Jul | S | DEMA 1EMA Price Cross 1EMA Price Cross 2EMA Price Cross 3EMA Price Cross 4KAMA 1WMA Crossover 1T3 Slope 1T3 Slope 2TEMA Price 1TEMA Price 2TEMA Price 3TRIMA Slope 1TRIMA Slope 2CCI Crossover 1CCI Crossover 2MOM Crossover 1MOM Crossover 2PLUS_DI Threshold 1ROC Threshold 2ROCR Threshold 2ROCR Threshold 3ROCR Threshold 4BOP Smoothed ThresholdSTOCH Normal Zone CrossPercentage Price OscillatorVolume SpikeIchimoku 1Ichimoku 3Rolling VWAPCMO Divergence 1 |
| 15 | 10 Jul | S | MIDPOINT Slope 2T3 Slope 1T3 Slope 2TEMA Price 1TRIMA Slope 1AROONOSC 4CCI Crossover 3BOP Smoothed ThresholdBBANDS Breakout 2Stochastic RSI SignalOBV CrossoverChaikin AD CrossoverChaikin ADOSC Zero CrossEngulfing PatternVolume SpikeDaily Pivot Point 1Elder's Force IndexCMO Divergence 2Coppock Curve |
| 16 | 09 Jul | S | DEMA 1DEMA 2DEMA 3KAMA 1KAMA 2KAMA 3KAMA 4EMA Crossover 3WMA Crossover 3MIDPOINT Slope 1MIDPOINT Slope 2MIDPOINT Slope 3MIDPOINT Slope 4T3 Slope 1TEMA Price 1TEMA Price 2TEMA Price 3TRIMA Slope 1ROC Threshold 1ROC Threshold 2ROCR Threshold 2WILLR Exit OversoldWILLR Exit OverboughtBOP Smoothed ThresholdChaikin AD CrossoverChaikin ADOSC Zero CrossDonchian ChannelElder's Force IndexCMO Divergence 1 |
| 17 | 08 Jul | B | EMA Crossover 2WMA Crossover 2MIDPOINT Slope 1TEMA Price 2TEMA Price 3TRIMA Slope 1SAR CrossoverAROONOSC 1AROONOSC 2AROONOSC 3MOM Crossover 1ROCR Threshold 1TRIX Crossover 1BOP Smoothed ThresholdOBV CrossoverChaikin AD CrossoverChaikin ADOSC Zero CrossVortex IndicatorCMO Divergence 1CMO Divergence 2 |
| 18 | 07 Jul | B | EMA Price Cross 3KAMA 4EMA Crossover 1WMA Crossover 1MIDPOINT Slope 3T3 Slope 2TEMA Price 2TEMA Price 3PLUS_DI Threshold 1PLUS_DI Threshold 2ROC Threshold 2ROCR Threshold 3BOP Smoothed ThresholdMACD Crossover 1MACD Crossover 2BBANDS Breakout 1Percentage Price OscillatorIchimoku 2CMO Divergence 1 |
| 19 | 06 Jul | B | EMA Price Cross 1EMA Price Cross 2EMA Price Cross 4KAMA 4T3 Slope 2TEMA Price 1TEMA Price 2MOM Crossover 2PLUS_DI Threshold 1PLUS_DI Threshold 2ROCR Threshold 4BOP Smoothed ThresholdSTOCH Normal Zone CrossStochastic RSI SignalChaikin AD CrossoverEngulfing PatternDaily Pivot Point 1Rolling VWAP |
| 20 | 03 Jul | B | KAMA 3KAMA 4MIDPOINT Slope 1MIDPOINT Slope 2T3 Slope 1TEMA Price 3TRIMA Slope 1PLUS_DI Threshold 1PLUS_DI Threshold 2ROC Threshold 1ROCR Threshold 1ROCR Threshold 4TRIX Crossover 1BOP Smoothed ThresholdMACD Crossover 2Chaikin AD CrossoverDaily Pivot Point 1CMO Divergence 1 |
| 21 | 02 Jul | S | KAMA 3KAMA 4MIDPOINT Slope 2T3 Slope 1TEMA Price 3MOM Crossover 1PLUS_DI Threshold 1PLUS_DI Threshold 2ROC Threshold 2ROCR Threshold 1ROCR Threshold 2BOP Smoothed ThresholdIchimoku 1CMO Divergence 1Coppock Curve |
| 22 | 01 Jul | S | EMA Price Cross 1EMA Price Cross 2EMA Price Cross 3EMA Price Cross 4KAMA 1KAMA 3KAMA 4EMA Crossover 1WMA Crossover 1MIDPOINT Slope 1TEMA Price 2TEMA Price 3MOM Crossover 2PLUS_DI Threshold 1PLUS_DI Threshold 2ROCR Threshold 3BOP Smoothed ThresholdMACD Crossover 1STOCH Normal Zone CrossBBANDS Breakout 1Stochastic RSI SignalIchimoku 2Ichimoku 3Rolling VWAP |
| 23 | 30 Jun | S | EMA Price Cross 1EMA Price Cross 2EMA Price Cross 3EMA Price Cross 4EMA Crossover 1WMA Crossover 1MIDPOINT Slope 1MIDPOINT Slope 2TEMA Price 3AROONOSC 1AROONOSC 2AROONOSC 3MOM Crossover 1MOM Crossover 2PLUS_DI Threshold 1PLUS_DI Threshold 2ROC Threshold 1ROCR Threshold 2ROCR Threshold 3ROCR Threshold 4BOP Smoothed ThresholdMACD Crossover 1STOCH Normal Zone CrossBBANDS Breakout 1Chaikin AD CrossoverChaikin ADOSC Zero CrossPiercing / Dark CloudVolume SpikeIchimoku 2 |
| 24 | 29 Jun | B | EMA Price Cross 1EMA Price Cross 2EMA Price Cross 3EMA Price Cross 4KAMA 3KAMA 4EMA Crossover 1WMA Crossover 3MIDPOINT Slope 3T3 Slope 1TEMA Price 2TEMA Price 3TRIMA Slope 1SAR CrossoverCCI Crossover 1CCI Crossover 2CCI Crossover 3MOM Crossover 1MOM Crossover 2PLUS_DI Threshold 1ROC Threshold 1ROCR Threshold 1ROCR Threshold 2BOP Smoothed ThresholdBBANDS Breakout 1Stochastic RSI SignalOBV CrossoverVolume SpikeIchimoku 1Ichimoku 2Ichimoku 3Vortex Indicator |
| 25 | 26 Jun | S | DEMA 1DEMA 3EMA Price Cross 1EMA Price Cross 2EMA Price Cross 3EMA Price Cross 4EMA Crossover 1T3 Slope 1TEMA Price 1TEMA Price 2TEMA Price 3TRIMA Slope 1CCI Crossover 1CCI Crossover 2CCI Crossover 3MOM Crossover 1MOM Crossover 2ROC Threshold 2ROCR Threshold 3ROCR Threshold 4BOP Smoothed ThresholdBBANDS Breakout 1Stochastic RSI SignalIchimoku 2Rolling VWAP |
| 26 | 25 Jun | B | DEMA 1DEMA 2DEMA 3KAMA 1KAMA 2KAMA 3KAMA 4EMA Crossover 1EMA Crossover 2WMA Crossover 2MIDPOINT Slope 1MIDPOINT Slope 2MIDPOINT Slope 3MIDPOINT Slope 4T3 Slope 1TEMA Price 1TEMA Price 2TEMA Price 3MOM Crossover 1MOM Crossover 2PLUS_DI Threshold 1ROC Threshold 1ROC Threshold 2ROCR Threshold 1ROCR Threshold 2ROCR Threshold 3ROCR Threshold 4WILLR Exit OversoldWILLR Exit OverboughtBOP Smoothed ThresholdMACD Crossover 1BBANDS Breakout 1Rolling VWAPCMO Divergence 1 |
| 27 | 24 Jun | S | DEMA 1EMA Price Cross 1EMA Price Cross 2EMA Price Cross 3EMA Price Cross 4KAMA 1KAMA 4WMA Crossover 1MIDPOINT Slope 1MIDPOINT Slope 2TEMA Price 1TEMA Price 2TRIMA Slope 1BOP Smoothed ThresholdSTOCH Normal Zone CrossStochastic RSI SignalChaikin AD CrossoverChaikin ADOSC Zero CrossIchimoku 2Ichimoku 3 |
| 28 | 23 Jun | S | DEMA 2DEMA 3KAMA 2MIDPOINT Slope 1MIDPOINT Slope 2T3 Slope 1T3 Slope 2TEMA Price 2TEMA Price 3TRIMA Slope 1ROCR Threshold 1WILLR Exit OversoldWILLR Exit OverboughtBOP Smoothed ThresholdChaikin ADOSC Zero CrossHammer / Hanging ManCMO Divergence 1 |
| 29 | 22 Jun | B | DEMA 3KAMA 2WMA Crossover 2MIDPOINT Slope 2T3 Slope 2TEMA Price 3ROC Threshold 1ROCR Threshold 1ROCR Threshold 2BOP Smoothed ThresholdIchimoku 2CMO Divergence 1 |
| 30 | 18 Jun | B | DEMA 1DEMA 2DEMA 3EMA Price Cross 1EMA Price Cross 2EMA Price Cross 3EMA Price Cross 4KAMA 2EMA Crossover 1EMA Crossover 2WMA Crossover 1MIDPOINT Slope 1T3 Slope 2TEMA Price 1TEMA Price 2TEMA Price 3TRIMA Slope 1SAR CrossoverAROONOSC 3MOM Crossover 2ROC Threshold 2ROCR Threshold 3ROCR Threshold 4BOP Smoothed ThresholdMACD Crossover 1STOCH Normal Zone CrossChaikin AD Crossover |
توقعات المستخدمين لـ Bactiguard Holding AB Series B (BACTI-B)
ما هي توقعاتك؟
In this section, you can easily predict without user registration. See also other users predictions.
