Free Great Western Exploration Ltd. (GTE) Technical Analysis Signals
Great Western Exploration Ltd. (GTE) signal with technical analysis on 06 Aug
KAMA 3KAMA 4WMA Crossover 2TEMA Price 2TEMA Price 3TRIMA Slope 1TRIMA Slope 2TRIMA Slope 3PLUS_DI Threshold 1PLUS_DI Threshold 2CMO Divergence 1
Doji Up/Down-gap side-by-side white lines
Overall Strategy:
Buy Signals: 7
Sell Signals: 4
Neutral Signals: 88
Result: This strategy leads to a Neutral position.
Disclaimer! Please exercise caution and thorough consideration before making any financial decisions. It's important to note that our signals are based solely on daily price changes and do not take into account external factors such as news, market sentiment, or company developments. We strongly recommend considering all relevant factors and conducting your own research.
Useful Tips: To make the most informed decisions about your Great Western Exploration Ltd. (GTE) investments, we highly recommend visiting the "Magic Prediction" AI models signals website. They provide free signals, and if one aligns with ours, it is likely to be a reliable indicator, as we have observed over time.
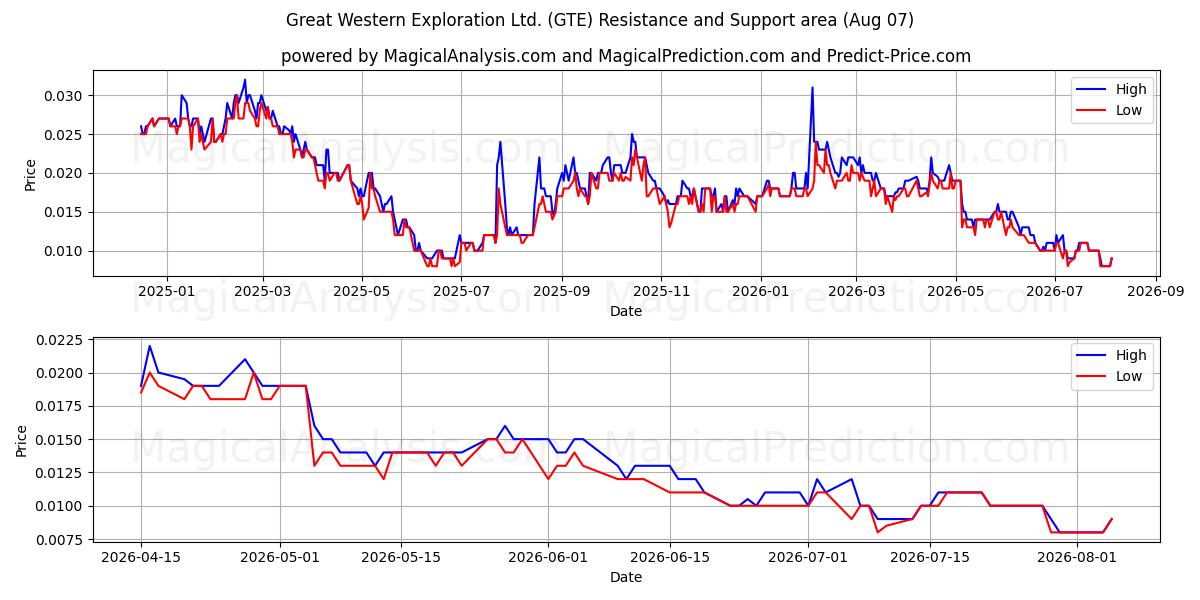
These support levels should be considered carefully in the context of broader market trends and indicators. Staying alert and consistently analyzing the market will allow you to make informed decisions while trading Great Western Exploration Ltd. (GTE). Paying attention to these support levels will help you adapt to the dynamic nature of the market and make smarter trading choices. Second Resistance Level: 0.011
If the upward trend continues with significant strength, we may see Great Western Exploration Ltd. (GTE) cross the second resistance level at 0.011. This would indicate a major upside move and a promising direction for our position.
Third Resistance Level: 0.012
For a more comprehensive analysis, consider the possibility of Great Western Exploration Ltd. (GTE) not only breaking the second resistance level but also holding its price above this mark. If this trend continues in the coming days, Great Western Exploration Ltd. (GTE) could potentially reach the third resistance level at 0.012.
It's crucial to closely monitor these resistance levels and consider them in the context of broader market trends and indicators. To make informed decisions when trading Great Western Exploration Ltd. (GTE), stay vigilant and continuously analyze the market. Focusing on these resistance levels, along with broader market dynamics, will help you make smarter trading decisions and adapt to the changing market conditions.
Great Western Exploration Ltd. (GTE) technical analysis chart
Great Western Exploration Ltd. (GTE) support and resistance levels
| Name | Level1 | Level2 | Level3 | Level4 | Level5 |
|---|---|---|---|---|---|
| Resistance | 0.01 | 0.011 | 0.012 | 0.013 | 0.025 |
| Support | 0.008 | -- | -- | -- | -- |
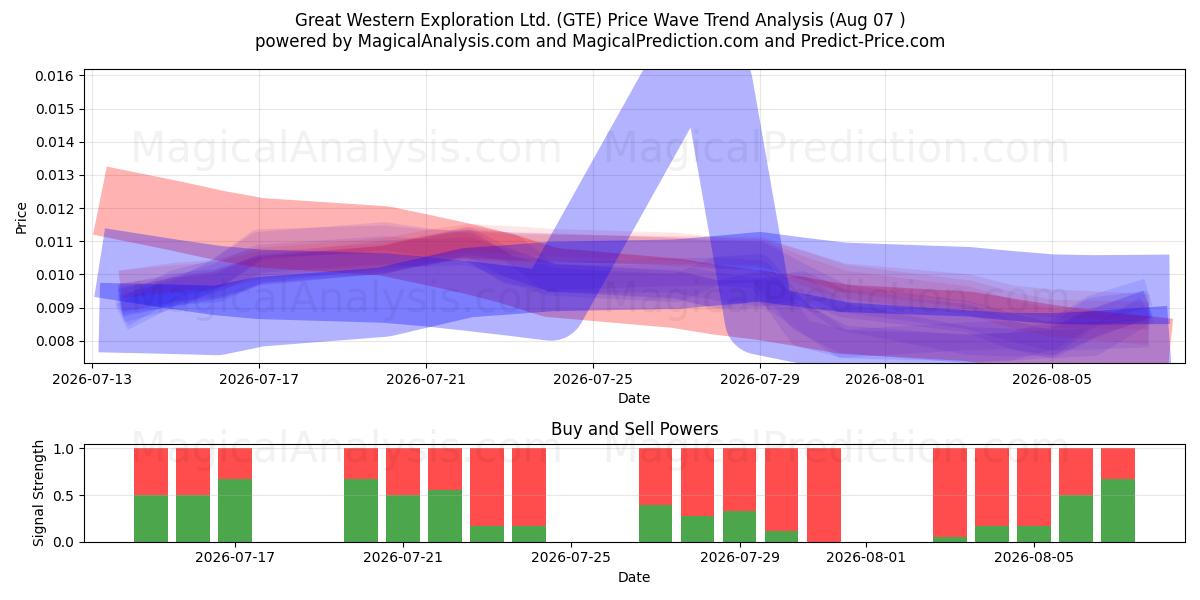
Great Western Exploration Ltd. (GTE) signals list for 06 Aug
| Overall Signals |
|---|
Great Western Exploration Ltd. (GTE) candlestick patterns on 06 Aug
Great Western Exploration Ltd. (GTE) technical analysis over the past days
| # | Date | Overal Signals | ALL Signals |
|---|---|---|---|
| 1 | 06 Aug | N | DEMA 1DEMA 2EMA Price Cross 1EMA Price Cross 2EMA Price Cross 4KAMA 1KAMA 3KAMA 4EMA Crossover 1WMA Crossover 1MIDPOINT Slope 1MIDPOINT Slope 2T3 Slope 2TEMA Price 1TEMA Price 2TEMA Price 3TRIMA Slope 2TRIMA Slope 3CCI Crossover 2PLUS_DI Threshold 1PLUS_DI Threshold 2ROCR Threshold 1RSI Exit OversoldMACD Crossover 1Stochastic RSI SignalUltimate OscillatorRolling VWAPCMO Divergence 1 |
| 2 | 05 Aug | B | KAMA 3KAMA 4MIDPOINT Slope 2MIDPOINT Slope 3T3 Slope 2TEMA Price 3TRIMA Slope 1TRIMA Slope 2TRIMA Slope 3CCI Crossover 1CCI Crossover 3 |
| 3 | 04 Aug | S | KAMA 3KAMA 4T3 Slope 1T3 Slope 2TEMA Price 3TRIMA Slope 1TRIMA Slope 2AROONOSC 3BOP Smoothed ThresholdPercentage Price OscillatorADXR with DI+/DI-CMO Divergence 1 |
| 4 | 03 Aug | S | KAMA 2KAMA 3KAMA 4MIDPOINT Slope 1T3 Slope 1T3 Slope 2TEMA Price 3TRIMA Slope 1TRIMA Slope 2AROONOSC 4TRIX Crossover 2BOP Smoothed ThresholdBBANDS Breakout 2DEMA with ATR 2DEMA with ATR 3ADXR with DI+/DI-CMO Divergence 1 |
| 5 | 31 Jul | S | DEMA 2DEMA 3KAMA 1KAMA 2KAMA 3KAMA 4T3 Slope 1TEMA Price 2TEMA Price 3TRIMA Slope 1TRIMA Slope 2TRIX Crossover 1BOP Smoothed ThresholdDEMA with ATR 2DEMA with ATR 3ADXR with DI+/DI-CMO Divergence 1CMO Divergence 2Coppock Curve |
| 6 | 30 Jul | S | DEMA 1DEMA 2DEMA 3KAMA 1KAMA 2KAMA 3KAMA 4WMA Crossover 1WMA Crossover 3MIDPOINT Slope 1MIDPOINT Slope 2MIDPOINT Slope 3MIDPOINT Slope 4T3 Slope 1TEMA Price 1TEMA Price 2TEMA Price 3TRIMA Slope 1TRIMA Slope 2SAR CrossoverAROONOSC 2CMO Crossover 1MOM Crossover 1MOM Crossover 2ROC Threshold 1ROC Threshold 2ROCR Threshold 2ROCR Threshold 3ROCR Threshold 4WILLR Exit OverboughtBOP Smoothed ThresholdMACD Crossover 2Chaikin AD CrossoverChaikin ADOSC Zero CrossDEMA with ATR 1DEMA with ATR 2DEMA with ATR 3Volume SpikeADXR with DI+/DI-Keltner Channel 1Ichimoku 1Ichimoku 3Rolling VWAPCMO Divergence 1 |
| 7 | 29 Jul | S | KAMA 2KAMA 3KAMA 4MIDPOINT Slope 2TEMA Price 3TRIMA Slope 1PLUS_DI Threshold 1PLUS_DI Threshold 2Stochastic RSI SignalADXR with DI+/DI- |
| 8 | 28 Jul | S | KAMA 2KAMA 3KAMA 4MIDPOINT Slope 3TEMA Price 2TEMA Price 3TRIMA Slope 1TRIMA Slope 3AROONOSC 2AROONOSC 3AROONOSC 4PLUS_DI Threshold 1PLUS_DI Threshold 2ROCR Threshold 4WILLR Exit OversoldCMO Divergence 1 |
| 9 | 27 Jul | N | KAMA 2KAMA 3KAMA 4EMA Crossover 2MIDPOINT Slope 1TEMA Price 2TEMA Price 3TRIMA Slope 1TRIMA Slope 3AROONOSC 1MOM Crossover 2PLUS_DI Threshold 1PLUS_DI Threshold 2ROC Threshold 2ROCR Threshold 3Ichimoku 1CMO Divergence 1 |
| 10 | 24 Jul | N | KAMA 2KAMA 3KAMA 4WMA Crossover 2T3 Slope 2TEMA Price 2TEMA Price 3TRIMA Slope 1TRIMA Slope 2MOM Crossover 1PLUS_DI Threshold 1PLUS_DI Threshold 2ROC Threshold 1ROCR Threshold 1ROCR Threshold 2MACD Crossover 1CMO Divergence 1 |
| 11 | 23 Jul | S | DEMA 1EMA Price Cross 1EMA Price Cross 2EMA Price Cross 3EMA Price Cross 4KAMA 2KAMA 3KAMA 4EMA Crossover 1WMA Crossover 1MIDPOINT Slope 1T3 Slope 2TEMA Price 1TEMA Price 2TEMA Price 3TRIMA Slope 2MOM Crossover 2PLUS_DI Threshold 1PLUS_DI Threshold 2ROC Threshold 2ROCR Threshold 3BBANDS Breakout 1Stochastic RSI SignalUltimate OscillatorIchimoku 2CMO Divergence 1Schaff Trend Cycle |
| 12 | 22 Jul | S | DEMA 3KAMA 4T3 Slope 1T3 Slope 2TEMA Price 3TRIMA Slope 1TRIMA Slope 2CCI Crossover 2PLUS_DI Threshold 1PLUS_DI Threshold 2BOP Smoothed ThresholdCMO Divergence 1Coppock Curve |
| 13 | 21 Jul | B | DEMA 2DEMA 3KAMA 4MIDPOINT Slope 1MIDPOINT Slope 2T3 Slope 1T3 Slope 2TEMA Price 3TRIMA Slope 1TRIMA Slope 2CCI Crossover 1MOM Crossover 1MOM Crossover 2PLUS_DI Threshold 1PLUS_DI Threshold 2ROC Threshold 1ROC Threshold 2ROCR Threshold 2ROCR Threshold 3ROCR Threshold 4WILLR Exit OversoldBOP Smoothed ThresholdCMO Divergence 1 |
| 14 | 20 Jul | B | DEMA 2DEMA 3KAMA 4WMA Crossover 3T3 Slope 1TEMA Price 2TEMA Price 3TRIMA Slope 1PLUS_DI Threshold 1PLUS_DI Threshold 2BOP Smoothed ThresholdCMO Divergence 1 |
| 15 | 17 Jul | B | DEMA 1DEMA 2DEMA 3EMA Price Cross 3KAMA 3KAMA 4EMA Crossover 2WMA Crossover 2MIDPOINT Slope 1MIDPOINT Slope 2MIDPOINT Slope 4T3 Slope 1TEMA Price 1TEMA Price 2TEMA Price 3TRIMA Slope 1SAR CrossoverAROONOSC 1AROONOSC 3MOM Crossover 2PLUS_DI Threshold 1PLUS_DI Threshold 2ROC Threshold 2ROCR Threshold 1ROCR Threshold 3BOP Smoothed ThresholdBBANDS Breakout 1Ichimoku 2Daily Pivot Point 1Rolling VWAPCMO Divergence 1 |
| 16 | 16 Jul | B | DEMA 3KAMA 2KAMA 3KAMA 4TEMA Price 2TEMA Price 3CMO Divergence 1 |
| 17 | 15 Jul | N | DEMA 1DEMA 2DEMA 3EMA Price Cross 1EMA Price Cross 2EMA Price Cross 4KAMA 2KAMA 3KAMA 4EMA Crossover 1WMA Crossover 1MIDPOINT Slope 1TEMA Price 1TEMA Price 2TEMA Price 3CCI Crossover 1CCI Crossover 2CCI Crossover 3MACD Crossover 1STOCH Normal Zone CrossStochastic RSI SignalCMO Divergence 1 |
| 18 | 14 Jul | B | KAMA 2KAMA 3KAMA 4MIDPOINT Slope 1T3 Slope 1TRIMA Slope 1TRIMA Slope 2PLUS_DI Threshold 1PLUS_DI Threshold 2STOCH Normal Zone CrossCMO Divergence 1 |
| 19 | 13 Jul | S | KAMA 1KAMA 2KAMA 3KAMA 4MIDPOINT Slope 2MIDPOINT Slope 4T3 Slope 1TRIMA Slope 1TRIMA Slope 2PLUS_DI Threshold 1PLUS_DI Threshold 2Chaikin ADOSC Zero CrossHammer / Hanging ManADXR with DI+/DI-CMO Divergence 1 |
| 20 | 10 Jul | S | KAMA 1KAMA 2KAMA 3KAMA 4T3 Slope 1TEMA Price 1TEMA Price 2TEMA Price 3TRIMA Slope 1AROONOSC 1MOM Crossover 1PLUS_DI Threshold 1PLUS_DI Threshold 2ROC Threshold 1ROCR Threshold 1ROCR Threshold 2BOP Smoothed ThresholdMACD Crossover 1STOCH Normal Zone CrossUltimate OscillatorChaikin AD CrossoverHammer / Hanging ManVolume SpikeADXR with DI+/DI-CMO Divergence 1 |
| 21 | 09 Jul | S | KAMA 2KAMA 3KAMA 4MIDPOINT Slope 1T3 Slope 1TEMA Price 3TRIMA Slope 1BOP Smoothed ThresholdCMO Divergence 2 |
| 22 | 08 Jul | S | KAMA 2KAMA 3KAMA 4T3 Slope 1TEMA Price 3TRIX Crossover 2BOP Smoothed ThresholdSTOCH Normal Zone CrossStochastic RSI SignalUltimate OscillatorPercentage Price OscillatorCMO Divergence 2 |
| 23 | 07 Jul | N | DEMA 1DEMA 2EMA Price Cross 1EMA Price Cross 2EMA Price Cross 4KAMA 1KAMA 2KAMA 3KAMA 4EMA Crossover 1WMA Crossover 1WMA Crossover 2MIDPOINT Slope 1MIDPOINT Slope 2MIDPOINT Slope 3MIDPOINT Slope 4TEMA Price 1TEMA Price 2TEMA Price 3MOM Crossover 1ADX +DI/-DI CrossoverROC Threshold 1ROCR Threshold 1ROCR Threshold 2WILLR Exit OversoldWILLR Exit OverboughtBOP Smoothed ThresholdStochastic RSI SignalEngulfing PatternDEMA with ATR 1DEMA with ATR 2Volume SpikeDonchian ChannelDaily Pivot Point 1Vortex IndicatorCMO Divergence 1 |
| 24 | 06 Jul | S | DEMA 2DEMA 3KAMA 3KAMA 4MIDPOINT Slope 4TEMA Price 2TEMA Price 3TRIMA Slope 1PLUS_DI Threshold 1PLUS_DI Threshold 2BOP Smoothed ThresholdCMO Divergence 1CMO Divergence 2 |
| 25 | 03 Jul | B | DEMA 1DEMA 2DEMA 3EMA Price Cross 1EMA Price Cross 2EMA Price Cross 4KAMA 3KAMA 4EMA Crossover 1WMA Crossover 1WMA Crossover 2MIDPOINT Slope 3TEMA Price 1TEMA Price 2TEMA Price 3TRIMA Slope 3ADX +DI/-DI CrossoverPLUS_DI Threshold 1PLUS_DI Threshold 2ROCR Threshold 1TRIX Crossover 1BOP Smoothed ThresholdVortex IndicatorCMO Divergence 1 |
| 26 | 02 Jul | B | KAMA 2KAMA 3KAMA 4WMA Crossover 1TEMA Price 3TRIMA Slope 3PLUS_DI Threshold 1PLUS_DI Threshold 2BOP Smoothed ThresholdMACD Crossover 2CMO Divergence 1 |
| 27 | 01 Jul | S | EMA Price Cross 1EMA Price Cross 4KAMA 2KAMA 3KAMA 4EMA Crossover 1TEMA Price 1TRIMA Slope 3PLUS_DI Threshold 1PLUS_DI Threshold 2WILLR Exit OversoldWILLR Exit OverboughtBOP Smoothed ThresholdStochastic RSI SignalVolume SpikeDaily Pivot Point 1CMO Divergence 1 |
| 28 | 30 Jun | S | DEMA 1DEMA 2DEMA 3EMA Price Cross 1EMA Price Cross 4KAMA 2KAMA 3KAMA 4EMA Crossover 1WMA Crossover 1MIDPOINT Slope 1MIDPOINT Slope 2TEMA Price 1TEMA Price 2TEMA Price 3TRIMA Slope 2TRIMA Slope 3PLUS_DI Threshold 1PLUS_DI Threshold 2ROCR Threshold 1RSI Exit OversoldUltimate OscillatorHammer / Hanging ManCMO Divergence 1 |
| 29 | 29 Jun | B | KAMA 2KAMA 3KAMA 4MIDPOINT Slope 2MIDPOINT Slope 3TEMA Price 2TRIMA Slope 2TRIMA Slope 3CCI Crossover 1CCI Crossover 2PLUS_DI Threshold 2MACD Crossover 1Money Flow IndexChaikin AD CrossoverChaikin ADOSC Zero Cross |
| 30 | 26 Jun | S | KAMA 2KAMA 3KAMA 4MIDPOINT Slope 2MIDPOINT Slope 4TRIMA Slope 1TRIMA Slope 2TRIMA Slope 3PLUS_DI Threshold 1PLUS_DI Threshold 2CMO Divergence 1 |
Users forecasts for Great Western Exploration Ltd. (GTE)
What is your prediction?
In this section, you can easily predict without user registration. See also other users predictions.
