Free Smartshares US 500 ETF Units (USF.NZ) Technical Analysis Signals
Smartshares US 500 ETF Units (USF.NZ) signal with technical analysis on 20 Aug
DEMA 1DEMA 2DEMA 3KAMA 1KAMA 2MIDPOINT Slope 1MIDPOINT Slope 2MIDPOINT Slope 3T3 Slope 1TEMA Price 2TEMA Price 3TRIMA Slope 1SAR CrossoverAROONOSC 3ROC Threshold 1TRIX Crossover 1BOP Smoothed ThresholdMACD Crossover 2BBANDS Breakout 1Chaikin AD CrossoverIchimoku 2Ichimoku 3Daily Pivot Point 1Rolling VWAPVortex IndicatorCMO Divergence 1
Closing Marubozu Long Line Candle
Overall Strategy:
Buy Signals: 1
Sell Signals: 26
Neutral Signals: 72
Result: This strategy leads to a Sell position.
Disclaimer! Please exercise caution and thorough consideration before making any financial decisions. It's important to note that our signals are based solely on daily price changes and do not take into account external factors such as news, market sentiment, or company developments. We strongly recommend considering all relevant factors and conducting your own research.
Useful Tips: To make the most informed decisions about your Smartshares US 500 ETF Units (USF.NZ) investments, we highly recommend visiting the "Magic Prediction" AI models signals website. They provide free signals, and if one aligns with ours, it is likely to be a reliable indicator, as we have observed over time.
Result: Looking at the technical analysis for Smartshares US 500 ETF Units (USF.NZ) on , there is a tendency towards a sell signal based on historical data and analysis. However, it’s crucial to remember that these signals are not guarantees. Make sure to carefully consider overall market conditions and align your decisions with your specific investment goals.
Based on the above signals and forecasts, we recommend the following strategies:
Smartshares US 500 ETF Units (USF.NZ) trading strategy for those in buy positions (long positions): If you are currently in a buy (long) position, it is advisable to identify the optimal time to exit your position based on a combination of technical signals. Those with a high risk tolerance may choose to wait and observe market movements over the next few days.
Smartshares US 500 ETF Units (USF.NZ) trading strategy for those in sell positions (short positions): If you are in a sell (short) position, holding your position may be the right strategy, as indicated by the consensus of our technical analysis. However, be cautious and monitor market developments closely.
For new positions: If you are not currently invested or considering switching to a sell (short) position, it’s recommended to assess the potential downside of 51.83% based on the lowest expected price range. Ensure that this aligns with your risk tolerance and objectives by conducting thorough research before entering a short position.
In all trading scenarios, a well-defined stop-loss strategy is critical to managing potential downside risks effectively.
Useful Tip: For long-term forecasting, we recommend using the "Predict-price" website, which offers both short-term and long-term predictions at no cost. This resource can support informed decision-making regarding your **Smartshares US 500 ETF Units (USF.NZ)** investments.
Smartshares US 500 ETF Units (USF.NZ) Price Analysis and Support Levels:
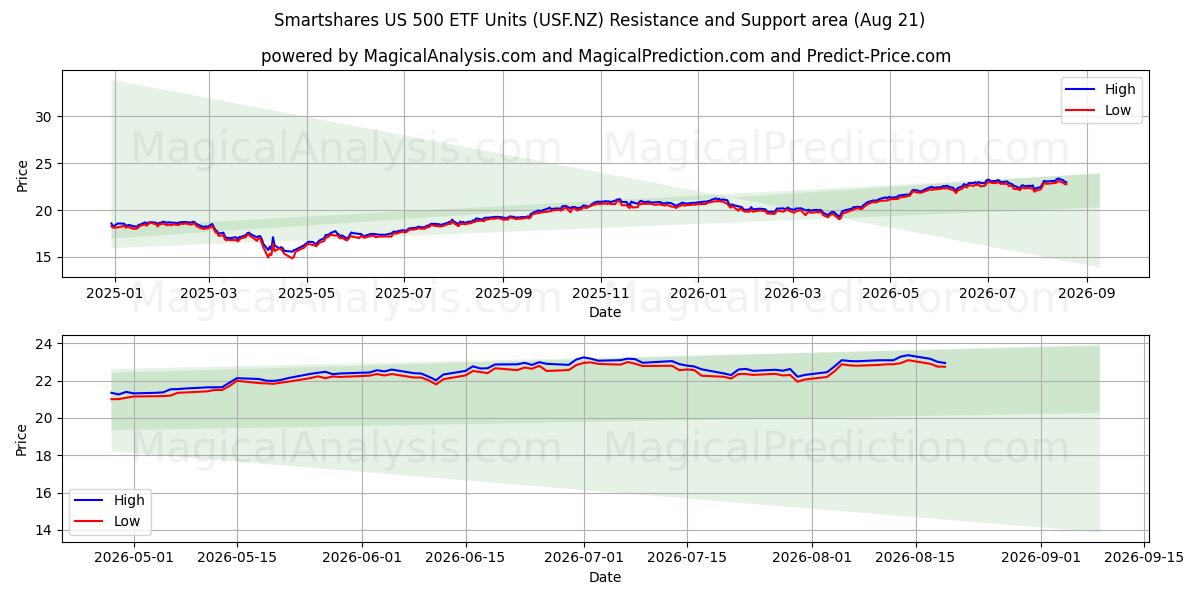
In our current Smartshares US 500 ETF Units (USF.NZ) position, we find ourselves in a short position, anticipating a potential downward trend. Understanding the key support levels is essential, as these serve as critical reference points for traders and investors to make informed decisions.First Support Level: 18.755
We are closely monitoring the price at 18.755, the first support level. If the downward trend continues, breaching this level would signal strong selling pressure, suggesting the possibility of further price depreciation.
Second Support Level: 14.841
If the first support level is broken, the second support level at 14.841 becomes crucial. A break here would indicate stronger downward momentum, likely driven by market sentiment or external factors.
These support levels should be carefully considered within the context of broader market trends and indicators. By staying alert and consistently analyzing the market, you can make well-informed decisions while trading Smartshares US 500 ETF Units (USF.NZ). Keeping these support levels in mind will help you adapt to the dynamic nature of the market and make smarter trading choices.
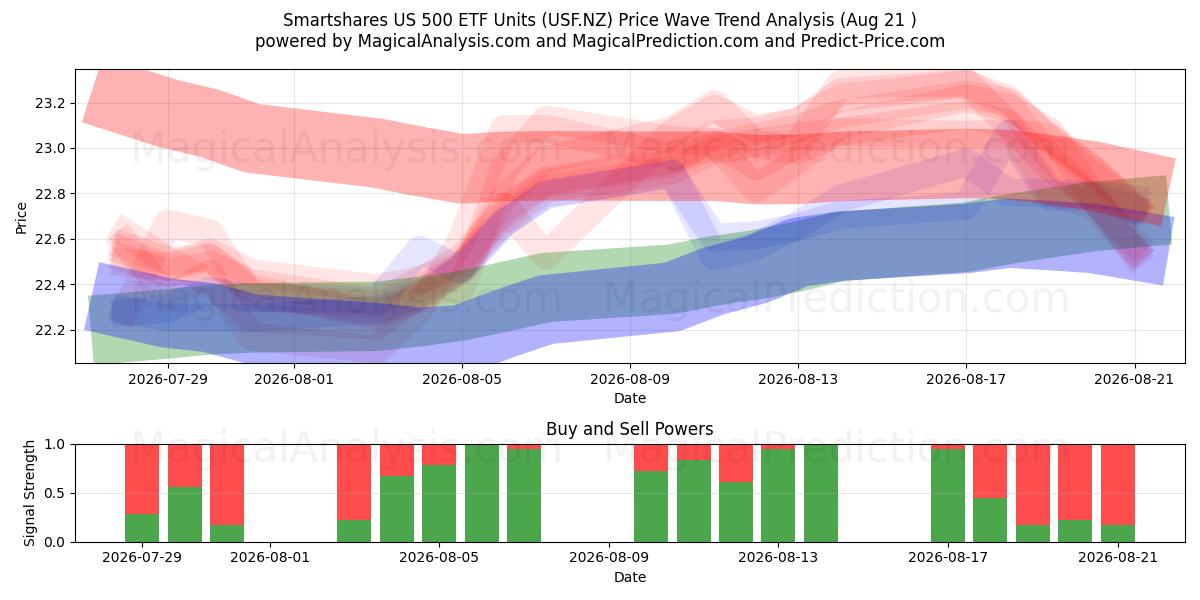
Smartshares US 500 ETF Units (USF.NZ) technical analysis chart
Smartshares US 500 ETF Units (USF.NZ) support and resistance levels
| Name | Level1 | Level2 | Level3 | Level4 | Level5 |
|---|---|---|---|---|---|
| Resistance | -- | -- | -- | -- | -- |
| Support | 18.755 | 14.841 | -- | -- | -- |
Smartshares US 500 ETF Units (USF.NZ) signals list for 20 Aug
| Overall Signals |
|---|
Smartshares US 500 ETF Units (USF.NZ) candlestick patterns on 20 Aug
Smartshares US 500 ETF Units (USF.NZ) technical analysis over the past days
| # | Date | Overal Signals | ALL Signals |
|---|---|---|---|
| 1 | 20 Aug | S | DEMA 1DEMA 2DEMA 3KAMA 3KAMA 4EMA Crossover 2MIDPOINT Slope 1TEMA Price 2TEMA Price 3TRIMA Slope 1TRIMA Slope 3AROONOSC 1MOM Crossover 1ROC Threshold 2ROCR Threshold 1ROCR Threshold 2BOP Smoothed ThresholdCMO Divergence 1 |
| 2 | 19 Aug | S | DEMA 1DEMA 2DEMA 3EMA Price Cross 1EMA Price Cross 2EMA Price Cross 3KAMA 1KAMA 3KAMA 4EMA Crossover 1WMA Crossover 1WMA Crossover 2MIDPOINT Slope 1MIDPOINT Slope 3TEMA Price 1TEMA Price 2TEMA Price 3TRIMA Slope 3WILLR Exit OversoldBOP Smoothed ThresholdMACD Crossover 1OBV CrossoverElder's Force IndexCMO Divergence 1 |
| 3 | 18 Aug | S | EMA Price Cross 4KAMA 2KAMA 3KAMA 4TEMA Price 1TEMA Price 2TRIMA Slope 1TRIMA Slope 2TRIMA Slope 3CCI Crossover 2BOP Smoothed ThresholdStochastic RSI SignalUltimate OscillatorVolume Spike |
| 4 | 17 Aug | N | DEMA 3KAMA 1KAMA 2KAMA 3KAMA 4MIDPOINT Slope 3T3 Slope 2TEMA Price 3TRIMA Slope 1TRIMA Slope 2TRIMA Slope 3PLUS_DI Threshold 1PLUS_DI Threshold 2BOP Smoothed ThresholdDonchian ChannelCMO Divergence 1 |
| 5 | 14 Aug | B | DEMA 3KAMA 1KAMA 2KAMA 3KAMA 4MIDPOINT Slope 3MIDPOINT Slope 4T3 Slope 2TEMA Price 3TRIMA Slope 2TRIMA Slope 3AROONOSC 1AROONOSC 2AROONOSC 3AROONOSC 4PLUS_DI Threshold 1PLUS_DI Threshold 2ROCR Threshold 1BOP Smoothed ThresholdDonchian ChannelDaily Pivot Point 1CMO Divergence 1 |
| 6 | 13 Aug | B | EMA Price Cross 4KAMA 2KAMA 3KAMA 4WMA Crossover 1WMA Crossover 4T3 Slope 2TEMA Price 3TRIMA Slope 2BOP Smoothed ThresholdSTOCH Normal Zone CrossStochastic RSI SignalIchimoku 1Daily Pivot Point 1CMO Divergence 1 |
| 7 | 12 Aug | B | DEMA 1EMA Price Cross 4KAMA 3KAMA 4WMA Crossover 1MIDPOINT Slope 2T3 Slope 2TEMA Price 1TEMA Price 2TRIMA Slope 2CCI Crossover 1PLUS_DI Threshold 1ROCR Threshold 4BOP Smoothed ThresholdStochastic RSI SignalDaily Pivot Point 1CMO Divergence 1 |
| 8 | 11 Aug | N | DEMA 3KAMA 2KAMA 3KAMA 4T3 Slope 1T3 Slope 2TEMA Price 3TRIMA Slope 1TRIMA Slope 2CCI Crossover 3PLUS_DI Threshold 1PLUS_DI Threshold 2BOP Smoothed ThresholdEngulfing PatternDEMA with ATR 3Daily Pivot Point 1 |
| 9 | 10 Aug | B | DEMA 3KAMA 2KAMA 3KAMA 4MIDPOINT Slope 1MIDPOINT Slope 2T3 Slope 1T3 Slope 2TEMA Price 3TRIMA Slope 1TRIMA Slope 2PLUS_DI Threshold 1PLUS_DI Threshold 2BOP Smoothed ThresholdStochastic RSI SignalDEMA with ATR 3 |
| 10 | 07 Aug | B | DEMA 2DEMA 3KAMA 2KAMA 3KAMA 4T3 Slope 1TEMA Price 2TEMA Price 3TRIMA Slope 1PLUS_DI Threshold 1PLUS_DI Threshold 2ROC Threshold 2RSI Exit OversoldTRIX Crossover 2BOP Smoothed ThresholdBBANDS Breakout 2Percentage Price OscillatorCoppock Curve |
| 11 | 06 Aug | B | DEMA 1DEMA 2DEMA 3KAMA 1KAMA 2KAMA 3KAMA 4EMA Crossover 3WMA Crossover 3MIDPOINT Slope 1MIDPOINT Slope 2MIDPOINT Slope 3MIDPOINT Slope 4T3 Slope 1TEMA Price 1TEMA Price 2TEMA Price 3TRIMA Slope 1AROONOSC 3MOM Crossover 2PLUS_DI Threshold 1PLUS_DI Threshold 2ROC Threshold 1ROCR Threshold 3TRIX Crossover 1BOP Smoothed ThresholdMACD Crossover 2DEMA with ATR 1DEMA with ATR 2DEMA with ATR 3Volume SpikeCMO Divergence 1CMO Divergence 2 |
| 12 | 05 Aug | B | DEMA 1DEMA 2DEMA 3EMA Price Cross 3KAMA 2KAMA 3EMA Crossover 2WMA Crossover 1WMA Crossover 2MIDPOINT Slope 1MIDPOINT Slope 2T3 Slope 1TEMA Price 1TEMA Price 2TEMA Price 3SAR CrossoverAROONOSC 1PLUS_DI Threshold 1ROCR Threshold 1ROCR Threshold 2WILLR Exit OversoldWILLR Exit OverboughtBOP Smoothed ThresholdBBANDS Breakout 1Ichimoku 2Ichimoku 3Rolling VWAPVortex IndicatorCMO Divergence 1 |
| 13 | 04 Aug | B | DEMA 1DEMA 2EMA Price Cross 1EMA Price Cross 2EMA Price Cross 4EMA Crossover 1MIDPOINT Slope 2TEMA Price 1TEMA Price 2TEMA Price 3TRIMA Slope 1CCI Crossover 1CCI Crossover 2CCI Crossover 3MOM Crossover 1PLUS_DI Threshold 1BOP Smoothed ThresholdMACD Crossover 1STOCH Normal Zone CrossStochastic RSI SignalChaikin AD CrossoverChaikin ADOSC Zero CrossVolume SpikeDaily Pivot Point 1Elder's Force IndexCMO Divergence 1 |
| 14 | 03 Aug | B | DEMA 3KAMA 1KAMA 2KAMA 3KAMA 4MIDPOINT Slope 4T3 Slope 1TEMA Price 2TEMA Price 3TRIMA Slope 1PLUS_DI Threshold 1PLUS_DI Threshold 2Chaikin AD CrossoverCMO Divergence 1 |
| 15 | 31 Jul | S | DEMA 1DEMA 3EMA Price Cross 4KAMA 1KAMA 2KAMA 3KAMA 4EMA Crossover 1WMA Crossover 2MIDPOINT Slope 1MIDPOINT Slope 2MIDPOINT Slope 3MIDPOINT Slope 4TEMA Price 1TEMA Price 2TEMA Price 3TRIMA Slope 1TRIMA Slope 3SAR CrossoverAROONOSC 1AROONOSC 3PLUS_DI Threshold 1PLUS_DI Threshold 2ROC Threshold 1ROCR Threshold 1WILLR Exit OverboughtMACD Crossover 1STOCH Normal Zone CrossChaikin AD CrossoverIchimoku 3CMO Divergence 1 |
| 16 | 30 Jul | S | EMA Price Cross 4EMA Crossover 1WMA Crossover 1TEMA Price 2TEMA Price 3TRIMA Slope 3SAR CrossoverPLUS_DI Threshold 1BOP Smoothed ThresholdStochastic RSI Signal |
| 17 | 29 Jul | N | DEMA 3EMA Price Cross 1EMA Price Cross 2EMA Price Cross 3EMA Price Cross 4KAMA 1EMA Crossover 1TEMA Price 1TRIMA Slope 1TRIMA Slope 3PLUS_DI Threshold 1PLUS_DI Threshold 2ROC Threshold 2ROCR Threshold 4WILLR Exit OverboughtBOP Smoothed ThresholdStochastic RSI SignalChaikin AD CrossoverIchimoku 3Daily Pivot Point 1Elder's Force IndexCMO Divergence 1 |
| 18 | 28 Jul | S | DEMA 1DEMA 2EMA Price Cross 1EMA Price Cross 2EMA Price Cross 3WMA Crossover 2MIDPOINT Slope 3TEMA Price 2TEMA Price 3TRIMA Slope 1TRIMA Slope 2TRIMA Slope 3PLUS_DI Threshold 1ROCR Threshold 1BOP Smoothed ThresholdChaikin AD CrossoverHammer / Hanging ManIchimoku 3Daily Pivot Point 1Elder's Force IndexCMO Divergence 1 |
| 19 | 27 Jul | B | DEMA 1EMA Price Cross 4EMA Crossover 1WMA Crossover 4MIDPOINT Slope 1TEMA Price 2TEMA Price 3TRIMA Slope 2TRIMA Slope 3PLUS_DI Threshold 1BOP Smoothed ThresholdMACD Crossover 1CMO Divergence 1 |
| 20 | 24 Jul | N | DEMA 3KAMA 1WMA Crossover 1MIDPOINT Slope 2MIDPOINT Slope 3T3 Slope 2TEMA Price 2TRIMA Slope 2TRIMA Slope 3BOP Smoothed ThresholdCMO Divergence 1 |
| 21 | 23 Jul | S | DEMA 1DEMA 3KAMA 1T3 Slope 2TEMA Price 1TEMA Price 2TRIMA Slope 1TRIMA Slope 2TRIMA Slope 3CCI Crossover 1CCI Crossover 2CCI Crossover 3RSI Exit OversoldBOP Smoothed ThresholdStochastic RSI Signal |
| 22 | 22 Jul | N | DEMA 2DEMA 3KAMA 1MIDPOINT Slope 1T3 Slope 1T3 Slope 2TEMA Price 3TRIMA Slope 1TRIMA Slope 2TRIMA Slope 3PLUS_DI Threshold 1PLUS_DI Threshold 2ROC Threshold 2BOP Smoothed ThresholdHammer / Hanging ManADXR with DI+/DI-Ichimoku 1Ichimoku 3Daily Pivot Point 1CMO Divergence 1 |
| 23 | 21 Jul | S | DEMA 2DEMA 3KAMA 1EMA Crossover 3T3 Slope 1T3 Slope 2TEMA Price 3TRIMA Slope 1TRIMA Slope 2PLUS_DI Threshold 1PLUS_DI Threshold 2ROCR Threshold 4RSI Exit OversoldBOP Smoothed ThresholdSTOCH Normal Zone CrossBBANDS Breakout 2 |
| 24 | 20 Jul | S | DEMA 1DEMA 2DEMA 3KAMA 1MIDPOINT Slope 1MIDPOINT Slope 2MIDPOINT Slope 3MIDPOINT Slope 4T3 Slope 1T3 Slope 2TEMA Price 1TEMA Price 2TEMA Price 3TRIMA Slope 1TRIMA Slope 2AROONOSC 2AROONOSC 4PLUS_DI Threshold 1PLUS_DI Threshold 2ROC Threshold 1ROCR Threshold 3WILLR Exit OversoldWILLR Exit OverboughtBOP Smoothed ThresholdDonchian ChannelIchimoku 2Elder's Force IndexCMO Divergence 1CMO Divergence 2Coppock Curve |
| 25 | 17 Jul | S | DEMA 3KAMA 3KAMA 4MIDPOINT Slope 2T3 Slope 1TEMA Price 1TEMA Price 3TRIMA Slope 1TRIMA Slope 2MOM Crossover 2PLUS_DI Threshold 1BOP Smoothed ThresholdEngulfing PatternElder's Force IndexCMO Divergence 2 |
| 26 | 16 Jul | N | DEMA 3KAMA 3KAMA 4WMA Crossover 3T3 Slope 1TEMA Price 1TEMA Price 3TRIMA Slope 1TRIMA Slope 2CCI Crossover 1MOM Crossover 2PLUS_DI Threshold 1ROCR Threshold 2BOP Smoothed ThresholdStochastic RSI SignalOBV CrossoverIchimoku 3Schaff Trend Cycle |
| 27 | 15 Jul | N | DEMA 1DEMA 2DEMA 3EMA Price Cross 2EMA Price Cross 3KAMA 1EMA Crossover 2MIDPOINT Slope 1MIDPOINT Slope 2MIDPOINT Slope 3T3 Slope 1TEMA Price 1TEMA Price 2TEMA Price 3TRIMA Slope 1MOM Crossover 1MOM Crossover 2ADX +DI/-DI CrossoverROCR Threshold 1ROCR Threshold 3WILLR Exit OversoldWILLR Exit OverboughtBOP Smoothed ThresholdBBANDS Breakout 1Percentage Price OscillatorOBV CrossoverDaily Pivot Point 1Rolling VWAPVortex IndicatorElder's Force IndexCMO Divergence 1 |
| 28 | 14 Jul | S | DEMA 3EMA Price Cross 2KAMA 2KAMA 3KAMA 4MIDPOINT Slope 3MIDPOINT Slope 4TEMA Price 3TRIMA Slope 1MOM Crossover 1MOM Crossover 2ROCR Threshold 2ROCR Threshold 3BOP Smoothed ThresholdStochastic RSI SignalOBV CrossoverElder's Force Index |
| 29 | 13 Jul | B | DEMA 1DEMA 2DEMA 3EMA Price Cross 1EMA Price Cross 2EMA Price Cross 4KAMA 2KAMA 3KAMA 4EMA Crossover 1WMA Crossover 2MIDPOINT Slope 1MIDPOINT Slope 2MIDPOINT Slope 4TEMA Price 2TEMA Price 3SAR CrossoverAROONOSC 1AROONOSC 3MOM Crossover 1MOM Crossover 2ROCR Threshold 1TRIX Crossover 1TRIX Crossover 2BOP Smoothed ThresholdOBV CrossoverDaily Pivot Point 1Elder's Force IndexCMO Divergence 1CMO Divergence 2 |
| 30 | 09 Jul | S | EMA Price Cross 4KAMA 2KAMA 3KAMA 4TEMA Price 3TRIMA Slope 2TRIMA Slope 3ROC Threshold 2ROCR Threshold 2OBV Crossover |
Users forecasts for Smartshares US 500 ETF Units (USF.NZ)
What is your prediction?
In this section, you can easily predict without user registration. See also other users predictions.
