Gratis SSAB AB Series B (SSAB-B) Technische Analyse Signalen
SSAB AB Series B (SSAB-B) signaal met technische analyse op 23 Jul
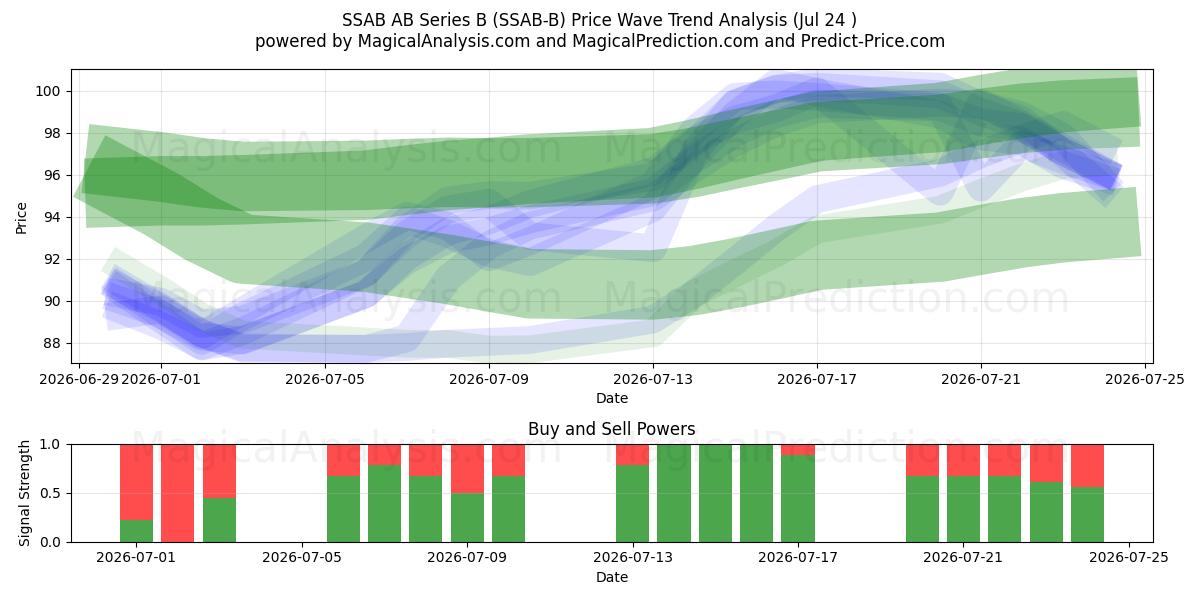
De 256 signalen werden gecategoriseerd in vier verschillende strategieën, elk bestaande uit 64 signalen. Laten we de details van elke strategie bekijken:
Strategie 1:
Koop Signalenen:
Verkoop Signalenen:
Neutrale Signalenen:
Resultaat: Deze strategie leidt tot een positie.
Strategie 2:
Koop Signalenen:
Verkoop Signalenen:
Neutrale Signalenen:
Resultaat: Deze strategie leidt tot een positie.
Strategie 3:
Koop Signalenen:
Verkoop Signalenen:
Neutrale Signalenen:
Resultaat: Deze strategie leidt tot een positie.
Strategie 4:
Koop Signalenen:
Verkoop Signalenen:
Neutrale Signalenen:
Resultaat: Deze strategie leidt tot een positie.
Algemene Strategie:
Koop Signalenen: 4
Verkoop Signalenen: 6
Neutrale Signalenen: 89
Resultaat: Deze strategie leidt tot een Neutraal positie.
Disclaimer! Gelieve voorzichtigheid en zorgvuldige overweging te betrachten voordat u financiële beslissingen neemt. Het is belangrijk op te merken dat onze signalen uitsluitend zijn gebaseerd op dagelijkse prijsveranderingen en geen rekening houden met externe factoren zoals nieuws, marktsentiment of bedrijfsontwikkelingen. We raden ten zeerste aan om alle relevante factoren te overwegen en uw eigen onderzoek te doen.
Nuttige Tips: Om de best geïnformeerde beslissingen te nemen over uw SSAB AB Series B (SSAB-B) investeringen, raden we ten zeerste aan de website van de "magicalprediction" AI-modellen signalen te bezoeken. Zij bieden gratis signalen, en als een daarvan overeenkomt met de onze, is het waarschijnlijk een betrouwbare indicator, zoals we in de loop der tijd hebben waargenomen.
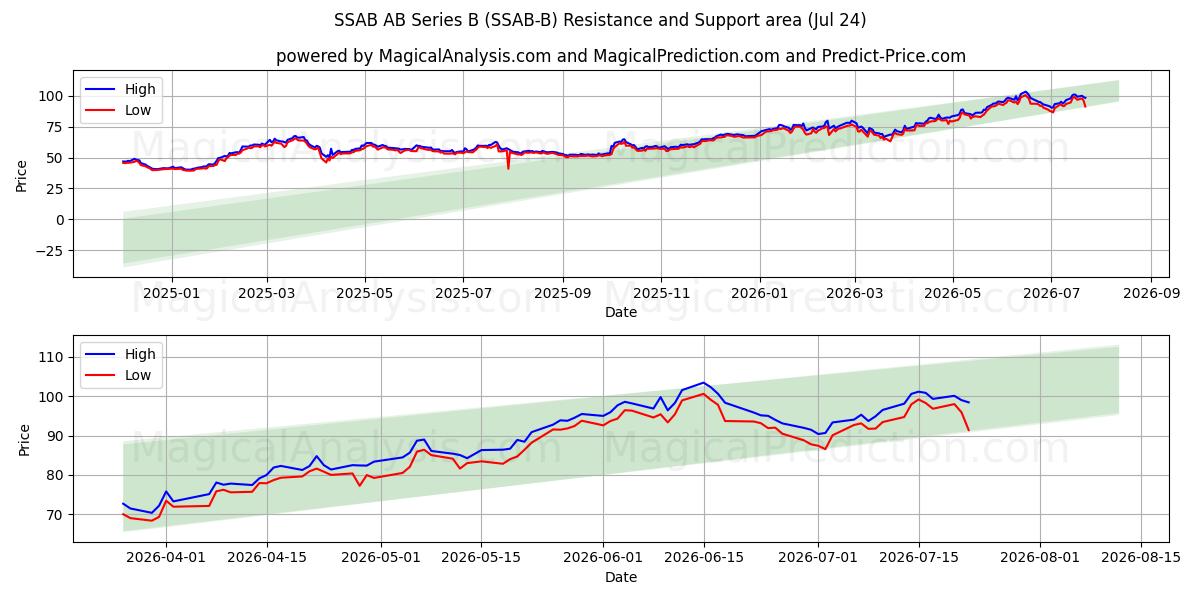
Tweede Ondersteuningsniveau: 67.529
Als het eerste ondersteuningsniveau doorbroken wordt, wordt het tweede ondersteuningsniveau op 67.529 een kritiek punt. Het doorbreken van dit niveau zou wijzen op een sterkere neerwaartse momentum, waarschijnlijk gedreven door marktsentiment of externe factoren.
Derde Ondersteuningsniveau: 64.859
Als het tweede ondersteuningsniveau wordt doorbroken en de prijs blijft dalen, duidt dit op een significante verschuiving op de markt. Onder 64.859 blijven zou een aanhoudende neerwaartse trend bevestigen, waarbij handelaren waarschijnlijk dit derde niveau als het volgende belangrijke ondersteuningspunt targeten.
Deze ondersteuningsniveaus moeten zorgvuldig worden overwogen in de context van bredere markttrends en indicatoren. Alert blijven en de markt consequent analyseren zal u in staat stellen om weloverwogen beslissingen te nemen tijdens het handelen in SSAB AB Series B (SSAB-B). Aandacht voor deze ondersteuningsniveaus zal u helpen zich aan te passen aan de dynamische aard van de markt en slimmer handelskeuzes te maken. Het is cruciaal om deze weerstands niveaus nauwlettend te volgen en ze in de context van bredere markttrends en indicatoren te overwegen. Om weloverwogen beslissingen te nemen bij het handelen in SSAB AB Series B (SSAB-B), blijf waakzaam en analyseer de markt continu. Focus op deze weerstands niveaus, samen met bredere marktdynamiek, zal u helpen om slimmer handelsbeslissingen te nemen en u aan te passen aan de veranderende marktomstandigheden.
SSAB AB Series B (SSAB-B) technische analyse grafiek
SSAB AB Series B (SSAB-B) steun- en weerstands-niveaus
| Naam | Level1 | Level2 | Level3 | Level4 | Level5 |
|---|---|---|---|---|---|
| Weerstand | 103.45 | -- | -- | -- | -- |
| Ondersteuning | 79.938 | 67.529 | 64.859 | -- | -- |
SSAB AB Series B (SSAB-B) signalenlijst voor 23 Jul
| Overall Signals |
|---|
SSAB AB Series B (SSAB-B) candlestick patronen op 23 Jul
SSAB AB Series B (SSAB-B) technische analyse in de afgelopen dagen
| # | Date | Overal Signals | ALL Signals |
|---|---|---|---|
| 1 | 23 Jul | N | DEMA 1DEMA 2EMA Price Cross 1EMA Price Cross 2KAMA 4EMA Crossover 1WMA Crossover 2TEMA Price 2TEMA Price 3TRIMA Slope 1TRIMA Slope 2TRIMA Slope 3SAR CrossoverAROONOSC 1AROONOSC 3BOP Smoothed ThresholdVolume SpikeVortex IndicatorElder's Force IndexCMO Divergence 1 |
| 2 | 22 Jul | S | KAMA 4TEMA Price 2TRIMA Slope 2TRIMA Slope 3CCI Crossover 2PLUS_DI Threshold 1PLUS_DI Threshold 2ROCR Threshold 1BOP Smoothed ThresholdMACD Crossover 1OBV CrossoverCMO Divergence 1 |
| 3 | 21 Jul | N | DEMA 1EMA Price Cross 4KAMA 4WMA Crossover 1T3 Slope 2TEMA Price 2TRIMA Slope 2TRIMA Slope 3PLUS_DI Threshold 1PLUS_DI Threshold 2RSI Exit OversoldCMO Divergence 1 |
| 4 | 20 Jul | N | KAMA 2KAMA 3KAMA 4T3 Slope 2TEMA Price 2TEMA Price 3TRIMA Slope 2TRIMA Slope 3CCI Crossover 1CCI Crossover 3PLUS_DI Threshold 1PLUS_DI Threshold 2BOP Smoothed ThresholdStochastic RSI SignalHammer / Hanging ManVolume Spike |
| 5 | 17 Jul | B | DEMA 3KAMA 2KAMA 3KAMA 4MIDPOINT Slope 2MIDPOINT Slope 3T3 Slope 2TEMA Price 3TRIMA Slope 1TRIMA Slope 2TRIMA Slope 3PLUS_DI Threshold 1PLUS_DI Threshold 2ROCR Threshold 4BOP Smoothed ThresholdCMO Divergence 1 |
| 6 | 16 Jul | B | DEMA 2DEMA 3KAMA 2KAMA 3KAMA 4WMA Crossover 4MIDPOINT Slope 3MIDPOINT Slope 4T3 Slope 1T3 Slope 2TEMA Price 3TRIMA Slope 1TRIMA Slope 2PLUS_DI Threshold 1PLUS_DI Threshold 2BOP Smoothed ThresholdIchimoku 1CMO Divergence 1CMO Divergence 2 |
| 7 | 15 Jul | B | DEMA 1DEMA 2DEMA 3KAMA 1KAMA 2KAMA 3KAMA 4MIDPOINT Slope 1MIDPOINT Slope 3MIDPOINT Slope 4T3 Slope 1TEMA Price 2TEMA Price 3TRIMA Slope 1TRIMA Slope 2AROONOSC 4PLUS_DI Threshold 1PLUS_DI Threshold 2TRIX Crossover 2BOP Smoothed ThresholdPercentage Price OscillatorDaily Pivot Point 1CMO Divergence 1Coppock Curve |
| 8 | 14 Jul | B | DEMA 1DEMA 2DEMA 3KAMA 1KAMA 2KAMA 4EMA Crossover 3MIDPOINT Slope 1MIDPOINT Slope 2MIDPOINT Slope 3T3 Slope 1TEMA Price 2TEMA Price 3TRIMA Slope 1TRIMA Slope 2MOM Crossover 2PLUS_DI Threshold 1PLUS_DI Threshold 2ROC Threshold 2ROCR Threshold 3BOP Smoothed ThresholdMACD Crossover 2Daily Pivot Point 1CMO Divergence 1 |
| 9 | 13 Jul | B | DEMA 1DEMA 2EMA Price Cross 3KAMA 1KAMA 2WMA Crossover 1WMA Crossover 3MIDPOINT Slope 1MIDPOINT Slope 2MIDPOINT Slope 3T3 Slope 1TEMA Price 2TEMA Price 3TRIMA Slope 2AROONOSC 2AROONOSC 3MOM Crossover 1PLUS_DI Threshold 1PLUS_DI Threshold 2ROC Threshold 1ROCR Threshold 2TRIX Crossover 1WILLR Exit OversoldWILLR Exit OverboughtBOP Smoothed ThresholdSTOCH Normal Zone CrossBBANDS Breakout 1OBV CrossoverIchimoku 2Ichimoku 3Daily Pivot Point 1Rolling VWAPElder's Force IndexCMO Divergence 1 |
| 10 | 10 Jul | B | EMA Price Cross 1EMA Price Cross 2EMA Price Cross 4KAMA 3EMA Crossover 2WMA Crossover 1MIDPOINT Slope 2TEMA Price 3TRIMA Slope 2BOP Smoothed ThresholdSTOCH Normal Zone CrossVortex Indicator |
| 11 | 09 Jul | B | EMA Price Cross 1EMA Price Cross 2EMA Price Cross 3EMA Price Cross 4KAMA 3EMA Crossover 2MIDPOINT Slope 2TEMA Price 1TEMA Price 3TRIMA Slope 1BOP Smoothed ThresholdStochastic RSI SignalDaily Pivot Point 1Vortex Indicator |
| 12 | 08 Jul | S | EMA Crossover 2WMA Crossover 4MIDPOINT Slope 1TEMA Price 2TEMA Price 3TRIMA Slope 1TRIMA Slope 3AROONOSC 1BOP Smoothed ThresholdOBV CrossoverVortex Indicator |
| 13 | 07 Jul | B | DEMA 1DEMA 2WMA Crossover 2TEMA Price 2TEMA Price 3TRIMA Slope 1TRIMA Slope 3SAR CrossoverROCR Threshold 2WILLR Exit OversoldBOP Smoothed ThresholdOBV CrossoverChaikin ADOSC Zero CrossCMO Divergence 1 |
| 14 | 06 Jul | B | DEMA 1DEMA 2EMA Price Cross 1EMA Price Cross 2EMA Price Cross 3EMA Price Cross 4EMA Crossover 1WMA Crossover 1MIDPOINT Slope 1TEMA Price 1TEMA Price 2TEMA Price 3TRIMA Slope 2TRIMA Slope 3CCI Crossover 2ROCR Threshold 1BOP Smoothed ThresholdMACD Crossover 1Chaikin AD CrossoverIchimoku 3Daily Pivot Point 1CMO Divergence 1 |
| 15 | 03 Jul | B | DEMA 1DEMA 3KAMA 1KAMA 2KAMA 3KAMA 4MIDPOINT Slope 3T3 Slope 2TEMA Price 1TEMA Price 2TRIMA Slope 1TRIMA Slope 2TRIMA Slope 3CCI Crossover 1CCI Crossover 3PLUS_DI Threshold 1PLUS_DI Threshold 2RSI Exit OversoldStochastic RSI SignalADXR with DI+/DI- |
| 16 | 02 Jul | S | DEMA 2DEMA 3KAMA 1KAMA 2KAMA 3KAMA 4MIDPOINT Slope 3MIDPOINT Slope 4T3 Slope 2TEMA Price 3TRIMA Slope 1TRIMA Slope 2TRIMA Slope 3PLUS_DI Threshold 1BOP Smoothed ThresholdCMO Divergence 1 |
| 17 | 01 Jul | S | DEMA 2DEMA 3KAMA 1KAMA 2KAMA 3KAMA 4T3 Slope 2TEMA Price 3TRIMA Slope 1TRIMA Slope 2TRIMA Slope 3PLUS_DI Threshold 1BOP Smoothed ThresholdBBANDS Breakout 2Schaff Trend Cycle |
| 18 | 30 Jun | S | DEMA 1DEMA 2DEMA 3KAMA 1KAMA 2KAMA 3KAMA 4EMA Crossover 3MIDPOINT Slope 2MIDPOINT Slope 3MIDPOINT Slope 4T3 Slope 1T3 Slope 2TEMA Price 3TRIMA Slope 1TRIMA Slope 2BOP Smoothed ThresholdChaikin ADOSC Zero CrossDonchian ChannelIchimoku 1Ichimoku 3Daily Pivot Point 1CMO Divergence 1 |
| 19 | 29 Jun | S | DEMA 2DEMA 3KAMA 1KAMA 2KAMA 3MIDPOINT Slope 3T3 Slope 1T3 Slope 2TEMA Price 3TRIMA Slope 1TRIMA Slope 2AROONOSC 4ROCR Threshold 4BOP Smoothed ThresholdDonchian ChannelDaily Pivot Point 1CMO Divergence 1Coppock Curve |
| 20 | 26 Jun | S | DEMA 3KAMA 1KAMA 2MIDPOINT Slope 2T3 Slope 1TEMA Price 3TRIMA Slope 1TRIMA Slope 2CCI Crossover 3PLUS_DI Threshold 2BOP Smoothed ThresholdStochastic RSI SignalChaikin ADOSC Zero Cross |
| 21 | 25 Jun | S | DEMA 2DEMA 3KAMA 1KAMA 2KAMA 3WMA Crossover 3MIDPOINT Slope 2MIDPOINT Slope 3T3 Slope 1TEMA Price 2TEMA Price 3TRIMA Slope 1MOM Crossover 2ADX +DI/-DI CrossoverPLUS_DI Threshold 1PLUS_DI Threshold 2ROC Threshold 1ROC Threshold 2ROCR Threshold 2ROCR Threshold 3BOP Smoothed ThresholdIchimoku 2Daily Pivot Point 1Vortex IndicatorCMO Divergence 1 |
| 22 | 24 Jun | S | DEMA 2DEMA 3EMA Price Cross 3MIDPOINT Slope 1MIDPOINT Slope 2T3 Slope 1TEMA Price 3TRIMA Slope 1AROONOSC 1AROONOSC 2AROONOSC 3PLUS_DI Threshold 1PLUS_DI Threshold 2WILLR Exit OversoldWILLR Exit OverboughtBOP Smoothed ThresholdHammer / Hanging Man |
| 23 | 23 Jun | S | DEMA 2DEMA 3EMA Price Cross 3EMA Crossover 2T3 Slope 1TEMA Price 2TEMA Price 3TRIMA Slope 1MOM Crossover 2PLUS_DI Threshold 1PLUS_DI Threshold 2ROC Threshold 2ROCR Threshold 3Ichimoku 3 |
| 24 | 22 Jun | N | DEMA 1DEMA 2DEMA 3EMA Price Cross 1EMA Price Cross 2EMA Price Cross 3KAMA 1KAMA 2EMA Crossover 1WMA Crossover 2MIDPOINT Slope 1MIDPOINT Slope 2MIDPOINT Slope 3MIDPOINT Slope 4TEMA Price 1TEMA Price 2TEMA Price 3TRIMA Slope 1SAR CrossoverMOM Crossover 1MOM Crossover 2PLUS_DI Threshold 1PLUS_DI Threshold 2ROC Threshold 1ROCR Threshold 1ROCR Threshold 2ROCR Threshold 3WILLR Exit OversoldWILLR Exit OverboughtBOP Smoothed ThresholdBBANDS Breakout 1OBV CrossoverChaikin ADOSC Zero CrossVolume SpikeDaily Pivot Point 1Rolling VWAPElder's Force IndexCMO Divergence 1CMO Divergence 2 |
| 25 | 18 Jun | S | DEMA 1DEMA 2DEMA 3EMA Price Cross 4KAMA 3KAMA 4WMA Crossover 1MIDPOINT Slope 2TEMA Price 1TEMA Price 2TEMA Price 3TRIMA Slope 1TRIMA Slope 2CCI Crossover 1CCI Crossover 2CCI Crossover 3PLUS_DI Threshold 1PLUS_DI Threshold 2RSI Exit OversoldRSI Exit OverboughtBOP Smoothed ThresholdMACD Crossover 1MACD Crossover 2STOCH Normal Zone CrossPercentage Price OscillatorADXR with DI+/DI-Daily Pivot Point 1CMO Divergence 1 |
| 26 | 17 Jun | S | KAMA 2KAMA 3KAMA 4MIDPOINT Slope 1MIDPOINT Slope 4T3 Slope 1TEMA Price 1TEMA Price 3TRIMA Slope 1PLUS_DI Threshold 1PLUS_DI Threshold 2BOP Smoothed ThresholdStochastic RSI SignalChaikin AD CrossoverADXR with DI+/DI-CMO Divergence 2 |
| 27 | 16 Jun | B | KAMA 1KAMA 2KAMA 3KAMA 4MIDPOINT Slope 1T3 Slope 1TEMA Price 2TRIMA Slope 1AROONOSC 1PLUS_DI Threshold 1PLUS_DI Threshold 2ADXR with DI+/DI-CMO Divergence 1 |
| 28 | 15 Jun | B | DEMA 1DEMA 2DEMA 3KAMA 1KAMA 2KAMA 3KAMA 4MIDPOINT Slope 1MIDPOINT Slope 2MIDPOINT Slope 3MIDPOINT Slope 4TEMA Price 1TEMA Price 2TEMA Price 3TRIMA Slope 1TRIMA Slope 3SAR CrossoverCMO Crossover 1PLUS_DI Threshold 1PLUS_DI Threshold 2ROCR Threshold 1TRIX Crossover 2WILLR Exit OversoldBOP Smoothed ThresholdMACD Crossover 1MACD Crossover 2STOCH Normal Zone CrossDEMA with ATR 3ADXR with DI+/DI-Keltner Channel 1Donchian ChannelDaily Pivot Point 1CMO Divergence 1 |
| 29 | 12 Jun | B | DEMA 1EMA Price Cross 4KAMA 1KAMA 2KAMA 3KAMA 4EMA Crossover 1WMA Crossover 1WMA Crossover 2MIDPOINT Slope 1TEMA Price 1TEMA Price 2TRIMA Slope 3PLUS_DI Threshold 1PLUS_DI Threshold 2WILLR Exit OverboughtBOP Smoothed ThresholdStochastic RSI SignalADXR with DI+/DI-Daily Pivot Point 1CMO Divergence 1CMO Divergence 2 |
| 30 | 11 Jun | B | DEMA 2DEMA 3KAMA 3KAMA 4WMA Crossover 2MIDPOINT Slope 4TEMA Price 2TEMA Price 3TRIMA Slope 1TRIMA Slope 2TRIMA Slope 3SAR CrossoverPLUS_DI Threshold 1PLUS_DI Threshold 2ROCR Threshold 1TRIX Crossover 1MACD Crossover 2Money Flow IndexADXR with DI+/DI- |
Voorspellingen van gebruikers voor SSAB AB Series B (SSAB-B)
Wat is jouw voorspelling?
In this section, you can easily predict without user registration. See also other users predictions.
