Sinais Gratuitos de Análise Técnica SETOR DE SAÚDE DO ÍNDICE S&P 500 (E-MINI) (XAV)
SETOR DE SAÚDE DO ÍNDICE S&P 500 (E-MINI) (XAV) sinal com análise técnica em 17 Aug
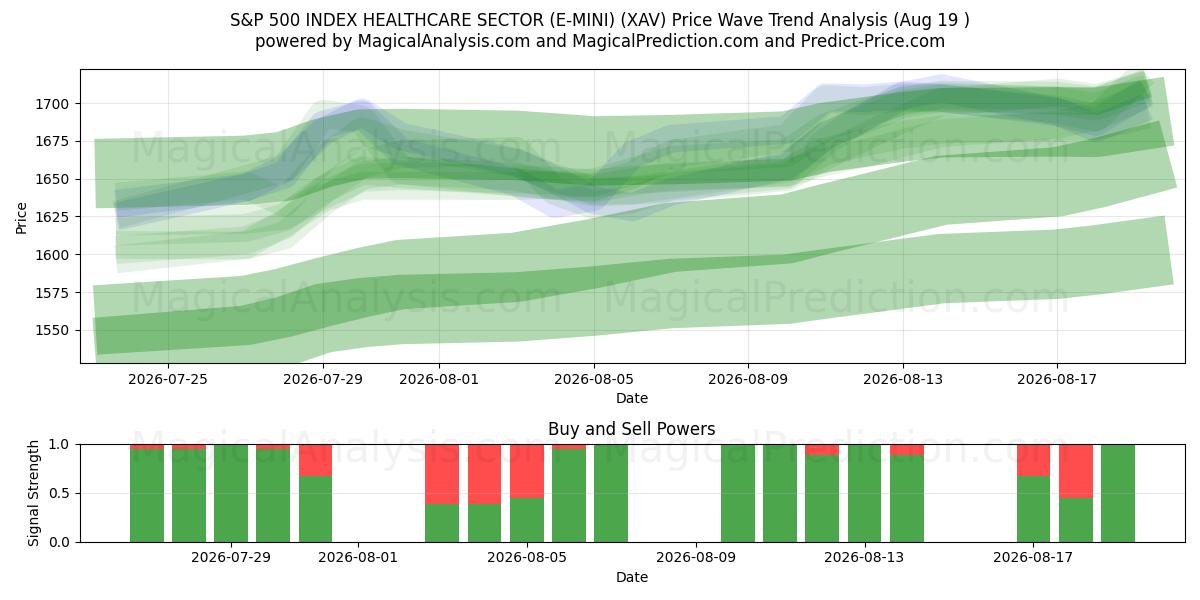
Os 256 sinais foram categorizados em quatro estratégias distintas, cada uma composta por 64 sinais. Vamos mergulhar nos detalhes de cada estratégia:
Estratégia 1:
Sinais de Compra:
Sinais de Venda:
Sinais Neutros:
Resultado: Esta estratégia leva a uma posição de .
Estratégia 2:
Sinais de Compra:
Sinais de Venda:
Sinais Neutros:
Resultado: Esta estratégia leva a uma posição de .
Estratégia 3:
Sinais de Compra:
Sinais de Venda:
Sinais Neutros:
Resultado: Esta estratégia leva a uma posição de .
Estratégia 4:
Sinais de Compra:
Sinais de Venda:
Sinais Neutros:
Resultado: Esta estratégia leva a uma posição de .
Estratégia Geral:
Sinais de Compra: 8
Sinais de Venda: 7
Sinais Neutros: 84
Resultado: Esta estratégia leva a uma posição de Neutro.
Aviso! Por favor, exerça cautela e consideração minuciosa antes de tomar quaisquer decisões financeiras. É importante notar que nossos sinais são baseados exclusivamente em mudanças diárias de preço e não levam em conta fatores externos, como notícias, sentimento do mercado ou desenvolvimentos da empresa. Recomendamos fortemente considerar todos os fatores relevantes e conduzir sua própria pesquisa.
Dicas Úteis: Para tomar decisões mais informadas sobre seus investimentos em SETOR DE SAÚDE DO ÍNDICE S&P 500 (E-MINI) (XAV), recomendamos fortemente visitar o site de sinais de modelos de IA "magicalprediction". Eles fornecem sinais gratuitos e, se um sinal se alinhar com o nosso, é provável que seja um indicador confiável, como observamos ao longo do tempo.
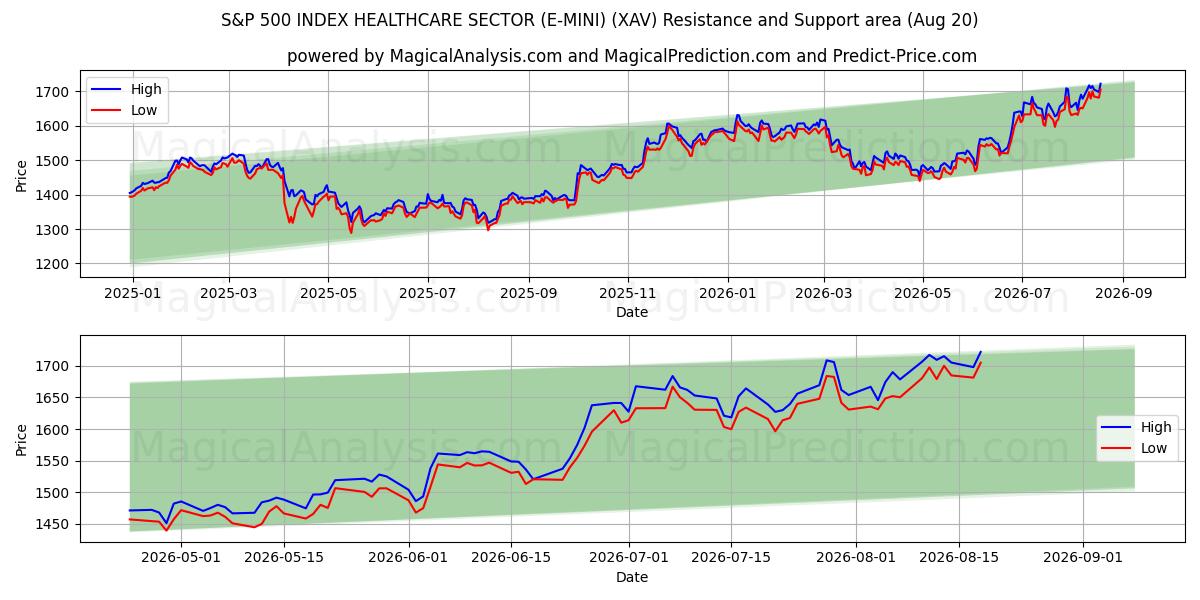
Segundo Nível de Suporte: 1519
Se o primeiro nível de suporte for rompido, o segundo nível de suporte em 1519 torna-se um ponto crítico. Romper este nível indicaria um momentum descendente mais forte, provavelmente impulsionado pelo sentimento do mercado ou fatores externos.
Terceiro Nível de Suporte: 1439.5
Se o segundo nível de suporte for rompido e o preço continuar a cair, isso sinaliza uma mudança significativa no mercado. Permanecer abaixo de 1439.5 confirmaria uma tendência de baixa persistente, com os traders provavelmente mirando neste terceiro nível como o próximo ponto de suporte chave.
Esses níveis de suporte devem ser considerados com cuidado no contexto de tendências e indicadores de mercado mais amplos. Manter-se alerta e analisar consistentemente o mercado permitirá que você tome decisões informadas ao negociar SETOR DE SAÚDE DO ÍNDICE S&P 500 (E-MINI) (XAV). Prestar atenção a esses níveis de suporte ajudará você a se adaptar à natureza dinâmica do mercado e a fazer escolhas de negociação mais inteligentes. É crucial monitorar de perto esses níveis de resistência e considerá-los no contexto de tendências e indicadores de mercado mais amplos. Para tomar decisões informadas ao negociar SETOR DE SAÚDE DO ÍNDICE S&P 500 (E-MINI) (XAV), mantenha-se vigilante e analise continuamente o mercado. Focar nesses níveis de resistência, juntamente com a dinâmica mais ampla do mercado, ajudará você a tomar decisões de negociação mais inteligentes e a se adaptar às condições de mercado em mudança.
SETOR DE SAÚDE DO ÍNDICE S&P 500 (E-MINI) (XAV) gráfico de análise técnica
SETOR DE SAÚDE DO ÍNDICE S&P 500 (E-MINI) (XAV) níveis de suporte e resistência
| Nome | Level1 | Level2 | Level3 | Level4 | Level5 |
|---|---|---|---|---|---|
| Resistência | -- | -- | -- | -- | -- |
| Suporte | 1631.1 | 1519 | 1439.5 | -- | -- |
SETOR DE SAÚDE DO ÍNDICE S&P 500 (E-MINI) (XAV) lista de sinais para 17 Aug
| Overall Signals |
|---|
SETOR DE SAÚDE DO ÍNDICE S&P 500 (E-MINI) (XAV) padrões de velas em 17 Aug
SETOR DE SAÚDE DO ÍNDICE S&P 500 (E-MINI) (XAV) análise técnica nos últimos dias
| # | Date | Overal Signals | ALL Signals |
|---|---|---|---|
| 1 | 17 Aug | N | DEMA 1EMA Price Cross 4KAMA 2KAMA 3KAMA 4WMA Crossover 1T3 Slope 2TEMA Price 2TRIMA Slope 2CCI Crossover 1CCI Crossover 2PLUS_DI Threshold 1PLUS_DI Threshold 2RSI Exit OversoldBOP Smoothed ThresholdADXR with DI+/DI-Daily Pivot Point 1CMO Divergence 1 |
| 2 | 14 Aug | N | KAMA 1KAMA 2KAMA 3KAMA 4T3 Slope 1T3 Slope 2TRIMA Slope 1TRIMA Slope 2PLUS_DI Threshold 1PLUS_DI Threshold 2ROC Threshold 1BOP Smoothed ThresholdStochastic RSI SignalADXR with DI+/DI- |
| 3 | 13 Aug | B | KAMA 1KAMA 2KAMA 3KAMA 4MIDPOINT Slope 1MIDPOINT Slope 4T3 Slope 1T3 Slope 2TEMA Price 3TRIMA Slope 1TRIMA Slope 2CCI Crossover 1CCI Crossover 3PLUS_DI Threshold 1PLUS_DI Threshold 2ROCR Threshold 2TRIX Crossover 2BOP Smoothed ThresholdEngulfing Pattern |
| 4 | 12 Aug | B | KAMA 2KAMA 3KAMA 4MIDPOINT Slope 2T3 Slope 1T3 Slope 2TEMA Price 3TRIMA Slope 1AROONOSC 4PLUS_DI Threshold 1PLUS_DI Threshold 2RSI Exit OversoldTRIX Crossover 1BOP Smoothed ThresholdBBANDS Breakout 2Stochastic RSI SignalADXR with DI+/DI- |
| 5 | 11 Aug | B | DEMA 1DEMA 2DEMA 3KAMA 1KAMA 2KAMA 3KAMA 4MIDPOINT Slope 1MIDPOINT Slope 2MIDPOINT Slope 3MIDPOINT Slope 4T3 Slope 1TEMA Price 1TEMA Price 2TEMA Price 3TRIMA Slope 1AROONOSC 1AROONOSC 3PLUS_DI Threshold 1PLUS_DI Threshold 2ROC Threshold 1WILLR Exit OversoldWILLR Exit OverboughtBOP Smoothed ThresholdMACD Crossover 2Daily Pivot Point 1CMO Divergence 1CMO Divergence 2 |
| 6 | 10 Aug | B | KAMA 2KAMA 3KAMA 4WMA Crossover 2MIDPOINT Slope 1MIDPOINT Slope 2TEMA Price 2TEMA Price 3TRIMA Slope 1PLUS_DI Threshold 1PLUS_DI Threshold 2ROC Threshold 2ROCR Threshold 1BOP Smoothed ThresholdMACD Crossover 1Percentage Price OscillatorOBV CrossoverCMO Divergence 1 |
| 7 | 07 Aug | B | KAMA 2KAMA 3KAMA 4TEMA Price 2PLUS_DI Threshold 1PLUS_DI Threshold 2ROCR Threshold 4BOP Smoothed ThresholdSTOCH Normal Zone CrossCMO Divergence 1 |
| 8 | 06 Aug | B | EMA Price Cross 1EMA Price Cross 2EMA Price Cross 4KAMA 3KAMA 4EMA Crossover 1WMA Crossover 1MIDPOINT Slope 2MIDPOINT Slope 3TEMA Price 1TEMA Price 2TRIMA Slope 1PLUS_DI Threshold 1PLUS_DI Threshold 2ROC Threshold 1Stochastic RSI SignalADXR with DI+/DI-Ichimoku 2Ichimoku 3Elder's Force IndexCMO Divergence 1 |
| 9 | 05 Aug | B | DEMA 3KAMA 3KAMA 4TEMA Price 2TEMA Price 3TRIMA Slope 1AROONOSC 1PLUS_DI Threshold 1PLUS_DI Threshold 2ROCR Threshold 1ROCR Threshold 4CMO Divergence 1 |
| 10 | 04 Aug | S | DEMA 3KAMA 3KAMA 4WMA Crossover 2MIDPOINT Slope 1T3 Slope 2TEMA Price 2TEMA Price 3TRIMA Slope 1TRIMA Slope 2TRIMA Slope 3PLUS_DI Threshold 1PLUS_DI Threshold 2ROC Threshold 2ROCR Threshold 2ROCR Threshold 3TRIX Crossover 1BOP Smoothed ThresholdEngulfing PatternVolume SpikeIchimoku 2CMO Divergence 1 |
| 11 | 03 Aug | N | DEMA 1DEMA 2DEMA 3EMA Price Cross 1EMA Price Cross 2KAMA 3KAMA 4EMA Crossover 1WMA Crossover 1T3 Slope 2TEMA Price 1TEMA Price 2TEMA Price 3TRIMA Slope 2PLUS_DI Threshold 1PLUS_DI Threshold 2ROCR Threshold 4MACD Crossover 1MACD Crossover 2OBV CrossoverElder's Force IndexCMO Divergence 1 |
| 12 | 31 Jul | S | DEMA 1EMA Price Cross 4KAMA 3KAMA 4T3 Slope 1T3 Slope 2TEMA Price 1TEMA Price 2TEMA Price 3TRIMA Slope 1TRIMA Slope 2CCI Crossover 1CCI Crossover 2CCI Crossover 3PLUS_DI Threshold 1PLUS_DI Threshold 2TRIX Crossover 1STOCH Normal Zone CrossCMO Divergence 1 |
| 13 | 30 Jul | N | KAMA 1KAMA 2KAMA 3KAMA 4MIDPOINT Slope 2T3 Slope 1T3 Slope 2TEMA Price 3TRIMA Slope 1TRIMA Slope 2PLUS_DI Threshold 1PLUS_DI Threshold 2RSI Exit OversoldBBANDS Breakout 2Stochastic RSI SignalADXR with DI+/DI- |
| 14 | 29 Jul | B | DEMA 1DEMA 2DEMA 3KAMA 1KAMA 2KAMA 3KAMA 4MIDPOINT Slope 1MIDPOINT Slope 2MIDPOINT Slope 3MIDPOINT Slope 4T3 Slope 1TEMA Price 1TEMA Price 2TEMA Price 3TRIMA Slope 1AROONOSC 2MOM Crossover 2PLUS_DI Threshold 1PLUS_DI Threshold 2ROC Threshold 1ROC Threshold 2ROCR Threshold 3BOP Smoothed ThresholdMACD Crossover 2ADXR with DI+/DI-Keltner Channel 1Donchian ChannelCMO Divergence 1Coppock Curve |
| 15 | 28 Jul | B | KAMA 1KAMA 2KAMA 3KAMA 4WMA Crossover 3MIDPOINT Slope 1MIDPOINT Slope 2MIDPOINT Slope 3T3 Slope 1TEMA Price 2TEMA Price 3TRIMA Slope 1SAR CrossoverAROONOSC 1AROONOSC 3MOM Crossover 2PLUS_DI Threshold 1PLUS_DI Threshold 2ROCR Threshold 1ROCR Threshold 2WILLR Exit OversoldWILLR Exit OverboughtBOP Smoothed ThresholdEngulfing PatternADXR with DI+/DI-Daily Pivot Point 1CMO Divergence 1 |
| 16 | 27 Jul | B | KAMA 1KAMA 2KAMA 3KAMA 4MIDPOINT Slope 1MIDPOINT Slope 2MIDPOINT Slope 4TEMA Price 2TEMA Price 3TRIMA Slope 1MOM Crossover 1MOM Crossover 2PLUS_DI Threshold 1PLUS_DI Threshold 2BOP Smoothed ThresholdMACD Crossover 1OBV CrossoverADXR with DI+/DI-CMO Divergence 1 |
| 17 | 24 Jul | B | EMA Price Cross 1EMA Price Cross 2EMA Price Cross 4KAMA 3KAMA 4EMA Crossover 1EMA Crossover 2WMA Crossover 1WMA Crossover 2MIDPOINT Slope 1MIDPOINT Slope 4TEMA Price 1TEMA Price 2TRIMA Slope 3PLUS_DI Threshold 1PLUS_DI Threshold 2ROCR Threshold 3BOP Smoothed ThresholdSTOCH Normal Zone CrossBBANDS Breakout 1Stochastic RSI SignalChaikin AD CrossoverChaikin ADOSC Zero CrossADXR with DI+/DI-Daily Pivot Point 1Rolling VWAPElder's Force IndexCMO Divergence 1Coppock Curve |
| 18 | 23 Jul | B | DEMA 3KAMA 4MIDPOINT Slope 4TEMA Price 3TRIMA Slope 1TRIMA Slope 3MOM Crossover 2PLUS_DI Threshold 1PLUS_DI Threshold 2BOP Smoothed ThresholdBBANDS Breakout 1ADXR with DI+/DI-CMO Divergence 1 |
| 19 | 22 Jul | S | DEMA 3KAMA 3KAMA 4WMA Crossover 1MIDPOINT Slope 3MIDPOINT Slope 4TEMA Price 3TRIMA Slope 2SAR CrossoverAROONOSC 4MOM Crossover 2PLUS_DI Threshold 1PLUS_DI Threshold 2ROC Threshold 1ROCR Threshold 1BOP Smoothed ThresholdSTOCH Normal Zone CrossBBANDS Breakout 1Stochastic RSI SignalCMO Divergence 2 |
| 20 | 21 Jul | N | DEMA 2DEMA 3EMA Price Cross 1EMA Price Cross 2EMA Price Cross 4EMA Crossover 1EMA Crossover 2WMA Crossover 3MIDPOINT Slope 4TEMA Price 3TRIMA Slope 1TRIMA Slope 2AROONOSC 2MOM Crossover 2PLUS_DI Threshold 1PLUS_DI Threshold 2ROCR Threshold 1ROCR Threshold 3BOP Smoothed ThresholdBBANDS Breakout 1ADXR with DI+/DI-Daily Pivot Point 1Rolling VWAP |
| 21 | 20 Jul | S | KAMA 3KAMA 4EMA Crossover 1WMA Crossover 1MIDPOINT Slope 4TEMA Price 3TRIMA Slope 2SAR CrossoverMOM Crossover 1PLUS_DI Threshold 1PLUS_DI Threshold 2ROCR Threshold 2Stochastic RSI SignalADXR with DI+/DI- |
| 22 | 17 Jul | N | DEMA 1EMA Price Cross 1EMA Price Cross 2EMA Price Cross 4KAMA 1KAMA 3KAMA 4EMA Crossover 2TEMA Price 1TEMA Price 2TEMA Price 3TRIMA Slope 1TRIMA Slope 2MOM Crossover 1PLUS_DI Threshold 1PLUS_DI Threshold 2ROCR Threshold 2BOP Smoothed ThresholdSTOCH Normal Zone CrossStochastic RSI SignalPercentage Price OscillatorIchimoku 3Elder's Force IndexCMO Divergence 1 |
| 23 | 16 Jul | B | DEMA 2DEMA 3EMA Crossover 2T3 Slope 1TEMA Price 2TEMA Price 3TRIMA Slope 1PLUS_DI Threshold 1PLUS_DI Threshold 2TRIX Crossover 2CMO Divergence 1 |
| 24 | 15 Jul | S | DEMA 1DEMA 2DEMA 3EMA Price Cross 1EMA Price Cross 2MIDPOINT Slope 1MIDPOINT Slope 2TEMA Price 2TEMA Price 3TRIMA Slope 1TRIMA Slope 3AROONOSC 1AROONOSC 3MOM Crossover 1PLUS_DI Threshold 1PLUS_DI Threshold 2ROCR Threshold 1ROCR Threshold 2TRIX Crossover 1WILLR Exit OversoldBOP Smoothed ThresholdMACD Crossover 2Chaikin ADOSC Zero CrossElder's Force IndexCMO Divergence 1 |
| 25 | 14 Jul | S | KAMA 3KAMA 4WMA Crossover 2TEMA Price 2TEMA Price 3TRIMA Slope 1TRIMA Slope 3PLUS_DI Threshold 1PLUS_DI Threshold 2BOP Smoothed Threshold |
| 26 | 13 Jul | N | DEMA 1DEMA 2KAMA 3KAMA 4EMA Crossover 1MIDPOINT Slope 1MIDPOINT Slope 3TEMA Price 2TEMA Price 3TRIMA Slope 1TRIMA Slope 2TRIMA Slope 3SAR CrossoverPLUS_DI Threshold 1PLUS_DI Threshold 2ROCR Threshold 1BOP Smoothed ThresholdChaikin AD CrossoverEngulfing PatternDaily Pivot Point 1Elder's Force IndexCMO Divergence 1 |
| 27 | 10 Jul | S | EMA Price Cross 4KAMA 1KAMA 3KAMA 4WMA Crossover 1MIDPOINT Slope 3TEMA Price 2TEMA Price 3TRIMA Slope 2TRIMA Slope 3CCI Crossover 2PLUS_DI Threshold 1PLUS_DI Threshold 2BOP Smoothed ThresholdCMO Divergence 1 |
| 28 | 09 Jul | N | DEMA 1KAMA 1KAMA 2KAMA 3KAMA 4TEMA Price 2TEMA Price 3TRIMA Slope 1TRIMA Slope 2TRIMA Slope 3CCI Crossover 1PLUS_DI Threshold 1PLUS_DI Threshold 2RSI Exit OversoldRSI Exit OverboughtBOP Smoothed ThresholdMACD Crossover 1CMO Divergence 1 |
| 29 | 08 Jul | N | DEMA 3KAMA 1KAMA 2KAMA 3KAMA 4MIDPOINT Slope 3T3 Slope 2TRIMA Slope 1TRIMA Slope 2TRIMA Slope 3PLUS_DI Threshold 1PLUS_DI Threshold 2ROCR Threshold 1BOP Smoothed ThresholdStochastic RSI SignalOBV CrossoverDEMA with ATR 3Volume SpikeDonchian ChannelCMO Divergence 1 |
| 30 | 07 Jul | B | KAMA 1KAMA 2KAMA 3KAMA 4T3 Slope 2TRIMA Slope 2TRIMA Slope 3CCI Crossover 1CCI Crossover 3PLUS_DI Threshold 1PLUS_DI Threshold 2RSI Exit OversoldRSI Exit OverboughtSTOCH Normal Zone CrossBBANDS Breakout 2Stochastic RSI Signal |
Previsões de usuários para SETOR DE SAÚDE DO ÍNDICE S&P 500 (E-MINI) (XAV)
Qual é a sua previsão?
In this section, you can easily predict without user registration. See also other users predictions.
