Kostenlose Tschechische Krone/Schwedische Krone (CZKSEK) technische Analyse Signale
Tschechische Krone/Schwedische Krone (CZKSEK) Signal mit technischer Analyse zu 16 Jul
Die 256 Signale wurden in vier verschiedene Strategien unterteilt, die jeweils aus 64 Signalen bestehen. Lassen Sie uns in die Einzelheiten jeder Strategie eintauchen:
Strategie 1:
Kaufsignale:
Verkaufssignale:
Neutrale Signale:
Ergebnis: Diese Strategie führt zu einer Position.
Strategie 2:
Kaufsignale:
Verkaufssignale:
Neutrale Signale:
Ergebnis: Diese Strategie führt zu einer Position.
Strategie 3:
Kaufsignale:
Verkaufssignale:
Neutrale Signale:
Ergebnis: Diese Strategie führt zu einer Position.
Strategie 4:
Kaufsignale:
Verkaufssignale:
Neutrale Signale:
Ergebnis: Diese Strategie führt zu einer Position.
Gesamtstrategie:
Kaufsignale: 3
Verkaufssignale: 11
Neutrale Signale: 85
Ergebnis: Diese Strategie führt zu einer Verkaufen Position.
Haftungsausschluss! Bitte seien Sie vorsichtig und ziehen Sie gründliche Überlegungen in Betracht, bevor Sie finanzielle Entscheidungen treffen. Es ist wichtig zu beachten, dass unsere Signale ausschließlich auf täglichen Preisänderungen basieren und externe Faktoren wie Nachrichten, Marktsentiment oder Unternehmensentwicklungen nicht berücksichtigen. Wir empfehlen dringend, alle relevanten Faktoren zu berücksichtigen und eigene Recherchen durchzuführen.
Nützliche Tipps: Um die bestmöglichen Entscheidungen über Ihre Tschechische Krone/Schwedische Krone (CZKSEK) Investitionen zu treffen, empfehlen wir Ihnen dringend, die "magicalprediction" KI-Modelle Signalseite zu besuchen. Dort finden Sie kostenlose Signale, und wenn eines mit unseren übereinstimmt, ist es wahrscheinlich ein zuverlässiger Indikator, wie wir im Laufe der Zeit beobachtet haben.
Ergebnis: Betrachtet man die technische Analyse für Tschechische Krone/Schwedische Krone (CZKSEK) am , gibt es eine Tendenz zu einem Verkaufssignal basierend auf historischen Daten und Analysen. Es ist jedoch entscheidend, sich daran zu erinnern, dass diese Signale keine Garantien sind. Stellen Sie sicher, dass Sie die allgemeinen Marktbedingungen sorgfältig berücksichtigen und Ihre Entscheidungen mit Ihren spezifischen Anlagezielen abstimmen.
Basierend auf den oben genannten Signalen und Prognosen empfehlen wir die folgenden Strategien:
Tschechische Krone/Schwedische Krone (CZKSEK) Handelsstrategie für Käufer (Long-Positionen): Wenn Sie sich derzeit in einer Kaufposition (Long) befinden, ist es ratsam, den optimalen Zeitpunkt für den Ausstieg aus Ihrer Position basierend auf einer Kombination technischer Signale zu identifizieren. Anleger mit hoher Risikobereitschaft können entscheiden, abzuwarten und die Marktbewegungen in den nächsten Tagen zu beobachten.
Tschechische Krone/Schwedische Krone (CZKSEK) Handelsstrategie für Verkäufer (Short-Positionen): Wenn Sie sich in einer Verkaufsposition (Short) befinden, kann das Halten Ihrer Position die richtige Strategie sein, wie die Konsensmeinung unserer technischen Analyse zeigt. Seien Sie jedoch vorsichtig und überwachen Sie die Marktentwicklungen genau.
Für neue Positionen: Wenn Sie derzeit nicht investiert sind oder erwägen, in eine Verkaufsposition (Short) zu wechseln, wird empfohlen, das potenzielle Abwärtsrisiko von INF% basierend auf dem niedrigsten erwarteten Preisbereich zu bewerten. Stellen Sie sicher, dass dies mit Ihrer Risikobereitschaft und Ihren Zielen übereinstimmt, indem Sie gründliche Recherchen durchführen, bevor Sie eine Short-Position eingehen.
In allen Handelsszenarien ist eine gut definierte Stop-Loss-Strategie entscheidend, um potenzielle Abwärtsrisiken effektiv zu steuern.
Nützlicher Tipp: Für langfristige Prognosen empfehlen wir die Nutzung der "Predict-price" Website, die sowohl kurzfristige als auch langfristige Vorhersagen kostenlos anbietet. Diese Ressource kann die informierte Entscheidungsfindung bezüglich Ihrer **Tschechische Krone/Schwedische Krone (CZKSEK)** Investitionen unterstützen.
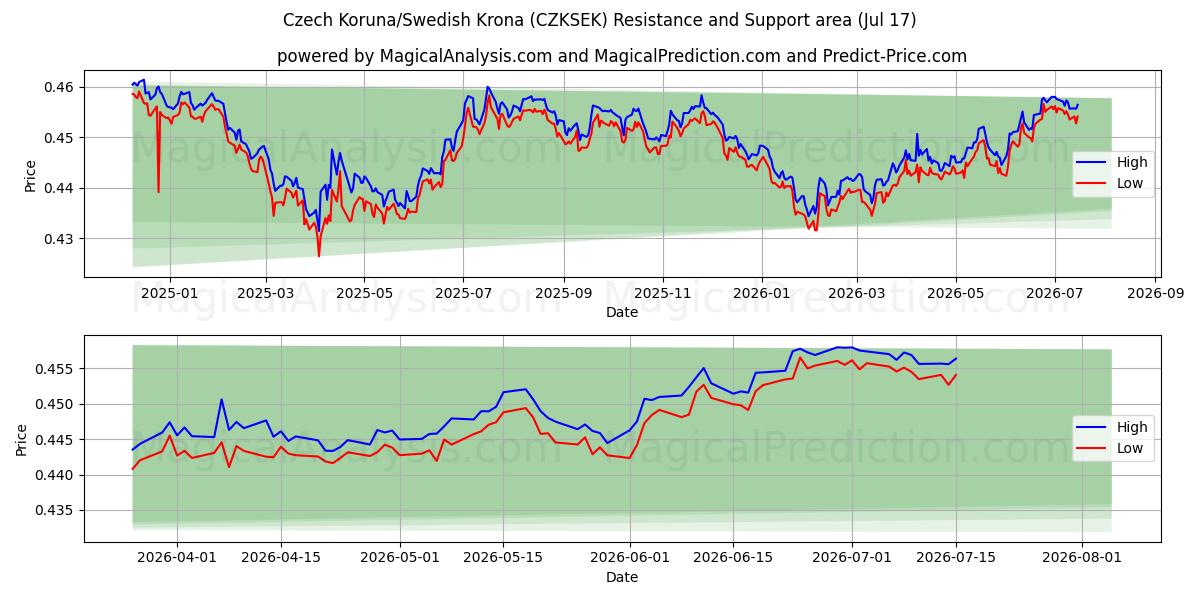
Tschechische Krone/Schwedische Krone (CZKSEK) Preisanalysen und Unterstützungsniveaus:
In unserer aktuellen Tschechische Krone/Schwedische Krone (CZKSEK) Position befinden wir uns in einer Short-Position und erwarten einen potenziellen Abwärtstrend. Es ist entscheidend, die wichtigsten Unterstützungsniveaus zu verstehen, da diese wichtige Bezugspunkte für Händler und Investoren sind, um informierte Entscheidungen zu treffen.Erstes Unterstützungsniveau: 0
Wir überwachen den Preis bei 0, dem ersten Unterstützungsniveau. Wenn der Abwärtstrend anhält und dieses Niveau durchbrochen wird, würde dies starken Verkaufsdruck signalisieren und die Möglichkeit einer weiteren Preisverringerung andeuten.
Diese Unterstützungsniveaus sollten im Kontext der breiteren Marktentwicklungen und Indikatoren sorgfältig berücksichtigt werden. Durch Wachsamkeit und kontinuierliche Marktanalysen können Sie informierte Entscheidungen beim Handel mit Tschechische Krone/Schwedische Krone (CZKSEK) treffen. Wenn Sie diese Unterstützungsniveaus im Hinterkopf behalten, können Sie sich an die dynamische Natur des Marktes anpassen und intelligentere Handelsentscheidungen treffen.
Tschechische Krone/Schwedische Krone (CZKSEK) technisches Analyse-Diagramm
Tschechische Krone/Schwedische Krone (CZKSEK) Unterstützungs- und Widerstandsniveaus
| Name | Level1 | Level2 | Level3 | Level4 | Level5 |
|---|---|---|---|---|---|
| Widerstand | -- | -- | -- | -- | -- |
| Unterstützung | -- | -- | -- | -- | -- |
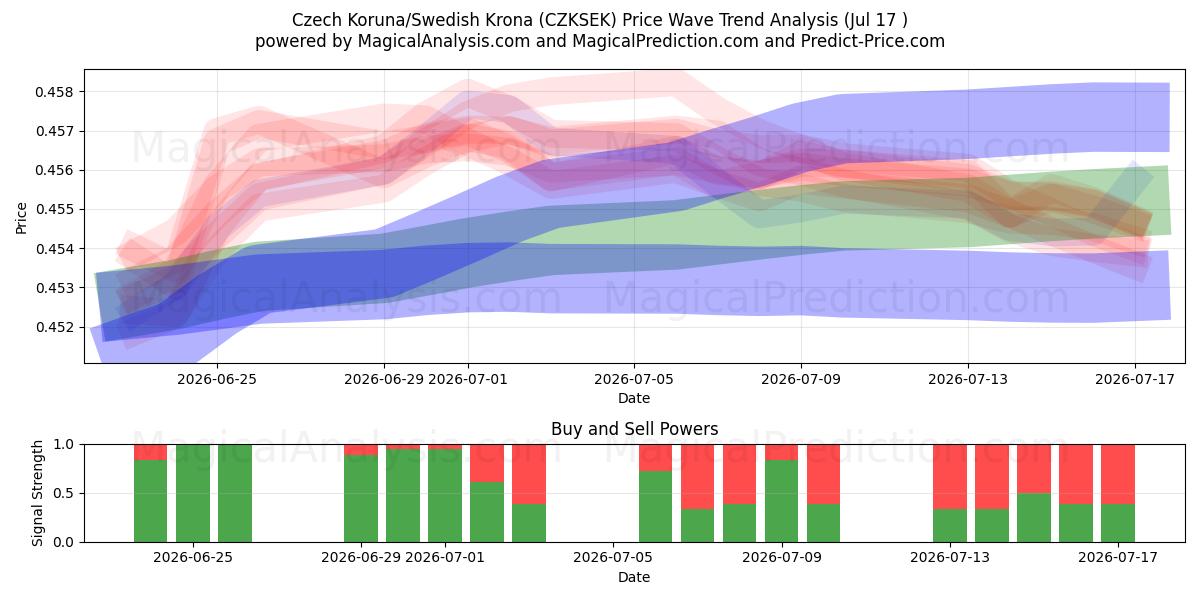
Tschechische Krone/Schwedische Krone (CZKSEK) Signalliste für 16 Jul
| Overall Signals |
|---|
Tschechische Krone/Schwedische Krone (CZKSEK) Kerzenmuster zu 16 Jul
Tschechische Krone/Schwedische Krone (CZKSEK) technische Analyse der letzten Tage
| # | Date | Overal Signals | ALL Signals |
|---|---|---|---|
| 1 | 16 Jul | S | DEMA 2DEMA 3KAMA 3KAMA 4MIDPOINT Slope 2MIDPOINT Slope 4TEMA Price 3TRIMA Slope 1CCI Crossover 1CCI Crossover 3PLUS_DI Threshold 1PLUS_DI Threshold 2BOP Smoothed ThresholdSTOCH Normal Zone CrossBBANDS Breakout 1 |
| 2 | 15 Jul | N | DEMA 3KAMA 2KAMA 3KAMA 4MIDPOINT Slope 1T3 Slope 1TEMA Price 1TEMA Price 2TEMA Price 3TRIMA Slope 1MOM Crossover 2PLUS_DI Threshold 1PLUS_DI Threshold 2ROCR Threshold 4BOP Smoothed ThresholdBBANDS Breakout 1Stochastic RSI SignalEngulfing PatternMorning/Evening Star |
| 3 | 14 Jul | N | DEMA 1DEMA 2DEMA 3KAMA 3KAMA 4EMA Crossover 2WMA Crossover 3MIDPOINT Slope 1MIDPOINT Slope 2T3 Slope 1TEMA Price 2TEMA Price 3TRIMA Slope 1TRIMA Slope 2AROONOSC 2AROONOSC 4PLUS_DI Threshold 1PLUS_DI Threshold 2STOCH Normal Zone CrossBBANDS Breakout 1CMO Divergence 1 |
| 4 | 13 Jul | S | DEMA 1DEMA 2DEMA 3EMA Price Cross 1EMA Price Cross 2KAMA 2KAMA 3KAMA 4WMA Crossover 1MIDPOINT Slope 1MIDPOINT Slope 2T3 Slope 1TEMA Price 1TEMA Price 2TEMA Price 3PLUS_DI Threshold 1PLUS_DI Threshold 2BOP Smoothed ThresholdVortex IndicatorCMO Divergence 1 |
| 5 | 10 Jul | S | DEMA 2DEMA 3EMA Price Cross 4KAMA 1KAMA 2KAMA 3KAMA 4EMA Crossover 1TEMA Price 2TEMA Price 3PLUS_DI Threshold 1PLUS_DI Threshold 2STOCH Normal Zone Cross |
| 6 | 09 Jul | N | EMA Price Cross 4KAMA 1KAMA 2KAMA 3KAMA 4EMA Crossover 1WMA Crossover 1TEMA Price 1TEMA Price 2TEMA Price 3TRIMA Slope 1TRIMA Slope 2TRIMA Slope 3MOM Crossover 1PLUS_DI Threshold 1TRIX Crossover 2Stochastic RSI Signal |
| 7 | 08 Jul | B | EMA Price Cross 1KAMA 2KAMA 3KAMA 4MIDPOINT Slope 3TEMA Price 2TEMA Price 3TRIMA Slope 3AROONOSC 3PLUS_DI Threshold 1PLUS_DI Threshold 2Percentage Price Oscillator |
| 8 | 07 Jul | N | DEMA 2DEMA 3EMA Price Cross 1EMA Price Cross 4KAMA 2KAMA 3KAMA 4EMA Crossover 1WMA Crossover 2TEMA Price 2TEMA Price 3TRIMA Slope 1TRIMA Slope 3PLUS_DI Threshold 1PLUS_DI Threshold 2TRIX Crossover 1MACD Crossover 2CMO Divergence 1 |
| 9 | 06 Jul | S | EMA Price Cross 4KAMA 1KAMA 2KAMA 3KAMA 4TEMA Price 3TRIMA Slope 3AROONOSC 1PLUS_DI Threshold 1ROCR Threshold 3WILLR Exit OverboughtStochastic RSI Signal |
| 10 | 03 Jul | B | DEMA 1DEMA 2EMA Price Cross 4KAMA 2KAMA 3KAMA 4WMA Crossover 1TEMA Price 2TEMA Price 3TRIMA Slope 2TRIMA Slope 3SAR CrossoverCCI Crossover 2BOP Smoothed ThresholdDaily Pivot Point 1CMO Divergence 1 |
| 11 | 02 Jul | S | KAMA 1KAMA 2KAMA 3KAMA 4MIDPOINT Slope 3TEMA Price 2TEMA Price 3TRIMA Slope 2TRIMA Slope 3RSI Exit OversoldMACD Crossover 1CMO Divergence 1 |
| 12 | 01 Jul | N | KAMA 1KAMA 2KAMA 3KAMA 4MIDPOINT Slope 2MIDPOINT Slope 4TRIMA Slope 2TRIMA Slope 3CCI Crossover 1 |
| 13 | 30 Jun | B | KAMA 1KAMA 2KAMA 3KAMA 4MIDPOINT Slope 4TRIMA Slope 1TRIMA Slope 2PLUS_DI Threshold 1ROCR Threshold 2 |
| 14 | 29 Jun | B | KAMA 1KAMA 2KAMA 3KAMA 4MIDPOINT Slope 1T3 Slope 1TRIMA Slope 1TRIMA Slope 2CCI Crossover 3RSI Exit Oversold |
| 15 | 26 Jun | B | DEMA 3KAMA 1KAMA 2KAMA 3KAMA 4T3 Slope 1TEMA Price 3TRIMA Slope 1TRIMA Slope 2Stochastic RSI Signal |
| 16 | 25 Jun | B | DEMA 1DEMA 2DEMA 3KAMA 1KAMA 2KAMA 3KAMA 4MIDPOINT Slope 1MIDPOINT Slope 2MIDPOINT Slope 3MIDPOINT Slope 4T3 Slope 1TEMA Price 1TEMA Price 2TEMA Price 3TRIMA Slope 1PLUS_DI Threshold 1ROCR Threshold 1ROCR Threshold 2WILLR Exit OversoldWILLR Exit OverboughtBOP Smoothed ThresholdHammer / Hanging ManKeltner Channel 1Donchian ChannelCMO Divergence 1 |
| 17 | 24 Jun | B | KAMA 2KAMA 3KAMA 4TRIMA Slope 1AROONOSC 1AROONOSC 3AROONOSC 4PLUS_DI Threshold 1PLUS_DI Threshold 2BOP Smoothed ThresholdStochastic RSI SignalEngulfing Pattern |
| 18 | 23 Jun | B | KAMA 1KAMA 2KAMA 3KAMA 4MIDPOINT Slope 1MIDPOINT Slope 4TEMA Price 3TRIMA Slope 1WILLR Exit OversoldBOP Smoothed ThresholdCMO Divergence 1 |
| 19 | 22 Jun | B | KAMA 1KAMA 2KAMA 3KAMA 4WMA Crossover 2TEMA Price 2TEMA Price 3TRIMA Slope 3AROONOSC 1AROONOSC 3MACD Crossover 1STOCH Normal Zone CrossCMO Divergence 1 |
| 20 | 19 Jun | B | DEMA 1EMA Price Cross 1EMA Price Cross 2EMA Price Cross 4KAMA 1KAMA 2KAMA 3KAMA 4EMA Crossover 1WMA Crossover 1MIDPOINT Slope 1TEMA Price 1TEMA Price 2TEMA Price 3TRIMA Slope 1TRIMA Slope 3ROC Threshold 2ROCR Threshold 4WILLR Exit OverboughtStochastic RSI SignalIchimoku 3CMO Divergence 1 |
| 21 | 18 Jun | B | DEMA 2EMA Price Cross 1EMA Price Cross 2KAMA 3KAMA 4WMA Crossover 2MIDPOINT Slope 1TEMA Price 2TEMA Price 3TRIMA Slope 1TRIMA Slope 2TRIMA Slope 3PLUS_DI Threshold 1PLUS_DI Threshold 2BOP Smoothed ThresholdDaily Pivot Point 1CMO Divergence 1 |
| 22 | 17 Jun | S | KAMA 3KAMA 4EMA Crossover 1MIDPOINT Slope 3TEMA Price 2TEMA Price 3TRIMA Slope 2TRIMA Slope 3MACD Crossover 1Engulfing PatternCMO Divergence 1 |
| 23 | 16 Jun | N | DEMA 1EMA Price Cross 4KAMA 2KAMA 3KAMA 4WMA Crossover 1MIDPOINT Slope 3T3 Slope 2TEMA Price 1TEMA Price 2TEMA Price 3TRIMA Slope 2TRIMA Slope 3BOP Smoothed ThresholdCMO Divergence 1 |
| 24 | 15 Jun | N | KAMA 1KAMA 2KAMA 3KAMA 4T3 Slope 2TEMA Price 2TRIMA Slope 1TRIMA Slope 2TRIMA Slope 3CCI Crossover 1CCI Crossover 2CCI Crossover 3RSI Exit OversoldStochastic RSI SignalIchimoku 1 |
| 25 | 12 Jun | N | DEMA 2DEMA 3KAMA 1KAMA 2KAMA 3KAMA 4MIDPOINT Slope 3MIDPOINT Slope 4T3 Slope 2TEMA Price 3TRIMA Slope 2AROONOSC 4ROC Threshold 1Percentage Price OscillatorDonchian ChannelCMO Divergence 1 |
| 26 | 11 Jun | B | DEMA 2DEMA 3KAMA 1KAMA 2KAMA 3KAMA 4MIDPOINT Slope 2MIDPOINT Slope 3MIDPOINT Slope 4T3 Slope 1T3 Slope 2TEMA Price 2TEMA Price 3TRIMA Slope 2ROCR Threshold 1ROCR Threshold 2ROCR Threshold 3ROCR Threshold 4WILLR Exit OversoldWILLR Exit OverboughtDonchian ChannelCMO Divergence 1Coppock Curve |
| 27 | 10 Jun | B | KAMA 2KAMA 3KAMA 4MIDPOINT Slope 2T3 Slope 1TRIMA Slope 1TRIMA Slope 2CCI Crossover 3RSI Exit OversoldTRIX Crossover 2Stochastic RSI SignalIchimoku 1 |
| 28 | 09 Jun | B | KAMA 2KAMA 3KAMA 4MIDPOINT Slope 1MIDPOINT Slope 2T3 Slope 1TEMA Price 3TRIMA Slope 1TRIMA Slope 2AROONOSC 2CCI Crossover 2MOM Crossover 2TRIX Crossover 1Morning/Evening StarCMO Divergence 1 |
| 29 | 08 Jun | B | DEMA 2DEMA 3KAMA 2KAMA 3KAMA 4WMA Crossover 3MIDPOINT Slope 1T3 Slope 1TEMA Price 2TEMA Price 3TRIMA Slope 1AROONOSC 1AROONOSC 3RSI Exit Oversold |
| 30 | 05 Jun | B | DEMA 1DEMA 2DEMA 3KAMA 1KAMA 2KAMA 3KAMA 4EMA Crossover 2EMA Crossover 3MIDPOINT Slope 1MIDPOINT Slope 2MIDPOINT Slope 3T3 Slope 1TEMA Price 2TEMA Price 3TRIMA Slope 1MOM Crossover 1ROCR Threshold 1WILLR Exit OversoldWILLR Exit OverboughtMACD Crossover 2CMO Divergence 1Schaff Trend Cycle |
Benutzerprognosen für Tschechische Krone/Schwedische Krone (CZKSEK)
Was ist Ihre Vorhersage?
In this section, you can easily predict without user registration. See also other users predictions.
