Kostenlose Far East Group Ltd. (5TJ) technische Analyse Signale
Far East Group Ltd. (5TJ) Signal mit technischer Analyse zu 02 Jul
Die 256 Signale wurden in vier verschiedene Strategien kategorisiert, die jeweils aus 64 Signalen bestehen. Lassen Sie uns in die Details jeder Strategie eintauchen:
Strategie 1:
Kaufsignale:
Verkaufssignale:
Neutrale Signale:
Ergebnis: Diese Strategie führt zu einer Position.
Strategie 2:
Kaufsignale:
Verkaufssignale:
Neutrale Signale:
Ergebnis: Diese Strategie führt zu einer Position.
Strategie 3:
Kaufsignale:
Verkaufssignale:
Neutrale Signale:
Ergebnis: Diese Strategie führt zu einer Position.
Strategie 4:
Kaufsignale:
Verkaufssignale:
Neutrale Signale:
Ergebnis: Diese Strategie führt zu einer Position.
Gesamtstrategie:
Kaufsignale: 7
Verkaufssignale: 4
Neutrale Signale: 88
Ergebnis: Diese Strategie führt zu einer Neutral Position.
Haftungsausschluss! Bitte gehen Sie vorsichtig und gründlich vor, bevor Sie finanzielle Entscheidungen treffen. Es ist wichtig zu beachten, dass unsere Signale ausschließlich auf täglichen Preisänderungen basieren und externe Faktoren wie Nachrichten, Marktsentiment oder Unternehmensentwicklungen nicht berücksichtigen. Wir empfehlen dringend, alle relevanten Faktoren zu berücksichtigen und eigene Recherchen durchzuführen.
Nützliche Tipps: Um die bestinformierten Entscheidungen über Ihre Far East Group Ltd. (5TJ) Investitionen zu treffen, empfehlen wir Ihnen dringend, die Website mit den Signalen der "magicalprediction" KI-Modelle zu besuchen. Dort werden kostenlose Signale angeboten, und wenn eines mit unseren übereinstimmt, ist es wahrscheinlich ein zuverlässiger Indikator, wie wir im Laufe der Zeit beobachtet haben.
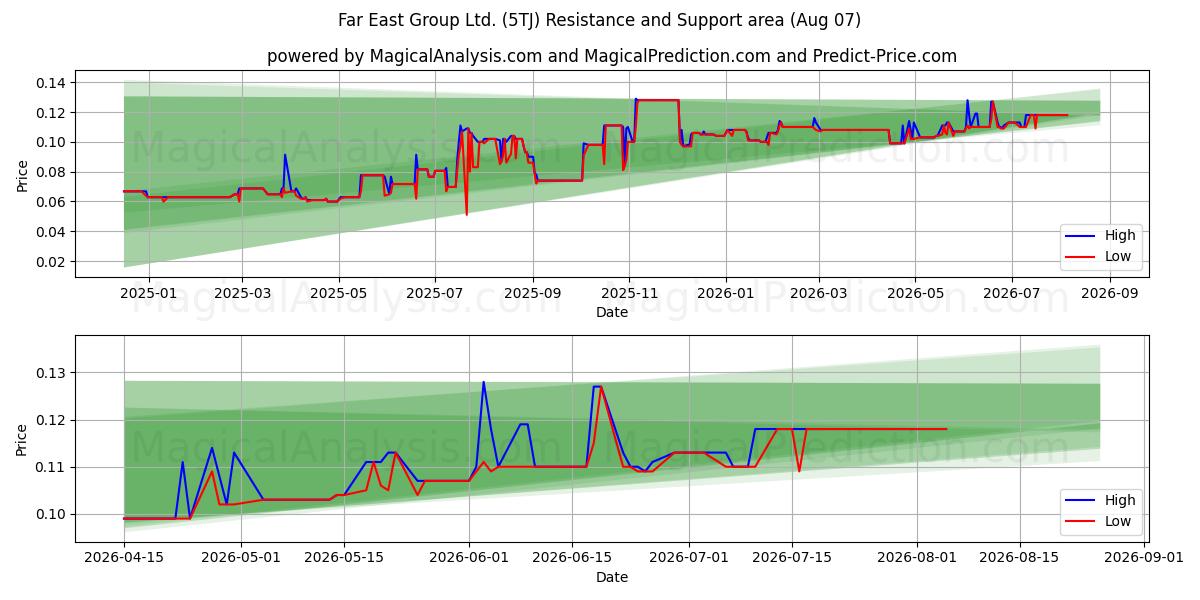
Zweites Unterstützungsniveau: 0.104
Wenn das erste Unterstützungsniveau durchbrochen wird, wird das zweite Unterstützungsniveau bei 0.104 zu einem kritischen Punkt. Ein Bruch dieses Niveaus würde auf eine stärkere Abwärtsbewegung hinweisen, die wahrscheinlich durch Marktsentiment oder externe Faktoren verursacht wird.
Drittes Unterstützungsniveau: 0.099
Wenn das zweite Unterstützungsniveau gebrochen wird und der Preis weiter fällt, signalisiert dies einen signifikanten Marktwandel. Unterhalb von 0.099 zu bleiben, würde einen anhaltenden Abwärtstrend bestätigen, wobei Händler dieses dritte Niveau als nächsten wichtigen Unterstützungsbereich anvisieren würden.
Diese Unterstützungsniveaus sollten im Kontext breiterer Markttrends und -indikatoren sorgfältig berücksichtigt werden. Wachsam zu bleiben und den Markt kontinuierlich zu analysieren, wird es Ihnen ermöglichen, informierte Entscheidungen beim Handel mit Far East Group Ltd. (5TJ) zu treffen. Die Aufmerksamkeit auf diese Unterstützungsniveaus wird Ihnen helfen, sich an die dynamische Natur des Marktes anzupassen und klügere Handelsentscheidungen zu treffen. Zweites Widerstandslevel: 0.129
Wenn der Aufwärtstrend mit signifikanter Stärke anhält, könnten wir sehen, dass Far East Group Ltd. (5TJ) das zweite Widerstandslevel bei 0.129 durchbricht. Dies würde einen großen Aufwärtsmove und eine vielversprechende Richtung für unsere Position anzeigen.
Es ist entscheidend, diese Widerstandslevels genau zu überwachen und sie im Kontext breiterer Markttrends und -indikatoren zu betrachten. Um informierte Entscheidungen beim Handel mit Far East Group Ltd. (5TJ) zu treffen, bleiben Sie wachsam und analysieren Sie den Markt kontinuierlich. Der Fokus auf diese Widerstandslevels, zusammen mit den breiteren Marktdynamiken, wird Ihnen helfen, klügere Handelsentscheidungen zu treffen und sich an die sich ändernden Marktbedingungen anzupassen.
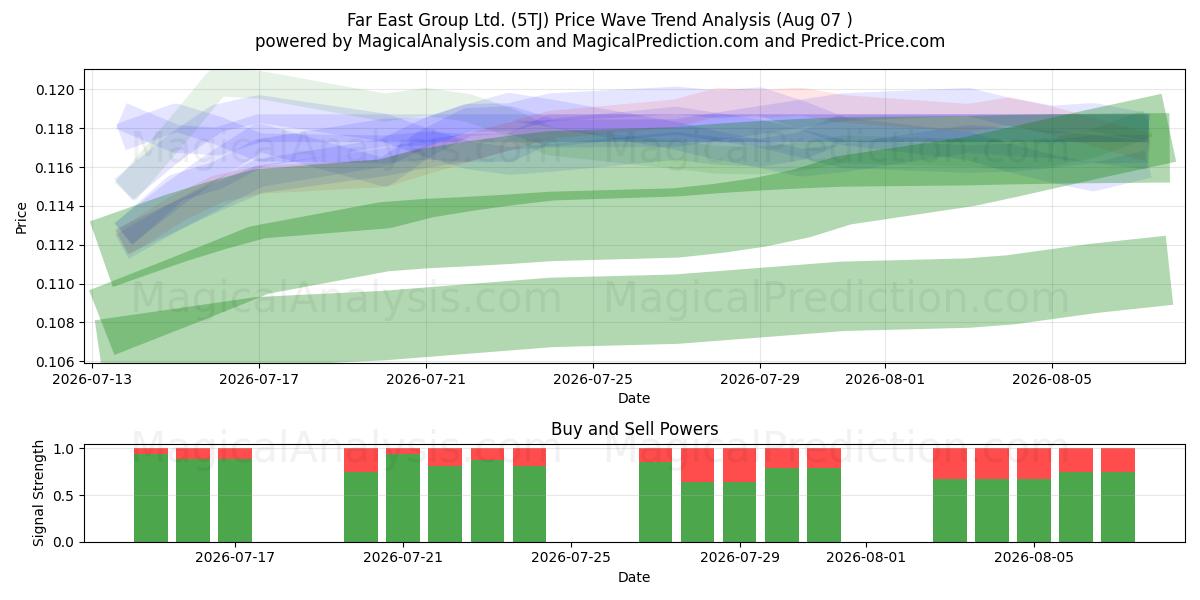
Far East Group Ltd. (5TJ) technisches Analyse-Diagramm
Far East Group Ltd. (5TJ) Unterstützungs- und Widerstandsniveaus
| Name | Level1 | Level2 | Level3 | Level4 | Level5 |
|---|---|---|---|---|---|
| Widerstand | 0.127 | 0.129 | -- | -- | -- |
| Unterstützung | 0.111 | 0.104 | 0.099 | -- | -- |
Far East Group Ltd. (5TJ) Signalliste für 02 Jul
| Overall Signals |
|---|
Far East Group Ltd. (5TJ) Kerzenmuster zu 02 Jul
Far East Group Ltd. (5TJ) technische Analyse der letzten Tage
| # | Date | Overal Signals | ALL Signals |
|---|---|---|---|
| 1 | 02 Jul | N | WMA Crossover 2AROONOSC 1PLUS_DI Threshold 1PLUS_DI Threshold 2ROCR Threshold 4MACD Crossover 1ADXR with DI+/DI-CMO Divergence 1 |
| 2 | 01 Jul | B | EMA Crossover 1PLUS_DI Threshold 1PLUS_DI Threshold 2BOP Smoothed ThresholdADXR with DI+/DI-CMO Divergence 1 |
| 3 | 30 Jun | B | EMA Price Cross 1EMA Price Cross 2EMA Price Cross 3EMA Price Cross 4WMA Crossover 3MIDPOINT Slope 4MOM Crossover 2PLUS_DI Threshold 1PLUS_DI Threshold 2ROC Threshold 1ROC Threshold 2ROCR Threshold 1ROCR Threshold 2ROCR Threshold 3BOP Smoothed ThresholdBBANDS Breakout 1ADXR with DI+/DI-Rolling VWAPCMO Divergence 1 |
| 4 | 29 Jun | B | WMA Crossover 1MIDPOINT Slope 2T3 Slope 1TRIMA Slope 1AROONOSC 2MOM Crossover 1PLUS_DI Threshold 1PLUS_DI Threshold 2ROC Threshold 2ROCR Threshold 3BOP Smoothed ThresholdStochastic RSI SignalDaily Pivot Point 1CMO Divergence 1 |
| 5 | 26 Jun | B | T3 Slope 1TEMA Price 3TRIMA Slope 1AROONOSC 3PLUS_DI Threshold 1PLUS_DI Threshold 2ROCR Threshold 1TRIX Crossover 2BOP Smoothed ThresholdCMO Divergence 1 |
| 6 | 25 Jun | S | EMA Crossover 2WMA Crossover 2MIDPOINT Slope 1TEMA Price 2TEMA Price 3TRIMA Slope 1AROONOSC 1MOM Crossover 1PLUS_DI Threshold 1PLUS_DI Threshold 2TRIX Crossover 1BOP Smoothed ThresholdMACD Crossover 2Volume SpikeDaily Pivot Point 1CMO Divergence 1 |
| 7 | 24 Jun | S | KAMA 1EMA Crossover 1WMA Crossover 1T3 Slope 2TEMA Price 2TEMA Price 3MOM Crossover 2PLUS_DI Threshold 1PLUS_DI Threshold 2ROC Threshold 2ROCR Threshold 3BOP Smoothed ThresholdMACD Crossover 1STOCH Normal Zone CrossCMO Divergence 1 |
| 8 | 23 Jun | S | DEMA 1DEMA 2DEMA 3EMA Price Cross 1EMA Price Cross 2EMA Price Cross 3EMA Price Cross 4KAMA 1T3 Slope 1T3 Slope 2TEMA Price 1TEMA Price 2TEMA Price 3TRIMA Slope 1SAR CrossoverCCI Crossover 1CCI Crossover 2CCI Crossover 3MOM Crossover 1PLUS_DI Threshold 1PLUS_DI Threshold 2ROC Threshold 1ROCR Threshold 2RSI Exit OversoldRSI Exit OverboughtWILLR Exit OversoldWILLR Exit OverboughtBOP Smoothed ThresholdBBANDS Breakout 1BBANDS Breakout 2Stochastic RSI SignalUltimate OscillatorPercentage Price OscillatorMoney Flow IndexOBV CrossoverChaikin AD CrossoverChaikin ADOSC Zero CrossVolume SpikeIchimoku 2Ichimoku 3Rolling VWAPElder's Force IndexCMO Divergence 1CMO Divergence 2 |
| 9 | 22 Jun | S | DEMA 2DEMA 3KAMA 1KAMA 2KAMA 3KAMA 4T3 Slope 1T3 Slope 2TEMA Price 2TEMA Price 3TRIMA Slope 1PLUS_DI Threshold 1PLUS_DI Threshold 2TRIX Crossover 1TRIX Crossover 2BOP Smoothed ThresholdADXR with DI+/DI-CMO Divergence 1 |
| 10 | 19 Jun | B | DEMA 1DEMA 2DEMA 3EMA Price Cross 1EMA Price Cross 2EMA Price Cross 4KAMA 1KAMA 2KAMA 3KAMA 4EMA Crossover 1EMA Crossover 2WMA Crossover 1WMA Crossover 2WMA Crossover 3MIDPOINT Slope 1MIDPOINT Slope 2MIDPOINT Slope 3MIDPOINT Slope 4T3 Slope 1TEMA Price 1TEMA Price 2TEMA Price 3TRIMA Slope 1SAR CrossoverCMO Crossover 1MOM Crossover 1PLUS_DI Threshold 1PLUS_DI Threshold 2ROC Threshold 1ROCR Threshold 1ROCR Threshold 2WILLR Exit OversoldWILLR Exit OverboughtBOP Smoothed ThresholdMACD Crossover 1MACD Crossover 2STOCH Normal Zone CrossBBANDS Breakout 1Stochastic RSI SignalUltimate OscillatorPercentage Price OscillatorChaikin AD CrossoverKeltner Channel 1Ichimoku 1Ichimoku 2Ichimoku 3CMO Divergence 1 |
| 11 | 18 Jun | B | KAMA 4WMA Crossover 3MIDPOINT Slope 4TEMA Price 3MOM Crossover 1PLUS_DI Threshold 1PLUS_DI Threshold 2ROC Threshold 1ROCR Threshold 2ROCR Threshold 4 |
| 12 | 17 Jun | N | KAMA 4TEMA Price 3AROONOSC 1AROONOSC 3PLUS_DI Threshold 1PLUS_DI Threshold 2Ichimoku 1 |
| 13 | 16 Jun | N | KAMA 4EMA Crossover 2MIDPOINT Slope 2MIDPOINT Slope 3TEMA Price 3TRIMA Slope 1AROONOSC 1PLUS_DI Threshold 1PLUS_DI Threshold 2ROCR Threshold 1TRIX Crossover 2Chaikin AD Crossover |
| 14 | 15 Jun | N | KAMA 4MIDPOINT Slope 4TEMA Price 3TRIMA Slope 1SAR CrossoverMOM Crossover 2PLUS_DI Threshold 1PLUS_DI Threshold 2ROC Threshold 2ROCR Threshold 3WILLR Exit OverboughtBBANDS Breakout 1CMO Divergence 1 |
| 15 | 12 Jun | B | KAMA 4WMA Crossover 2MIDPOINT Slope 1TEMA Price 2TEMA Price 3TRIMA Slope 1PLUS_DI Threshold 1PLUS_DI Threshold 2TRIX Crossover 1BOP Smoothed ThresholdMACD Crossover 2CMO Divergence 1 |
| 16 | 11 Jun | S | KAMA 4EMA Crossover 1WMA Crossover 1TEMA Price 2TEMA Price 3MOM Crossover 2PLUS_DI Threshold 1PLUS_DI Threshold 2ROC Threshold 2ROCR Threshold 1ROCR Threshold 3BOP Smoothed ThresholdADXR with DI+/DI-CMO Divergence 1CMO Divergence 2 |
| 17 | 10 Jun | S | DEMA 1DEMA 2EMA Price Cross 1EMA Price Cross 2EMA Price Cross 4KAMA 4T3 Slope 2TEMA Price 1TEMA Price 2TEMA Price 3TRIMA Slope 2CCI Crossover 1CCI Crossover 2CCI Crossover 3PLUS_DI Threshold 1PLUS_DI Threshold 2WILLR Exit OversoldBOP Smoothed ThresholdMACD Crossover 1BBANDS Breakout 2ADXR with DI+/DI-Ichimoku 2Ichimoku 3Daily Pivot Point 1CMO Divergence 1 |
| 18 | 09 Jun | S | DEMA 1DEMA 2DEMA 3EMA Price Cross 4KAMA 1KAMA 2KAMA 3KAMA 4WMA Crossover 1WMA Crossover 5MIDPOINT Slope 2T3 Slope 1T3 Slope 2TEMA Price 1TEMA Price 2TEMA Price 3TRIMA Slope 2MOM Crossover 1MOM Crossover 2PLUS_DI Threshold 1PLUS_DI Threshold 2ROC Threshold 1ROC Threshold 2ROCR Threshold 2ROCR Threshold 3BOP Smoothed ThresholdMACD Crossover 1Stochastic RSI SignalPercentage Price OscillatorADXR with DI+/DI-Keltner Channel 1Ichimoku 2Ichimoku 3Daily Pivot Point 1CMO Divergence 1 |
| 19 | 08 Jun | B | KAMA 1KAMA 3KAMA 4WMA Crossover 1T3 Slope 1TEMA Price 1TEMA Price 2TEMA Price 3TRIMA Slope 1CCI Crossover 2MOM Crossover 2PLUS_DI Threshold 1PLUS_DI Threshold 2BOP Smoothed ThresholdMACD Crossover 1STOCH Normal Zone CrossADXR with DI+/DI- |
| 20 | 05 Jun | N | DEMA 1EMA Price Cross 4KAMA 1KAMA 3KAMA 4MIDPOINT Slope 1T3 Slope 1TEMA Price 1TEMA Price 2TEMA Price 3TRIMA Slope 1CCI Crossover 1CCI Crossover 3MOM Crossover 1PLUS_DI Threshold 1PLUS_DI Threshold 2ROC Threshold 1ROCR Threshold 2RSI Exit OversoldRSI Exit OverboughtBOP Smoothed ThresholdBBANDS Breakout 2Stochastic RSI SignalADXR with DI+/DI-Ichimoku 2Ichimoku 3 |
| 21 | 04 Jun | S | DEMA 1DEMA 2DEMA 3KAMA 1KAMA 2KAMA 3KAMA 4WMA Crossover 2MIDPOINT Slope 1MIDPOINT Slope 2MIDPOINT Slope 3MIDPOINT Slope 4T3 Slope 1TEMA Price 1TEMA Price 2TEMA Price 3TRIMA Slope 1AROONOSC 1AROONOSC 3CMO Crossover 1MOM Crossover 1PLUS_DI Threshold 1PLUS_DI Threshold 2ROC Threshold 1ROCR Threshold 2TRIX Crossover 1BOP Smoothed ThresholdMACD Crossover 1DEMA with ATR 1DEMA with ATR 2DEMA with ATR 3Volume SpikeADXR with DI+/DI-Keltner Channel 1Donchian ChannelIchimoku 3CMO Divergence 1 |
| 22 | 03 Jun | B | EMA Price Cross 1EMA Price Cross 2EMA Price Cross 4KAMA 3KAMA 4EMA Crossover 1EMA Crossover 2WMA Crossover 1MIDPOINT Slope 1MIDPOINT Slope 2TEMA Price 1TEMA Price 2PLUS_DI Threshold 1PLUS_DI Threshold 2ROCR Threshold 1BOP Smoothed ThresholdMACD Crossover 2STOCH Normal Zone CrossStochastic RSI SignalOBV CrossoverDEMA with ATR 1DEMA with ATR 3Volume SpikeIchimoku 3Rolling VWAPElder's Force IndexCMO Divergence 1 |
| 23 | 02 Jun | B | KAMA 4EMA Crossover 2TEMA Price 3TRIMA Slope 2MOM Crossover 1PLUS_DI Threshold 1PLUS_DI Threshold 2ROC Threshold 1ROCR Threshold 2MACD Crossover 2 |
| 24 | 01 Jun | S | KAMA 4MIDPOINT Slope 2MIDPOINT Slope 3TEMA Price 3TRIMA Slope 1PLUS_DI Threshold 1PLUS_DI Threshold 2TRIX Crossover 1Stochastic RSI Signal |
| 25 | 29 May | N | KAMA 4TEMA Price 2TEMA Price 3TRIMA Slope 1PLUS_DI Threshold 1PLUS_DI Threshold 2ROCR Threshold 1BOP Smoothed ThresholdCMO Divergence 1 |
| 26 | 28 May | N | KAMA 4WMA Crossover 2MIDPOINT Slope 1TEMA Price 2TEMA Price 3TRIMA Slope 1TRIMA Slope 3PLUS_DI Threshold 1PLUS_DI Threshold 2ROCR Threshold 4BOP Smoothed ThresholdCMO Divergence 1 |
| 27 | 27 May | N | KAMA 4EMA Crossover 1WMA Crossover 1TEMA Price 2TEMA Price 3TRIMA Slope 3PLUS_DI Threshold 1PLUS_DI Threshold 2ROCR Threshold 4BOP Smoothed ThresholdSTOCH Normal Zone Cross |
| 28 | 26 May | N | DEMA 1DEMA 2EMA Price Cross 1EMA Price Cross 2EMA Price Cross 4KAMA 2KAMA 4MIDPOINT Slope 4T3 Slope 2TEMA Price 1TEMA Price 2TEMA Price 3TRIMA Slope 2CCI Crossover 1CCI Crossover 2CCI Crossover 3PLUS_DI Threshold 1PLUS_DI Threshold 2ROCR Threshold 1RSI Exit OversoldBOP Smoothed ThresholdMACD Crossover 1BBANDS Breakout 2Ultimate OscillatorMoney Flow IndexOBV CrossoverVolume SpikeRolling VWAPElder's Force IndexCMO Divergence 1CMO Divergence 2 |
| 29 | 25 May | S | DEMA 3KAMA 1KAMA 2KAMA 3KAMA 4T3 Slope 1T3 Slope 2TEMA Price 3TRIMA Slope 2PLUS_DI Threshold 1PLUS_DI Threshold 2BOP Smoothed ThresholdCMO Divergence 1 |
| 30 | 22 May | B | DEMA 1DEMA 2DEMA 3EMA Price Cross 4KAMA 1KAMA 2KAMA 3KAMA 4EMA Crossover 4MIDPOINT Slope 4T3 Slope 1T3 Slope 2TEMA Price 1TEMA Price 2TEMA Price 3TRIMA Slope 1TRIMA Slope 2AROONOSC 2AROONOSC 4PLUS_DI Threshold 1PLUS_DI Threshold 2WILLR Exit OversoldWILLR Exit OverboughtBOP Smoothed ThresholdStochastic RSI SignalChaikin ADOSC Zero CrossEngulfing PatternDEMA with ATR 1DEMA with ATR 2DEMA with ATR 3Volume SpikeKeltner Channel 1Ichimoku 2Ichimoku 3Daily Pivot Point 1Rolling VWAPCMO Divergence 1 |
Benutzerprognosen für Far East Group Ltd. (5TJ)
Was ist Ihre Vorhersage?
In this section, you can easily predict without user registration. See also other users predictions.