Signaux techniques gratuits Seanergy Maritime Holdings Corp. (SHIP)
Signal Seanergy Maritime Holdings Corp. (SHIP) avec analyse technique sur 06 Aug
Les 256 signaux ont été classés en quatre stratégies distinctes, chacune composée de 64 signaux. Plongeons dans les détails de chaque stratégie :
Stratégie 1 :
Signaux d'Achat :
Signaux de Vente :
Signaux Neutres :
Résultat : Cette stratégie mène à une position .
Stratégie 2 :
Signaux d'Achat :
Signaux de Vente :
Signaux Neutres :
Résultat : Cette stratégie mène à une position .
Stratégie 3 :
Signaux d'Achat :
Signaux de Vente :
Signaux Neutres :
Résultat : Cette stratégie mène à une position .
Stratégie 4 :
Signaux d'Achat :
Signaux de Vente :
Signaux Neutres :
Résultat : Cette stratégie mène à une position .
Stratégie Globale :
Signaux d'Achat : 8
Signaux de Vente : 5
Signaux Neutres : 86
Résultat : Cette stratégie mène à une position Neutre.
Avertissement ! Veuillez faire preuve de prudence et de réflexion avant de prendre des décisions financières. Il est important de noter que nos signaux sont basés uniquement sur les variations quotidiennes des prix et ne prennent pas en compte les facteurs externes tels que les nouvelles, le sentiment du marché ou les développements des entreprises. Nous vous recommandons fortement de considérer tous les facteurs pertinents et de mener vos propres recherches.
Conseils utiles : Pour prendre les décisions les plus éclairées concernant vos investissements dans Seanergy Maritime Holdings Corp. (SHIP), nous vous recommandons vivement de visiter le site des modèles d'IA de "magicalprediction". Ils fournissent des signaux gratuits, et si l'un d'eux correspond au nôtre, il est probablement un indicateur fiable, comme nous l'avons observé au fil du temps.
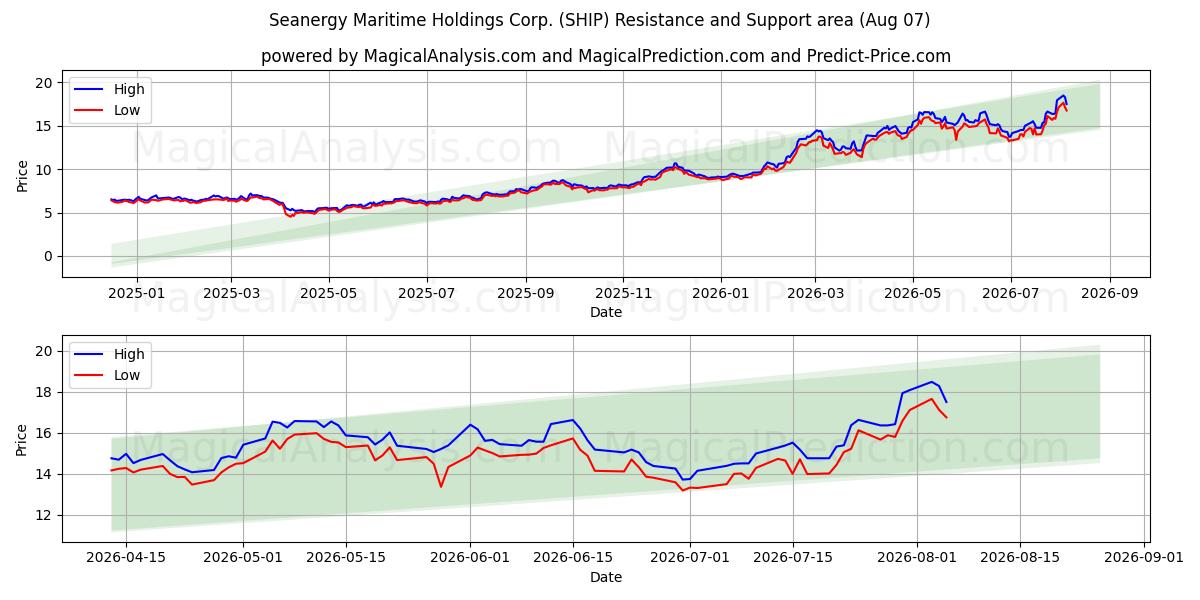
Deuxième Niveau de Support : 13.368
Si le premier niveau de support est franchi, le deuxième niveau de support à 13.368 devient un point critique. Briser ce niveau indiquerait une tendance baissière plus forte, probablement poussée par le sentiment du marché ou des facteurs externes.
Troisième Niveau de Support : 11.387
Si le deuxième niveau de support est rompu et que le prix continue de baisser, cela signale un changement significatif du marché. Rester en dessous de 11.387 confirmerait une tendance baissière persistante, avec des traders probablement ciblant ce troisième niveau comme le prochain point clé de support.
Ces niveaux de support doivent être considérés attentivement dans le contexte des tendances et des indicateurs du marché. Rester attentif et analyser continuellement le marché vous permettra de prendre des décisions éclairées lorsque vous tradez Seanergy Maritime Holdings Corp. (SHIP). Prêter attention à ces niveaux de support vous aidera à vous adapter à la nature dynamique du marché et à faire des choix de trading plus judicieux. Il est crucial de surveiller de près ces niveaux de résistance et de les considérer dans le contexte des tendances et des indicateurs du marché. Pour prendre des décisions éclairées lorsque vous tradez Seanergy Maritime Holdings Corp. (SHIP), restez vigilant et analysez continuellement le marché. En vous concentrant sur ces niveaux de résistance, ainsi que sur les dynamiques plus larges du marché, vous prendrez des décisions de trading plus intelligentes et vous vous adapterez aux conditions changeantes du marché.
Graphique d'analyse technique Seanergy Maritime Holdings Corp. (SHIP)
Niveaux de support et de résistance Seanergy Maritime Holdings Corp. (SHIP)
| Nom | Level1 | Level2 | Level3 | Level4 | Level5 |
|---|---|---|---|---|---|
| Résistance | -- | -- | -- | -- | -- |
| Support | 16.622 | 13.368 | 11.387 | -- | -- |
Liste des signaux Seanergy Maritime Holdings Corp. (SHIP) pour 06 Aug
| Overall Signals |
|---|
Modèles de chandeliers Seanergy Maritime Holdings Corp. (SHIP) sur 06 Aug
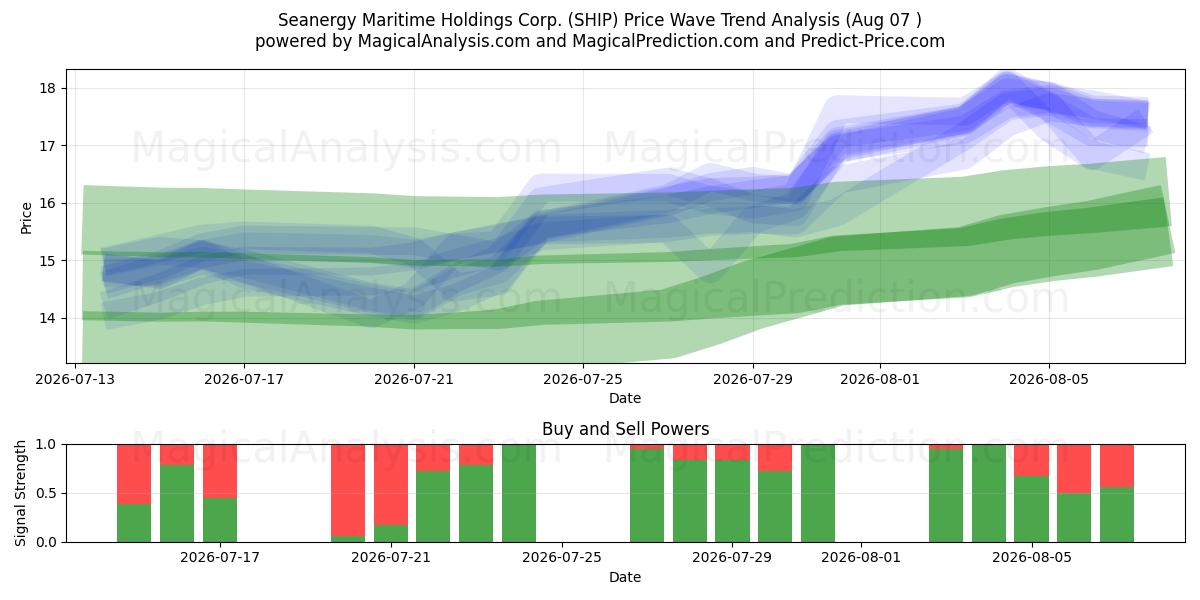
Analyse technique Seanergy Maritime Holdings Corp. (SHIP) au cours des derniers jours
| # | Date | Overal Signals | ALL Signals |
|---|---|---|---|
| 1 | 06 Aug | N | DEMA 1DEMA 2KAMA 3KAMA 4WMA Crossover 1MIDPOINT Slope 3TEMA Price 1TEMA Price 2TEMA Price 3TRIMA Slope 2TRIMA Slope 3SAR CrossoverCCI Crossover 1CCI Crossover 2PLUS_DI Threshold 1PLUS_DI Threshold 2BOP Smoothed ThresholdMACD Crossover 1Chaikin AD CrossoverDaily Pivot Point 1CMO Divergence 1 |
| 2 | 05 Aug | S | DEMA 1EMA Price Cross 4KAMA 2KAMA 3KAMA 4TEMA Price 1TEMA Price 2TEMA Price 3TRIMA Slope 1TRIMA Slope 2TRIMA Slope 3CCI Crossover 3PLUS_DI Threshold 1PLUS_DI Threshold 2RSI Exit OversoldRSI Exit OverboughtBOP Smoothed ThresholdSTOCH Normal Zone CrossBBANDS Breakout 2Stochastic RSI SignalEngulfing PatternVolume SpikeDaily Pivot Point 1 |
| 3 | 04 Aug | S | DEMA 2DEMA 3KAMA 1KAMA 2KAMA 3KAMA 4MIDPOINT Slope 1MIDPOINT Slope 3T3 Slope 1TEMA Price 3TRIMA Slope 1TRIMA Slope 2TRIMA Slope 3CMO Crossover 1PLUS_DI Threshold 1PLUS_DI Threshold 2BOP Smoothed ThresholdDEMA with ATR 3Volume SpikeDonchian ChannelDaily Pivot Point 1CMO Divergence 1 |
| 4 | 03 Aug | B | DEMA 3KAMA 1KAMA 2KAMA 3KAMA 4MIDPOINT Slope 4TEMA Price 3TRIMA Slope 1TRIMA Slope 2TRIMA Slope 3PLUS_DI Threshold 1PLUS_DI Threshold 2RSI Exit OverboughtStochastic RSI SignalDEMA with ATR 3Volume SpikeSchaff Trend Cycle |
| 5 | 31 Jul | B | DEMA 1DEMA 2DEMA 3KAMA 1KAMA 2KAMA 3KAMA 4WMA Crossover 1MIDPOINT Slope 1MIDPOINT Slope 2MIDPOINT Slope 3MIDPOINT Slope 4T3 Slope 2TEMA Price 1TEMA Price 2TEMA Price 3TRIMA Slope 2CMO Crossover 1PLUS_DI Threshold 1PLUS_DI Threshold 2WILLR Exit OversoldWILLR Exit OverboughtBOP Smoothed ThresholdSTOCH Normal Zone CrossStochastic RSI SignalDEMA with ATR 1DEMA with ATR 2DEMA with ATR 3Volume SpikeKeltner Channel 1Donchian ChannelCMO Divergence 1 |
| 6 | 30 Jul | B | KAMA 2KAMA 3KAMA 4WMA Crossover 1MIDPOINT Slope 2TEMA Price 2TRIMA Slope 2CCI Crossover 1 |
| 7 | 29 Jul | N | DEMA 3KAMA 2KAMA 3KAMA 4T3 Slope 1T3 Slope 2TEMA Price 2TRIMA Slope 1TRIMA Slope 2CCI Crossover 3BOP Smoothed Threshold |
| 8 | 28 Jul | B | DEMA 3KAMA 2KAMA 3KAMA 4MIDPOINT Slope 1MIDPOINT Slope 2T3 Slope 1T3 Slope 2TEMA Price 3TRIMA Slope 1TRIMA Slope 2BOP Smoothed ThresholdStochastic RSI Signal |
| 9 | 27 Jul | B | DEMA 2DEMA 3KAMA 1KAMA 2KAMA 3KAMA 4WMA Crossover 4MIDPOINT Slope 2T3 Slope 1T3 Slope 2TEMA Price 3TRIMA Slope 1PLUS_DI Threshold 1RSI Exit OversoldBOP Smoothed ThresholdBBANDS Breakout 2 |
| 10 | 24 Jul | B | DEMA 1DEMA 2DEMA 3KAMA 1KAMA 2KAMA 3KAMA 4MIDPOINT Slope 1MIDPOINT Slope 2MIDPOINT Slope 3MIDPOINT Slope 4T3 Slope 1TEMA Price 1TEMA Price 2TEMA Price 3TRIMA Slope 1AROONOSC 1AROONOSC 3PLUS_DI Threshold 1ROCR Threshold 1BOP Smoothed ThresholdDEMA with ATR 2DEMA with ATR 3Keltner Channel 1Donchian ChannelIchimoku 1Daily Pivot Point 1Vortex IndicatorCMO Divergence 1 |
| 11 | 23 Jul | B | DEMA 3KAMA 1KAMA 2KAMA 3KAMA 4WMA Crossover 2MIDPOINT Slope 1TEMA Price 2TEMA Price 3TRIMA Slope 1TRIMA Slope 3PLUS_DI Threshold 1PLUS_DI Threshold 2BOP Smoothed ThresholdSTOCH Normal Zone CrossChaikin ADOSC Zero CrossCMO Divergence 1 |
| 12 | 22 Jul | B | DEMA 1DEMA 2DEMA 3EMA Price Cross 1EMA Price Cross 2EMA Price Cross 3EMA Price Cross 4KAMA 1KAMA 2KAMA 3KAMA 4EMA Crossover 1EMA Crossover 2EMA Crossover 3EMA Crossover 4WMA Crossover 1MIDPOINT Slope 1TEMA Price 1TEMA Price 2TEMA Price 3TRIMA Slope 1TRIMA Slope 3PLUS_DI Threshold 1PLUS_DI Threshold 2ROC Threshold 1ROCR Threshold 1ROCR Threshold 4WILLR Exit OversoldWILLR Exit OverboughtBOP Smoothed ThresholdMACD Crossover 1OBV CrossoverChaikin AD CrossoverIchimoku 2Ichimoku 3Daily Pivot Point 1CMO Divergence 1 |
| 13 | 21 Jul | B | KAMA 4EMA Crossover 2MIDPOINT Slope 1TEMA Price 2TRIMA Slope 1TRIMA Slope 3PLUS_DI Threshold 1PLUS_DI Threshold 2ROC Threshold 2ROCR Threshold 3BOP Smoothed ThresholdBBANDS Breakout 1Stochastic RSI SignalRolling VWAPElder's Force Index |
| 14 | 20 Jul | N | DEMA 1DEMA 2DEMA 3EMA Price Cross 1EMA Price Cross 2EMA Price Cross 3KAMA 1KAMA 2KAMA 3KAMA 4EMA Crossover 1EMA Crossover 3EMA Crossover 4WMA Crossover 1WMA Crossover 2MIDPOINT Slope 1MIDPOINT Slope 2MIDPOINT Slope 3T3 Slope 2TEMA Price 1TEMA Price 2TEMA Price 3TRIMA Slope 2TRIMA Slope 3PLUS_DI Threshold 1PLUS_DI Threshold 2ROCR Threshold 1BOP Smoothed ThresholdMACD Crossover 1BBANDS Breakout 1Chaikin AD CrossoverChaikin ADOSC Zero CrossIchimoku 3Rolling VWAPElder's Force IndexCMO Divergence 1 |
| 15 | 17 Jul | S | DEMA 1EMA Price Cross 4KAMA 1EMA Crossover 4MIDPOINT Slope 2MIDPOINT Slope 4T3 Slope 2TEMA Price 1TEMA Price 2TEMA Price 3TRIMA Slope 2TRIMA Slope 3CCI Crossover 1PLUS_DI Threshold 1PLUS_DI Threshold 2BOP Smoothed ThresholdStochastic RSI SignalOBV CrossoverChaikin ADOSC Zero CrossIchimoku 2CMO Divergence 1Coppock Curve |
| 16 | 16 Jul | S | DEMA 2DEMA 3KAMA 1KAMA 2EMA Crossover 3MIDPOINT Slope 3MIDPOINT Slope 4TEMA Price 3TRIMA Slope 1TRIMA Slope 2CCI Crossover 3MOM Crossover 2PLUS_DI Threshold 1PLUS_DI Threshold 2ROC Threshold 2ROCR Threshold 3WILLR Exit OversoldWILLR Exit OverboughtBOP Smoothed ThresholdOBV CrossoverChaikin AD CrossoverEngulfing PatternDEMA with ATR 3Volume SpikeIchimoku 2Ichimoku 3Vortex IndicatorCMO Divergence 1 |
| 17 | 15 Jul | B | KAMA 1MIDPOINT Slope 1MIDPOINT Slope 4T3 Slope 1TEMA Price 3TRIMA Slope 1TRIMA Slope 2PLUS_DI Threshold 1PLUS_DI Threshold 2ROCR Threshold 3BOP Smoothed ThresholdPercentage Price OscillatorCMO Divergence 2 |
| 18 | 14 Jul | B | KAMA 1WMA Crossover 3T3 Slope 1TEMA Price 3TRIMA Slope 1TRIMA Slope 2AROONOSC 2AROONOSC 4MOM Crossover 2PLUS_DI Threshold 2TRIX Crossover 2Stochastic RSI SignalChaikin AD CrossoverDEMA with ATR 3Ichimoku 2Vortex Indicator |
| 19 | 13 Jul | B | DEMA 1DEMA 2DEMA 3EMA Price Cross 3KAMA 1KAMA 2EMA Crossover 2MIDPOINT Slope 1MIDPOINT Slope 2MIDPOINT Slope 3T3 Slope 1TEMA Price 2TEMA Price 3TRIMA Slope 1TRIMA Slope 2MOM Crossover 1MOM Crossover 2PLUS_DI Threshold 1PLUS_DI Threshold 2ROC Threshold 1ROC Threshold 2ROCR Threshold 2ROCR Threshold 3TRIX Crossover 1WILLR Exit OversoldWILLR Exit OverboughtBOP Smoothed ThresholdBBANDS Breakout 1Chaikin AD CrossoverIchimoku 2Ichimoku 3Daily Pivot Point 1Rolling VWAPElder's Force IndexCMO Divergence 1 |
| 20 | 10 Jul | B | EMA Price Cross 3KAMA 4TEMA Price 1TEMA Price 3TRIMA Slope 1TRIMA Slope 3SAR CrossoverPLUS_DI Threshold 1PLUS_DI Threshold 2BOP Smoothed ThresholdMACD Crossover 2Ichimoku 3Elder's Force Index |
| 21 | 09 Jul | S | DEMA 1DEMA 2EMA Price Cross 3MIDPOINT Slope 1MIDPOINT Slope 3TEMA Price 2TEMA Price 3TRIMA Slope 1TRIMA Slope 3AROONOSC 1AROONOSC 3PLUS_DI Threshold 1PLUS_DI Threshold 2BOP Smoothed ThresholdDaily Pivot Point 1Elder's Force IndexCMO Divergence 1 |
| 22 | 08 Jul | B | DEMA 1DEMA 2KAMA 4WMA Crossover 2TEMA Price 2TEMA Price 3TRIMA Slope 1TRIMA Slope 2TRIMA Slope 3PLUS_DI Threshold 1PLUS_DI Threshold 2ROC Threshold 1BOP Smoothed Threshold |
| 23 | 07 Jul | N | DEMA 1DEMA 2EMA Price Cross 1EMA Price Cross 2EMA Price Cross 4KAMA 1KAMA 4EMA Crossover 1WMA Crossover 1MIDPOINT Slope 1TEMA Price 1TEMA Price 2TEMA Price 3TRIMA Slope 2TRIMA Slope 3CCI Crossover 2PLUS_DI Threshold 1PLUS_DI Threshold 2ROCR Threshold 1RSI Exit OversoldBOP Smoothed ThresholdMACD Crossover 1Ultimate OscillatorDaily Pivot Point 1CMO Divergence 1 |
| 24 | 06 Jul | B | DEMA 3KAMA 2KAMA 3KAMA 4T3 Slope 2TEMA Price 2TRIMA Slope 1TRIMA Slope 2TRIMA Slope 3CCI Crossover 1PLUS_DI Threshold 1PLUS_DI Threshold 2BOP Smoothed ThresholdStochastic RSI Signal |
| 25 | 02 Jul | S | DEMA 3KAMA 1KAMA 2KAMA 3KAMA 4EMA Crossover 4MIDPOINT Slope 3T3 Slope 2TEMA Price 3TRIMA Slope 1TRIMA Slope 2TRIMA Slope 3CCI Crossover 3PLUS_DI Threshold 1PLUS_DI Threshold 2BOP Smoothed ThresholdBBANDS Breakout 2CMO Divergence 1 |
| 26 | 01 Jul | S | DEMA 2DEMA 3KAMA 1KAMA 2KAMA 3KAMA 4MIDPOINT Slope 2MIDPOINT Slope 3MIDPOINT Slope 4T3 Slope 2TEMA Price 3TRIMA Slope 1TRIMA Slope 2TRIMA Slope 3PLUS_DI Threshold 1PLUS_DI Threshold 2BOP Smoothed ThresholdVolume SpikeDonchian ChannelCMO Divergence 1 |
| 27 | 30 Jun | S | DEMA 2DEMA 3KAMA 1KAMA 2KAMA 3KAMA 4MIDPOINT Slope 1MIDPOINT Slope 3MIDPOINT Slope 4T3 Slope 1T3 Slope 2TEMA Price 3TRIMA Slope 1TRIMA Slope 2PLUS_DI Threshold 1PLUS_DI Threshold 2ROCR Threshold 4BOP Smoothed ThresholdDonchian ChannelIchimoku 1Daily Pivot Point 1CMO Divergence 1 |
| 28 | 29 Jun | S | DEMA 3KAMA 1KAMA 2KAMA 3KAMA 4MIDPOINT Slope 1MIDPOINT Slope 4T3 Slope 1T3 Slope 2TEMA Price 3TRIMA Slope 1TRIMA Slope 2AROONOSC 4PLUS_DI Threshold 1PLUS_DI Threshold 2BOP Smoothed ThresholdCMO Divergence 1 |
| 29 | 26 Jun | S | DEMA 2DEMA 3KAMA 1KAMA 2KAMA 3KAMA 4MIDPOINT Slope 3T3 Slope 1T3 Slope 2TEMA Price 2TEMA Price 3TRIMA Slope 2AROONOSC 2PLUS_DI Threshold 1PLUS_DI Threshold 2BOP Smoothed ThresholdSTOCH Normal Zone CrossPercentage Price OscillatorDaily Pivot Point 1CMO Divergence 1CMO Divergence 2 |
| 30 | 25 Jun | S | DEMA 3KAMA 1KAMA 2KAMA 3KAMA 4MIDPOINT Slope 2T3 Slope 1T3 Slope 2TEMA Price 2TEMA Price 3TRIMA Slope 2PLUS_DI Threshold 1PLUS_DI Threshold 2ROC Threshold 1ROCR Threshold 4WILLR Exit OversoldWILLR Exit OverboughtBOP Smoothed ThresholdChaikin AD CrossoverIchimoku 2Ichimoku 3Daily Pivot Point 1 |
Prévisions des utilisateurs pour Seanergy Maritime Holdings Corp. (SHIP)
Quelle est votre prédiction ?
In this section, you can easily predict without user registration. See also other users predictions.
