無料カナダドルとアラブ首長国連邦ディルハム (CADAED(Forex))テクニカル分析シグナル
全体シグナル
売却
最終更新 / 期間
24 Aug / 日次
カテゴリー/通貨
外国為替/AED
取引所/国
FX/--
カナダドルとアラブ首長国連邦ディルハム (CADAED(Forex))シグナルのテクニカル分析24 Aug
24 Augに、カナダドルとアラブ首長国連邦ディルハム (CADAED(Forex))の包括的なテクニカル分析を行い、256の詳細なシグナルを考慮しました。以下は主要な発見です:8シグナルは購入戦略を示唆し、17は売却戦略を示しました。残りの74シグナルは中立で、特定の方向性を提供しませんでした。
256のシグナルは、各64シグナルから成る4つの異なる戦略に分類されました。それぞれの戦略の詳細を見ていきましょう:
戦略1:
購入シグナル:
売却シグナル:
中立シグナル:
結果: この戦略はのポジションに導きます。
戦略2:
購入シグナル:
売却シグナル:
中立シグナル:
結果: この戦略はのポジションに導きます。
戦略3:
購入シグナル:
売却シグナル:
中立シグナル:
結果: この戦略はのポジションに導きます。
戦略4:
購入シグナル:
売却シグナル:
中立シグナル:
結果: この戦略はのポジションに導きます。
全体の戦略:
購入シグナル: 8
売却シグナル: 17
中立シグナル: 74
結果: この戦略は売却のポジションに導きます。
結果: におけるカナダドルとアラブ首長国連邦ディルハム (CADAED(Forex))のテクニカル分析を見ると、歴史的データと分析に基づいて売却シグナルへの傾向が見られます。しかし、これらのシグナルは保証ではないことを忘れないでください。全体の市場状況を注意深く考慮し、特定の投資目標に沿った決定を下してください。
上記のシグナルと予測に基づいて、以下の戦略をお勧めします:
カナダドルとアラブ首長国連邦ディルハム (CADAED(Forex)) 購入ポジション(ロングポジション)のための取引戦略: 現在購入(ロング)ポジションにいる場合、技術的シグナルの組み合わせに基づいてポジションを退出する最適なタイミングを特定することが推奨されます。高リスク耐性のある方は、次の数日間の市場の動きを観察することを選択するかもしれません。
カナダドルとアラブ首長国連邦ディルハム (CADAED(Forex)) 売却ポジション(ショートポジション)のための取引戦略: 売却(ショート)ポジションにいる場合、私たちのテクニカル分析の合意によるとポジションを保持することが正しい戦略かもしれません。ただし、注意を怠らず、市場の動向を綿密に監視してください。
新しいポジションの場合: 現在投資していないか、売却(ショート)ポジションへの切り替えを考えている場合、最低期待価格範囲に基づいて17.44%の潜在的な下落リスクを評価することをお勧めします。この判断がリスク耐性や目標に合致しているかどうか、十分に調査した上でショートポジションに入る前に確認してください。
すべての取引シナリオにおいて、明確なストップロス戦略は潜在的な下落リスクを効果的に管理するために重要です。
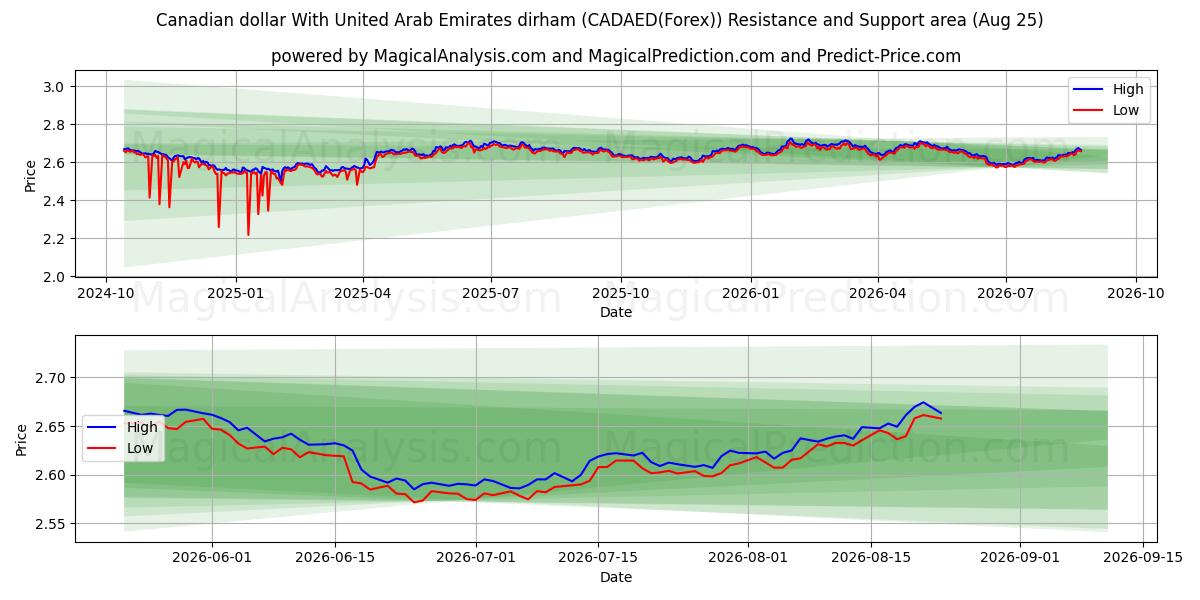
第一サポートレベル: 2.379
価格が2.379であることを注意深く監視しています。この第一サポートレベルを下回ると、強い売り圧力を示し、さらなる価格の下落が予想されます。
第二サポートレベル: 2.259
第一サポートレベルが破られた場合、2.259にある第二サポートレベルが重要になります。ここを下回ると、より強い下落モメンタムが示され、市場の感情や外部要因によって駆動される可能性があります。
第三サポートレベル: 2.217
第二サポートレベルが破られ、価格がさらに下落を続ける場合、市場における重要な変化を示します。2.217を下回ると、持続的な下落トレンドが確認され、トレーダーはこの第三レベルを次のサポートポイントとしてターゲットにする可能性が高いです。
これらのサポートレベルは、より広範な市場のトレンドや指標の文脈の中で注意深く考慮する必要があります。市場を常に注視し、継続的に分析することで、カナダドルとアラブ首長国連邦ディルハム (CADAED(Forex))の取引において情報に基づいた意思決定を行うことができます。これらのサポートレベルを念頭に置くことで、市場の動的な性質に適応し、より賢い取引選択を行うことができます。
256のシグナルは、各64シグナルから成る4つの異なる戦略に分類されました。それぞれの戦略の詳細を見ていきましょう:
戦略1:
購入シグナル:
売却シグナル:
中立シグナル:
結果: この戦略はのポジションに導きます。
戦略2:
購入シグナル:
売却シグナル:
中立シグナル:
結果: この戦略はのポジションに導きます。
戦略3:
購入シグナル:
売却シグナル:
中立シグナル:
結果: この戦略はのポジションに導きます。
戦略4:
購入シグナル:
売却シグナル:
中立シグナル:
結果: この戦略はのポジションに導きます。
全体の戦略:
購入シグナル: 8
売却シグナル: 17
中立シグナル: 74
結果: この戦略は売却のポジションに導きます。
免責事項! 財務決定を下す前に注意深く考慮してください。私たちのシグナルは日々の価格変動に基づいており、ニュースや市場の感情、企業の動向などの外部要因は考慮されていないことに注意してください。関連するすべての要因を考慮し、自分自身の調査を行うことを強く推奨します。
役立つヒント: カナダドルとアラブ首長国連邦ディルハム (CADAED(Forex))への投資について最も情報に基づいた決定を下すために、「magicalprediction」AIモデルのシグナルウェブサイトを訪れることを強く推奨します。無料のシグナルを提供しており、私たちのシグナルと一致する場合、信頼できる指標である可能性が高いと観察しています。
結果: におけるカナダドルとアラブ首長国連邦ディルハム (CADAED(Forex))のテクニカル分析を見ると、歴史的データと分析に基づいて売却シグナルへの傾向が見られます。しかし、これらのシグナルは保証ではないことを忘れないでください。全体の市場状況を注意深く考慮し、特定の投資目標に沿った決定を下してください。
上記のシグナルと予測に基づいて、以下の戦略をお勧めします:
カナダドルとアラブ首長国連邦ディルハム (CADAED(Forex)) 購入ポジション(ロングポジション)のための取引戦略: 現在購入(ロング)ポジションにいる場合、技術的シグナルの組み合わせに基づいてポジションを退出する最適なタイミングを特定することが推奨されます。高リスク耐性のある方は、次の数日間の市場の動きを観察することを選択するかもしれません。
カナダドルとアラブ首長国連邦ディルハム (CADAED(Forex)) 売却ポジション(ショートポジション)のための取引戦略: 売却(ショート)ポジションにいる場合、私たちのテクニカル分析の合意によるとポジションを保持することが正しい戦略かもしれません。ただし、注意を怠らず、市場の動向を綿密に監視してください。
新しいポジションの場合: 現在投資していないか、売却(ショート)ポジションへの切り替えを考えている場合、最低期待価格範囲に基づいて17.44%の潜在的な下落リスクを評価することをお勧めします。この判断がリスク耐性や目標に合致しているかどうか、十分に調査した上でショートポジションに入る前に確認してください。
すべての取引シナリオにおいて、明確なストップロス戦略は潜在的な下落リスクを効果的に管理するために重要です。
役立つヒント: 長期予測には、「Predict-price」ウェブサイトを使用することをお勧めします。短期および長期の予測を無償で提供しており、あなたの**カナダドルとアラブ首長国連邦ディルハム (CADAED(Forex))**への投資に関する情報に基づいた意思決定を支援します。
カナダドルとアラブ首長国連邦ディルハム (CADAED(Forex))の価格分析とサポートレベル:
現在のカナダドルとアラブ首長国連邦ディルハム (CADAED(Forex))ポジションでは、ショートポジションにあり、潜在的な下落トレンドを予測しています。主要なサポートレベルを理解することは重要で、これらはトレーダーや投資家が情報に基づいた決定を下すための重要な参照ポイントとなります。第一サポートレベル: 2.379
価格が2.379であることを注意深く監視しています。この第一サポートレベルを下回ると、強い売り圧力を示し、さらなる価格の下落が予想されます。
第二サポートレベル: 2.259
第一サポートレベルが破られた場合、2.259にある第二サポートレベルが重要になります。ここを下回ると、より強い下落モメンタムが示され、市場の感情や外部要因によって駆動される可能性があります。
第三サポートレベル: 2.217
第二サポートレベルが破られ、価格がさらに下落を続ける場合、市場における重要な変化を示します。2.217を下回ると、持続的な下落トレンドが確認され、トレーダーはこの第三レベルを次のサポートポイントとしてターゲットにする可能性が高いです。
これらのサポートレベルは、より広範な市場のトレンドや指標の文脈の中で注意深く考慮する必要があります。市場を常に注視し、継続的に分析することで、カナダドルとアラブ首長国連邦ディルハム (CADAED(Forex))の取引において情報に基づいた意思決定を行うことができます。これらのサポートレベルを念頭に置くことで、市場の動的な性質に適応し、より賢い取引選択を行うことができます。
カナダドルとアラブ首長国連邦ディルハム (CADAED(Forex))テクニカル分析チャート
カナダドルとアラブ首長国連邦ディルハム (CADAED(Forex))支持と抵抗レベル
| 名前 | Level1 | Level2 | Level3 | Level4 | Level5 |
|---|---|---|---|---|---|
| 抵抗 | -- | -- | -- | -- | -- |
| 支持 | 2.379 | 2.259 | 2.217 | -- | -- |
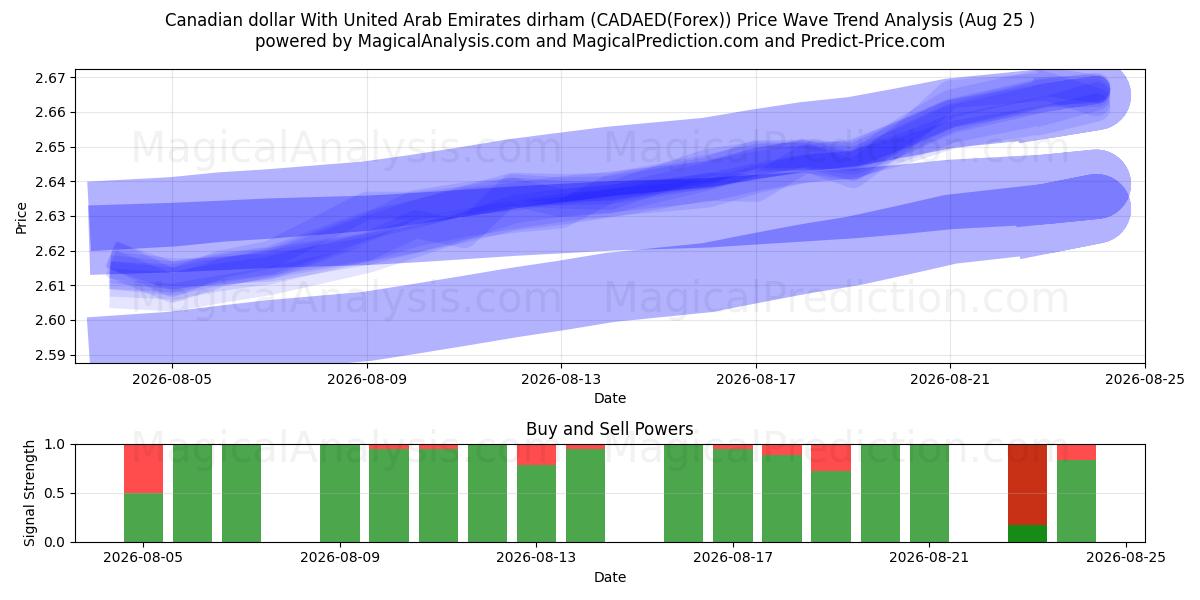
カナダドルとアラブ首長国連邦ディルハム (CADAED(Forex))に対する24 Augシグナルリスト
| Overall Signals |
|---|
カナダドルとアラブ首長国連邦ディルハム (CADAED(Forex))の24 Augローソク足パターン
Today's カナダドルとアラブ首長国連邦ディルハム (CADAED(Forex)) Candle Patterns List:
Engulfing Pattern
過去数日のカナダドルとアラブ首長国連邦ディルハム (CADAED(Forex))テクニカル分析
| # | Date | Overal Signals | ALL Signals |
|---|---|---|---|
| 1 | 24 Aug | S | DEMA 1KAMA 2KAMA 3KAMA 4TEMA Price 2TRIMA Slope 1TRIMA Slope 2TRIMA Slope 3CCI Crossover 3PLUS_DI Threshold 1PLUS_DI Threshold 2BOP Smoothed ThresholdBBANDS Breakout 2Stochastic RSI SignalADXR with DI+/DI- |
| 2 | 23 Aug | B | DEMA 2DEMA 3KAMA 1KAMA 2KAMA 3KAMA 4MIDPOINT Slope 1T3 Slope 1TEMA Price 3TRIMA Slope 1TRIMA Slope 2TRIMA Slope 3CMO Crossover 2PLUS_DI Threshold 1PLUS_DI Threshold 2BOP Smoothed ThresholdDEMA with ATR 3ADXR with DI+/DI-CMO Divergence 1 |
| 3 | 21 Aug | B | DEMA 1DEMA 2DEMA 3KAMA 1KAMA 2KAMA 3KAMA 4MIDPOINT Slope 4TEMA Price 2TEMA Price 3TRIMA Slope 1TRIMA Slope 2TRIMA Slope 3PLUS_DI Threshold 1PLUS_DI Threshold 2ROC Threshold 2ROCR Threshold 2BOP Smoothed ThresholdSTOCH Normal Zone CrossDEMA with ATR 3ADXR with DI+/DI-Donchian ChannelCMO Divergence 1 |
| 4 | 20 Aug | B | DEMA 1DEMA 2DEMA 3EMA Price Cross 4KAMA 1KAMA 2KAMA 3KAMA 4WMA Crossover 1MIDPOINT Slope 1MIDPOINT Slope 2MIDPOINT Slope 3MIDPOINT Slope 4TEMA Price 1TEMA Price 2TEMA Price 3TRIMA Slope 1TRIMA Slope 2TRIMA Slope 3CMO Crossover 1PLUS_DI Threshold 1PLUS_DI Threshold 2ROCR Threshold 3WILLR Exit OversoldWILLR Exit OverboughtBOP Smoothed ThresholdMACD Crossover 1Stochastic RSI SignalDEMA with ATR 3Keltner Channel 1Donchian ChannelDaily Pivot Point 1CMO Divergence 1 |
| 5 | 19 Aug | B | DEMA 1DEMA 2EMA Price Cross 4KAMA 2KAMA 3KAMA 4WMA Crossover 1MIDPOINT Slope 3TEMA Price 1TEMA Price 2TEMA Price 3TRIMA Slope 1TRIMA Slope 2TRIMA Slope 3CCI Crossover 1CCI Crossover 2PLUS_DI Threshold 1PLUS_DI Threshold 2RSI Exit OversoldRSI Exit OverboughtMACD Crossover 1STOCH Normal Zone CrossStochastic RSI SignalDaily Pivot Point 1CMO Divergence 1 |
| 6 | 18 Aug | S | DEMA 3KAMA 1KAMA 2KAMA 3KAMA 4MIDPOINT Slope 1TRIMA Slope 1TRIMA Slope 2TRIMA Slope 3CCI Crossover 3PLUS_DI Threshold 1PLUS_DI Threshold 2BOP Smoothed ThresholdADXR with DI+/DI-CMO Divergence 1 |
| 7 | 17 Aug | B | DEMA 3KAMA 1KAMA 2KAMA 3KAMA 4MIDPOINT Slope 3TRIMA Slope 1TRIMA Slope 2TRIMA Slope 3PLUS_DI Threshold 1PLUS_DI Threshold 2BOP Smoothed ThresholdSTOCH Normal Zone CrossUltimate OscillatorADXR with DI+/DI-CMO Divergence 1 |
| 8 | 16 Aug | B | DEMA 1DEMA 2DEMA 3KAMA 1KAMA 2KAMA 3KAMA 4MIDPOINT Slope 2MIDPOINT Slope 3MIDPOINT Slope 4TEMA Price 3TRIMA Slope 2TRIMA Slope 3CMO Crossover 1PLUS_DI Threshold 1PLUS_DI Threshold 2ROCR Threshold 2BOP Smoothed ThresholdADXR with DI+/DI-Keltner Channel 1Donchian ChannelDaily Pivot Point 1CMO Divergence 1 |
| 9 | 14 Aug | B | KAMA 1KAMA 2KAMA 3KAMA 4TRIMA Slope 2TRIMA Slope 3CCI Crossover 1ROCR Threshold 4BOP Smoothed ThresholdStochastic RSI SignalHammer / Hanging Man |
| 10 | 13 Aug | B | KAMA 2KAMA 3KAMA 4MIDPOINT Slope 2T3 Slope 2TEMA Price 2TRIMA Slope 1TRIMA Slope 2TRIMA Slope 3CCI Crossover 3PLUS_DI Threshold 1RSI Exit OversoldStochastic RSI SignalADXR with DI+/DI-CMO Divergence 1 |
| 11 | 12 Aug | B | DEMA 3KAMA 1KAMA 2KAMA 3KAMA 4T3 Slope 1T3 Slope 2TRIMA Slope 1TRIMA Slope 2AROONOSC 3PLUS_DI Threshold 1BOP Smoothed ThresholdDonchian ChannelCMO Divergence 1 |
| 12 | 11 Aug | B | DEMA 3KAMA 1KAMA 2KAMA 3KAMA 4MIDPOINT Slope 1MIDPOINT Slope 2T3 Slope 1T3 Slope 2TEMA Price 3TRIMA Slope 1TRIMA Slope 2TRIMA Slope 3PLUS_DI Threshold 1ROCR Threshold 3BOP Smoothed ThresholdPercentage Price OscillatorOBV CrossoverDaily Pivot Point 1CMO Divergence 1CMO Divergence 2 |
| 13 | 10 Aug | B | DEMA 3KAMA 1KAMA 2KAMA 3KAMA 4EMA Crossover 4MIDPOINT Slope 3T3 Slope 1T3 Slope 2TEMA Price 3TRIMA Slope 1TRIMA Slope 3BOP Smoothed ThresholdBBANDS Breakout 2 |
| 14 | 09 Aug | B | DEMA 1DEMA 2DEMA 3KAMA 1KAMA 2KAMA 3KAMA 4MIDPOINT Slope 1MIDPOINT Slope 2MIDPOINT Slope 3MIDPOINT Slope 4T3 Slope 2TEMA Price 1TEMA Price 2TEMA Price 3TRIMA Slope 1TRIMA Slope 3PLUS_DI Threshold 1ROCR Threshold 2ROCR Threshold 3BOP Smoothed ThresholdDonchian ChannelDaily Pivot Point 1CMO Divergence 1 |
| 15 | 07 Aug | B | KAMA 1KAMA 2KAMA 3KAMA 4WMA Crossover 1TRIMA Slope 3AROONOSC 1AROONOSC 2AROONOSC 3AROONOSC 4PLUS_DI Threshold 2BOP Smoothed ThresholdSTOCH Normal Zone Cross |
| 16 | 06 Aug | B | DEMA 3EMA Price Cross 1EMA Price Cross 2EMA Price Cross 4KAMA 1KAMA 2KAMA 3KAMA 4EMA Crossover 1MIDPOINT Slope 4T3 Slope 2TEMA Price 1TEMA Price 2TRIMA Slope 1TRIMA Slope 2MOM Crossover 2PLUS_DI Threshold 1PLUS_DI Threshold 2ROCR Threshold 4WILLR Exit OversoldWILLR Exit OverboughtBOP Smoothed ThresholdMACD Crossover 1BBANDS Breakout 1Stochastic RSI SignalChaikin AD CrossoverDaily Pivot Point 1Vortex IndicatorElder's Force IndexCMO Divergence 1 |
| 17 | 05 Aug | B | DEMA 1DEMA 2EMA Price Cross 1EMA Price Cross 2KAMA 4EMA Crossover 1T3 Slope 2TEMA Price 2TEMA Price 3TRIMA Slope 2PLUS_DI Threshold 1PLUS_DI Threshold 2BOP Smoothed ThresholdMACD Crossover 1BBANDS Breakout 1Chaikin AD CrossoverVortex IndicatorElder's Force IndexCMO Divergence 1 |
| 18 | 04 Aug | S | DEMA 1EMA Price Cross 4KAMA 3KAMA 4WMA Crossover 1MIDPOINT Slope 2T3 Slope 1T3 Slope 2TEMA Price 1TEMA Price 2TEMA Price 3TRIMA Slope 2CCI Crossover 1CCI Crossover 2MOM Crossover 2PLUS_DI Threshold 1PLUS_DI Threshold 2BOP Smoothed ThresholdSTOCH Normal Zone CrossStochastic RSI SignalOBV CrossoverDaily Pivot Point 1CMO Divergence 1 |
| 19 | 03 Aug | S | DEMA 3KAMA 2KAMA 3KAMA 4MIDPOINT Slope 2T3 Slope 1T3 Slope 2TRIMA Slope 1TRIMA Slope 2PLUS_DI Threshold 2TRIX Crossover 1WILLR Exit OversoldWILLR Exit OverboughtBOP Smoothed Threshold |
| 20 | 02 Aug | B | DEMA 3KAMA 2KAMA 3KAMA 4MIDPOINT Slope 1T3 Slope 1TRIMA Slope 1CCI Crossover 1PLUS_DI Threshold 2RSI Exit OversoldBOP Smoothed Threshold |
| 21 | 31 Jul | B | DEMA 1DEMA 2DEMA 3KAMA 1KAMA 2KAMA 3KAMA 4WMA Crossover 3MIDPOINT Slope 1MIDPOINT Slope 2MIDPOINT Slope 4T3 Slope 1TEMA Price 1TEMA Price 2TEMA Price 3TRIMA Slope 1AROONOSC 4MOM Crossover 1PLUS_DI Threshold 2WILLR Exit OversoldWILLR Exit OverboughtBOP Smoothed ThresholdChaikin AD CrossoverChaikin ADOSC Zero CrossIchimoku 3CMO Divergence 1 |
| 22 | 30 Jul | B | DEMA 1DEMA 2DEMA 3EMA Price Cross 1EMA Price Cross 2EMA Price Cross 3EMA Price Cross 4KAMA 1KAMA 2KAMA 3KAMA 4EMA Crossover 1EMA Crossover 2WMA Crossover 1WMA Crossover 2MIDPOINT Slope 1MIDPOINT Slope 2TEMA Price 1TEMA Price 2TEMA Price 3SAR CrossoverPLUS_DI Threshold 2ROCR Threshold 4BOP Smoothed ThresholdMACD Crossover 1STOCH Normal Zone CrossPercentage Price OscillatorDaily Pivot Point 1Vortex IndicatorElder's Force IndexCMO Divergence 1CMO Divergence 2 |
| 23 | 29 Jul | B | KAMA 2KAMA 4WMA Crossover 3TEMA Price 3TRIMA Slope 2PLUS_DI Threshold 1PLUS_DI Threshold 2BOP Smoothed ThresholdBBANDS Breakout 1Stochastic RSI SignalRolling VWAP |
| 24 | 28 Jul | N | DEMA 1DEMA 2EMA Price Cross 1EMA Price Cross 2EMA Price Cross 3KAMA 1KAMA 2EMA Crossover 2WMA Crossover 1MIDPOINT Slope 1MIDPOINT Slope 4T3 Slope 1TEMA Price 2TEMA Price 3TRIMA Slope 2PLUS_DI Threshold 1PLUS_DI Threshold 2TRIX Crossover 1WILLR Exit OversoldBOP Smoothed ThresholdBBANDS Breakout 1Stochastic RSI SignalEngulfing PatternIchimoku 3Daily Pivot Point 1Rolling VWAPVortex IndicatorElder's Force IndexCMO Divergence 1 |
| 25 | 27 Jul | S | EMA Price Cross 1EMA Price Cross 2KAMA 4TEMA Price 3TRIMA Slope 2MOM Crossover 1PLUS_DI Threshold 1PLUS_DI Threshold 2BOP Smoothed Threshold |
| 26 | 26 Jul | N | EMA Price Cross 1EMA Price Cross 2KAMA 4WMA Crossover 1MIDPOINT Slope 2MIDPOINT Slope 3TEMA Price 2TEMA Price 3TRIMA Slope 1TRIMA Slope 3AROONOSC 1AROONOSC 3PLUS_DI Threshold 1PLUS_DI Threshold 2Stochastic RSI SignalChaikin ADOSC Zero Cross |
| 27 | 24 Jul | S | EMA Price Cross 1KAMA 4TEMA Price 2TEMA Price 3TRIMA Slope 1TRIMA Slope 3ADX +DI/-DI CrossoverPLUS_DI Threshold 1PLUS_DI Threshold 2Vortex Indicator |
| 28 | 23 Jul | N | EMA Price Cross 2EMA Price Cross 3KAMA 4WMA Crossover 2MIDPOINT Slope 1TEMA Price 2TEMA Price 3TRIMA Slope 1TRIMA Slope 3PLUS_DI Threshold 1PLUS_DI Threshold 2BOP Smoothed Threshold |
| 29 | 22 Jul | N | DEMA 1DEMA 2EMA Price Cross 1EMA Price Cross 2EMA Price Cross 3KAMA 1KAMA 2KAMA 4EMA Crossover 1WMA Crossover 4TEMA Price 2TEMA Price 3TRIMA Slope 2TRIMA Slope 3SAR CrossoverCCI Crossover 2ADX +DI/-DI CrossoverPLUS_DI Threshold 1PLUS_DI Threshold 2BOP Smoothed ThresholdMACD Crossover 1Chaikin AD CrossoverVortex IndicatorCMO Divergence 1 |
| 30 | 21 Jul | S | DEMA 1DEMA 2EMA Price Cross 4KAMA 1KAMA 3KAMA 4WMA Crossover 1TEMA Price 1TEMA Price 2TEMA Price 3TRIMA Slope 2TRIMA Slope 3CCI Crossover 1PLUS_DI Threshold 1PLUS_DI Threshold 2RSI Exit OversoldBOP Smoothed ThresholdStochastic RSI SignalEngulfing PatternDaily Pivot Point 1CMO Divergence 1 |
ユーザーの予測カナダドルとアラブ首長国連邦ディルハム (CADAED(Forex))
あなたの予測は何ですか?
In this section, you can easily predict without user registration. See also other users predictions.
あなたの予測は何ですか?
カナダドルとアラブ首長国連邦ディルハム (CADAED(Forex)) predictions by visitors
メールアドレスを入力してください
テキストを入力してください
キャプチャを入力してください
