Ücretsiz Yeni Tayvan Doları/Yeni Zelanda Doları (TWDNZD) Teknik Analiz Sinyalleri
Yeni Tayvan Doları/Yeni Zelanda Doları (TWDNZD) sinyali 12 Aug üzerindeki teknik analiz ile
256 sinyal, her biri 64 sinyalden oluşan dört farklı stratejiye kategorize edildi. Her stratejinin detaylarına bakalım:
Strateji 1:
Alım Sinyalleri:
Satım Sinyalleri:
Nötr Sinyaller:
Sonuç: Bu strateji, pozisyonuna yol açar.
Strateji 2:
Alım Sinyalleri:
Satım Sinyalleri:
Nötr Sinyaller:
Sonuç: Bu strateji, pozisyonuna yol açar.
Strateji 3:
Alım Sinyalleri:
Satım Sinyalleri:
Nötr Sinyaller:
Sonuç: Bu strateji, pozisyonuna yol açar.
Strateji 4:
Alım Sinyalleri:
Satım Sinyalleri:
Nötr Sinyaller:
Sonuç: Bu strateji, pozisyonuna yol açar.
Genel Strateji:
Alım Sinyalleri: 6
Satım Sinyalleri: 6
Nötr Sinyaller: 87
Sonuç: Bu strateji, Nötr pozisyonuna yol açar.
Açıklama! Herhangi bir finansal karar almadan önce dikkatli ve kapsamlı bir değerlendirme yapmanızı önemle tavsiye ederiz. Sinyallerimizin yalnızca günlük fiyat değişimlerine dayandığını ve haberler, piyasa hissiyatı veya şirket gelişmeleri gibi dış faktörleri dikkate almadığını unutmayın. Tüm ilgili faktörleri göz önünde bulundurarak kendi araştırmanızı yapmanızı şiddetle öneririz.
Faydalı İpuçları: Yeni Tayvan Doları/Yeni Zelanda Doları (TWDNZD) yatırımlarınız hakkında en bilinçli kararları vermek için "magicalprediction" AI model sinyalleri web sitesini ziyaret etmenizi şiddetle öneriyoruz. Ücretsiz sinyaller sunuyorlar ve eğer bir sinyal bizimle örtüşüyorsa, bu büyük olasılıkla güvenilir bir gösterge olacaktır, zamanla gözlemlerimiz bunu göstermiştir.
İkinci Destek Seviyesi: 0.0503
Eğer birinci destek seviyesi aşılırsa, 0.0503'deki ikinci destek seviyesi kritik bir nokta haline gelir. Bu seviyenin kırılması, piyasa hissiyatı veya dış faktörler tarafından yönlendirilen daha güçlü bir aşağı yönlü ivmeyi gösterecektir.
Bu destek seviyeleri, daha geniş piyasa trendleri ve göstergeleri bağlamında dikkatlice değerlendirilmelidir. Piyasa analizlerinizi sürekli olarak yaparak Yeni Tayvan Doları/Yeni Zelanda Doları (TWDNZD) ticaretinde bilinçli kararlar alabilirsiniz. Bu destek seviyelerine dikkat etmek, piyasanın dinamik doğasına uyum sağlamanıza ve daha akıllı ticaret seçimleri yapmanıza yardımcı olacaktır. Bu direnç seviyelerini dikkatle izlemek ve daha geniş piyasa trendleri ve göstergeleri bağlamında değerlendirmek çok önemlidir. Yeni Tayvan Doları/Yeni Zelanda Doları (TWDNZD) ticaretinde bilinçli kararlar almak için dikkatli olun ve piyasa analizlerinizi sürekli olarak yapın. Bu direnç seviyelerine ve daha geniş piyasa dinamiklerine odaklanmak, daha akıllı ticaret kararları almanıza ve değişen piyasa koşullarına uyum sağlamanıza yardımcı olacaktır.
Yeni Tayvan Doları/Yeni Zelanda Doları (TWDNZD) teknik analiz grafiği
Yeni Tayvan Doları/Yeni Zelanda Doları (TWDNZD) destek ve direnç seviyeleri
| İsim | Level1 | Level2 | Level3 | Level4 | Level5 |
|---|---|---|---|---|---|
| Direnç | -- | -- | -- | -- | -- |
| Destek | 0.0511 | 0.0503 | -- | -- | -- |
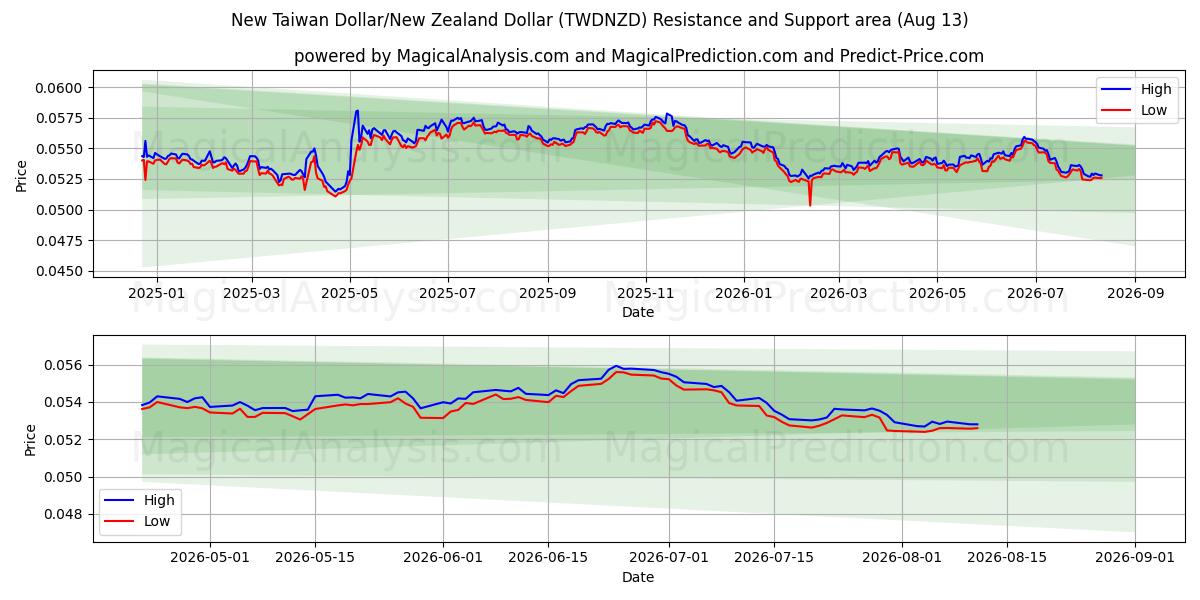
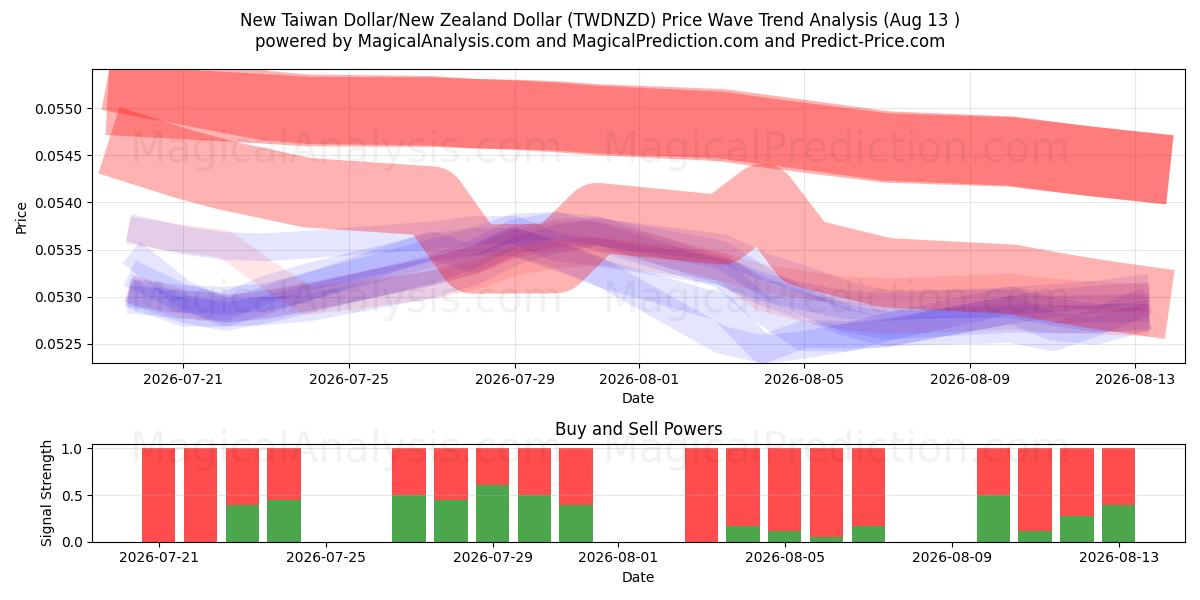
Yeni Tayvan Doları/Yeni Zelanda Doları (TWDNZD) için 12 Aug sinyalleri listesi
| Overall Signals |
|---|
Yeni Tayvan Doları/Yeni Zelanda Doları (TWDNZD)'deki 12 Aug mum çubuğu modelleri
Son günlerde Yeni Tayvan Doları/Yeni Zelanda Doları (TWDNZD) teknik analizi
| # | Date | Overal Signals | ALL Signals |
|---|---|---|---|
| 1 | 12 Aug | N | KAMA 3KAMA 4WMA Crossover 2MIDPOINT Slope 3TEMA Price 3TRIMA Slope 3AROONOSC 1PLUS_DI Threshold 1PLUS_DI Threshold 2MACD Crossover 2 |
| 2 | 11 Aug | N | EMA Price Cross 1EMA Price Cross 4KAMA 3KAMA 4EMA Crossover 1TEMA Price 3TRIMA Slope 2TRIMA Slope 3PLUS_DI Threshold 1PLUS_DI Threshold 2Stochastic RSI SignalADXR with DI+/DI- |
| 3 | 10 Aug | S | DEMA 1DEMA 2EMA Price Cross 1EMA Price Cross 4KAMA 4EMA Crossover 1TEMA Price 2TEMA Price 3TRIMA Slope 2PLUS_DI Threshold 1PLUS_DI Threshold 2ROCR Threshold 2TRIX Crossover 1MACD Crossover 1ADXR with DI+/DI-CMO Divergence 1 |
| 4 | 07 Aug | B | KAMA 3KAMA 4WMA Crossover 1MIDPOINT Slope 2MIDPOINT Slope 4T3 Slope 1TEMA Price 3TRIMA Slope 2PLUS_DI Threshold 1PLUS_DI Threshold 2RSI Exit OversoldStochastic RSI SignalADXR with DI+/DI-CMO Divergence 1 |
| 5 | 06 Aug | S | KAMA 2KAMA 3KAMA 4MIDPOINT Slope 4T3 Slope 1TRIMA Slope 1TRIMA Slope 2CCI Crossover 1CCI Crossover 2CCI Crossover 3PLUS_DI Threshold 1PLUS_DI Threshold 2ROCR Threshold 2TRIX Crossover 1ADXR with DI+/DI- |
| 6 | 05 Aug | S | KAMA 2KAMA 3KAMA 4MIDPOINT Slope 1MIDPOINT Slope 2T3 Slope 1TRIMA Slope 1PLUS_DI Threshold 1PLUS_DI Threshold 2Percentage Price OscillatorADXR with DI+/DI- |
| 7 | 04 Aug | S | DEMA 3KAMA 1KAMA 2KAMA 3KAMA 4WMA Crossover 5T3 Slope 1TEMA Price 2TEMA Price 3TRIMA Slope 1AROONOSC 3PLUS_DI Threshold 1PLUS_DI Threshold 2ADXR with DI+/DI-CMO Divergence 1 |
| 8 | 03 Aug | S | DEMA 1DEMA 2DEMA 3KAMA 1KAMA 2KAMA 3KAMA 4WMA Crossover 2MIDPOINT Slope 1MIDPOINT Slope 2MIDPOINT Slope 3MIDPOINT Slope 4TEMA Price 1TEMA Price 2TEMA Price 3TRIMA Slope 1AROONOSC 1MOM Crossover 1PLUS_DI Threshold 1PLUS_DI Threshold 2ROC Threshold 2ROCR Threshold 1WILLR Exit OversoldWILLR Exit OverboughtMACD Crossover 1ADXR with DI+/DI-Keltner Channel 1CMO Divergence 1 |
| 9 | 31 Jul | S | EMA Price Cross 4KAMA 4EMA Crossover 1WMA Crossover 1MIDPOINT Slope 4TEMA Price 1TEMA Price 2TEMA Price 3TRIMA Slope 2SAR CrossoverAROONOSC 4MOM Crossover 1PLUS_DI Threshold 1PLUS_DI Threshold 2ADXR with DI+/DI-CMO Divergence 1 |
| 10 | 30 Jul | S | EMA Price Cross 1EMA Price Cross 2KAMA 4MIDPOINT Slope 4TEMA Price 1TEMA Price 3TRIMA Slope 1TRIMA Slope 2TRIMA Slope 3PLUS_DI Threshold 1PLUS_DI Threshold 2TRIX Crossover 1Stochastic RSI SignalADXR with DI+/DI- |
| 11 | 29 Jul | S | DEMA 2EMA Price Cross 1EMA Price Cross 2KAMA 2KAMA 4MIDPOINT Slope 1MIDPOINT Slope 4TEMA Price 2TEMA Price 3TRIMA Slope 1TRIMA Slope 3AROONOSC 3PLUS_DI Threshold 1PLUS_DI Threshold 2ROCR Threshold 1WILLR Exit OversoldHammer / Hanging ManCMO Divergence 1 |
| 12 | 28 Jul | B | EMA Price Cross 1EMA Price Cross 2KAMA 4TEMA Price 2TEMA Price 3TRIMA Slope 1TRIMA Slope 3PLUS_DI Threshold 1PLUS_DI Threshold 2ROCR Threshold 2Stochastic RSI Signal |
| 13 | 27 Jul | S | DEMA 1DEMA 2EMA Price Cross 1EMA Price Cross 2EMA Price Cross 4KAMA 1KAMA 2KAMA 4EMA Crossover 1WMA Crossover 2MIDPOINT Slope 1TEMA Price 1TEMA Price 2TEMA Price 3TRIMA Slope 1TRIMA Slope 2TRIMA Slope 3AROONOSC 1PLUS_DI Threshold 1PLUS_DI Threshold 2ROCR Threshold 1RSI Exit OversoldHammer / Hanging ManCMO Divergence 1 |
| 14 | 24 Jul | B | DEMA 1KAMA 3KAMA 4TEMA Price 2TEMA Price 3TRIMA Slope 2TRIMA Slope 3SAR CrossoverPLUS_DI Threshold 1PLUS_DI Threshold 2RSI Exit OverboughtMACD Crossover 1CMO Divergence 1 |
| 15 | 23 Jul | N | DEMA 1DEMA 3KAMA 3KAMA 4WMA Crossover 1TEMA Price 2TRIMA Slope 2TRIMA Slope 3CCI Crossover 1CCI Crossover 2PLUS_DI Threshold 1PLUS_DI Threshold 2Stochastic RSI SignalCMO Divergence 1 |
| 16 | 22 Jul | N | DEMA 1DEMA 3KAMA 2KAMA 3KAMA 4TEMA Price 2TRIMA Slope 1TRIMA Slope 2TRIMA Slope 3CCI Crossover 3PLUS_DI Threshold 1PLUS_DI Threshold 2ADXR with DI+/DI-CMO Divergence 1 |
| 17 | 21 Jul | S | DEMA 2DEMA 3KAMA 1KAMA 2KAMA 3KAMA 4T3 Slope 2TEMA Price 3TRIMA Slope 1TRIMA Slope 2TRIMA Slope 3PLUS_DI Threshold 1PLUS_DI Threshold 2BBANDS Breakout 2ADXR with DI+/DI-CMO Divergence 1 |
| 18 | 20 Jul | S | DEMA 2DEMA 3KAMA 1KAMA 2KAMA 3KAMA 4EMA Crossover 4T3 Slope 2TEMA Price 3TRIMA Slope 1TRIMA Slope 2TRIMA Slope 3PLUS_DI Threshold 1PLUS_DI Threshold 2ADXR with DI+/DI-CMO Divergence 1 |
| 19 | 17 Jul | S | DEMA 1DEMA 2DEMA 3KAMA 1KAMA 2KAMA 3KAMA 4WMA Crossover 4MIDPOINT Slope 1MIDPOINT Slope 2MIDPOINT Slope 3MIDPOINT Slope 4T3 Slope 2TEMA Price 3TRIMA Slope 1TRIMA Slope 2TRIMA Slope 3PLUS_DI Threshold 1PLUS_DI Threshold 2STOCH Normal Zone CrossADXR with DI+/DI-Donchian ChannelCMO Divergence 1 |
| 20 | 16 Jul | S | DEMA 1DEMA 2DEMA 3KAMA 1KAMA 2KAMA 3KAMA 4MIDPOINT Slope 2MIDPOINT Slope 3MIDPOINT Slope 4T3 Slope 2TEMA Price 3TRIMA Slope 1TRIMA Slope 2TRIMA Slope 3CMO Crossover 1PLUS_DI Threshold 1PLUS_DI Threshold 2ROCR Threshold 4WILLR Exit OversoldWILLR Exit OverboughtADXR with DI+/DI-Keltner Channel 1CMO Divergence 1Schaff Trend Cycle |
| 21 | 15 Jul | S | DEMA 2DEMA 3KAMA 1KAMA 2KAMA 3KAMA 4MIDPOINT Slope 1MIDPOINT Slope 3MIDPOINT Slope 4T3 Slope 2TEMA Price 3TRIMA Slope 1TRIMA Slope 2TRIMA Slope 3PLUS_DI Threshold 1PLUS_DI Threshold 2CMO Divergence 1 |
| 22 | 14 Jul | S | DEMA 2DEMA 3KAMA 1KAMA 2KAMA 3T3 Slope 2TEMA Price 3TRIMA Slope 1TRIMA Slope 2TRIMA Slope 3PLUS_DI Threshold 1PLUS_DI Threshold 2ROC Threshold 2 |
| 23 | 13 Jul | S | DEMA 1DEMA 2DEMA 3KAMA 1KAMA 2KAMA 3EMA Crossover 3MIDPOINT Slope 1MIDPOINT Slope 2MIDPOINT Slope 3T3 Slope 1T3 Slope 2TEMA Price 2TEMA Price 3TRIMA Slope 1TRIMA Slope 2PLUS_DI Threshold 1PLUS_DI Threshold 2ROCR Threshold 3WILLR Exit OversoldWILLR Exit OverboughtCMO Divergence 1Coppock Curve |
| 24 | 10 Jul | S | DEMA 1DEMA 2DEMA 3KAMA 1MIDPOINT Slope 2MIDPOINT Slope 3T3 Slope 1TEMA Price 3TRIMA Slope 1TRIMA Slope 2MOM Crossover 2PLUS_DI Threshold 1PLUS_DI Threshold 2ROC Threshold 1ROCR Threshold 1Ichimoku 1Ichimoku 2Ichimoku 3CMO Divergence 1 |
| 25 | 09 Jul | S | DEMA 3WMA Crossover 3T3 Slope 1TEMA Price 3TRIMA Slope 1TRIMA Slope 2AROONOSC 2AROONOSC 4PLUS_DI Threshold 1PLUS_DI Threshold 2ROCR Threshold 2Percentage Price OscillatorIchimoku 2 |
| 26 | 08 Jul | S | DEMA 2DEMA 3MIDPOINT Slope 1MIDPOINT Slope 2MIDPOINT Slope 3T3 Slope 1TEMA Price 2TEMA Price 3TRIMA Slope 1TRIMA Slope 2PLUS_DI Threshold 1PLUS_DI Threshold 2TRIX Crossover 2WILLR Exit OverboughtIchimoku 2Vortex IndicatorCMO Divergence 1 |
| 27 | 07 Jul | S | DEMA 2DEMA 3EMA Price Cross 3KAMA 4EMA Crossover 2MIDPOINT Slope 2TEMA Price 2TEMA Price 3TRIMA Slope 1MOM Crossover 1PLUS_DI Threshold 1PLUS_DI Threshold 2WILLR Exit OversoldBBANDS Breakout 1CMO Divergence 1 |
| 28 | 06 Jul | S | DEMA 1DEMA 2DEMA 3EMA Price Cross 2KAMA 4MIDPOINT Slope 1TEMA Price 2TEMA Price 3TRIMA Slope 1TRIMA Slope 3PLUS_DI Threshold 1ROCR Threshold 1MACD Crossover 2CMO Divergence 1 |
| 29 | 03 Jul | S | DEMA 1DEMA 2EMA Price Cross 1KAMA 3KAMA 4WMA Crossover 2TEMA Price 2TEMA Price 3TRIMA Slope 1TRIMA Slope 2TRIMA Slope 3AROONOSC 1AROONOSC 3CMO Divergence 1 |
| 30 | 02 Jul | S | DEMA 1DEMA 2EMA Price Cross 4KAMA 3KAMA 4EMA Crossover 1MIDPOINT Slope 3MIDPOINT Slope 4TEMA Price 2TEMA Price 3TRIMA Slope 2TRIMA Slope 3SAR CrossoverCMO Divergence 1 |
Yeni Tayvan Doları/Yeni Zelanda Doları (TWDNZD) için kullanıcı tahminleri
Tahmininiz nedir?
In this section, you can easily predict without user registration. See also other users predictions.
