Señales de Análisis Técnico Red Akash (AKT) Gratis
Red Akash (AKT) señal con análisis técnico sobre 13 Aug
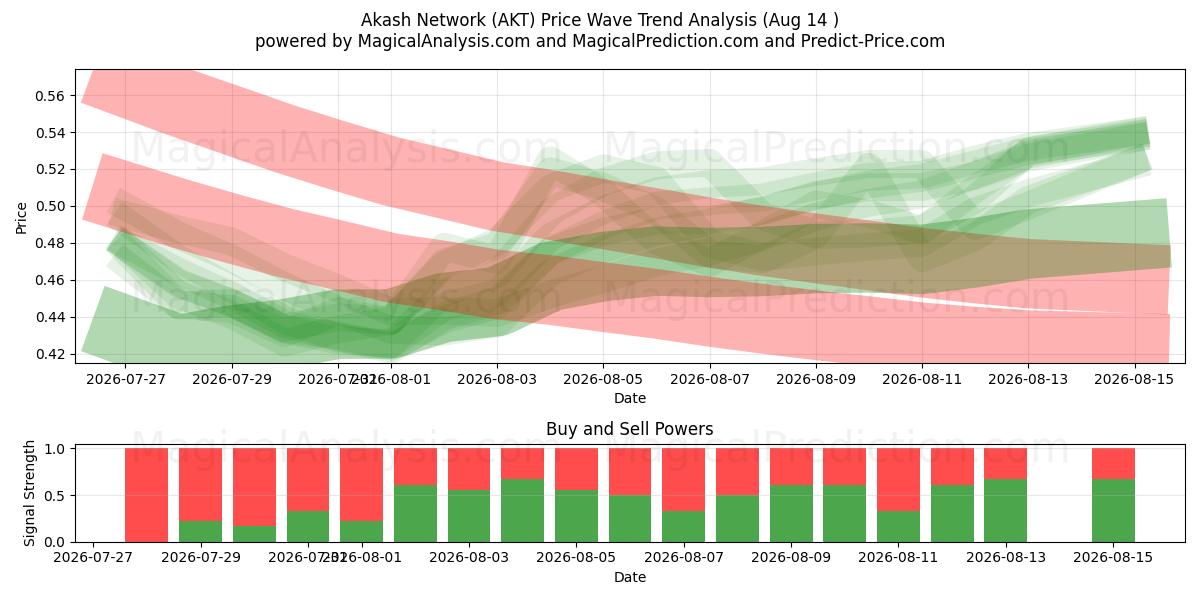
Las 256 señales se clasificaron en cuatro estrategias distintas, cada una compuesta por 64 señales. Vamos a profundizar en los detalles de cada estrategia:
Estrategia 1:
Señales de Compra:
Señales de Venta:
Señales Neutrales:
Resultado: Esta estrategia conduce a una posición .
Estrategia 2:
Señales de Compra:
Señales de Venta:
Señales Neutrales:
Resultado: Esta estrategia conduce a una posición .
Estrategia 3:
Señales de Compra:
Señales de Venta:
Señales Neutrales:
Resultado: Esta estrategia conduce a una posición .
Estrategia 4:
Señales de Compra:
Señales de Venta:
Señales Neutrales:
Resultado: Esta estrategia conduce a una posición .
Estrategia General:
Señales de Compra: 20
Señales de Venta: 2
Señales Neutrales: 77
Resultado: Esta estrategia conduce a una posición Comprar.
¡Descargo de responsabilidad! Por favor, ejerza precaución y consideración exhaustiva antes de tomar decisiones financieras. Es importante tener en cuenta que nuestras señales se basan únicamente en cambios de precios diarios y no consideran factores externos como noticias, sentimiento del mercado o desarrollos de la empresa. Recomendamos encarecidamente considerar todos los factores relevantes y realizar su propia investigación.
Consejos útiles: Para tomar decisiones más informadas sobre sus inversiones en Red Akash (AKT), le recomendamos encarecidamente visitar el sitio web de señales de modelos de IA "magicalprediction". Ofrecen señales gratuitas y si una se alinea con la nuestra, es probable que sea un indicador confiable, como hemos observado a lo largo del tiempo.
Resultado: Al observar el análisis técnico para Red Akash (AKT) en , parece haber una tendencia hacia una señal de compra basada en datos históricos y análisis. Sin embargo, es importante recordar que estas señales no son garantías y cualquier decisión de inversión debe hacerse con cuidado. Considere las condiciones generales del mercado y cómo sus elecciones se alinean con sus objetivos de inversión específicos.
Con base en las señales anteriores, recomendamos las siguientes estrategias:
Red Akash (AKT) estrategia de trading para aquellos en posiciones de compra (posiciones largas): Si actualmente está en una posición de compra (larga), mantener su posición puede ser una buena estrategia según nuestras señales. Sin embargo, siempre ejerza precaución y monitoree de cerca los desarrollos del mercado.
Red Akash (AKT) estrategia de trading para aquellos en posiciones de venta (posiciones cortas): Si actualmente está en una posición de venta (corta), se recomienda elegir el momento óptimo para salir según nuestra combinación de señales. Si tiene una mayor tolerancia al riesgo, considere esperar movimientos del mercado en los próximos días.
Para nuevas posiciones: Si no está actualmente en el mercado o está considerando cambiar a una posición de compra (larga), es aconsejable considerar el rango de precios proyectado. Este rango representa un potencial de aumento de 69.86%, determinado por el precio más alto proyectado. Sin embargo, antes de decidir entrar en una posición de compra, tenga cuidado y realice una investigación exhaustiva para asegurarse de que se alinea con su tolerancia al riesgo y objetivos de inversión.
En todos sus esfuerzos de trading, implementar una estrategia de stop-loss bien definida es crucial para gestionar eficazmente los riesgos potenciales a la baja.
Consejo útil 2: Para aquellos interesados en pronósticos a largo plazo, sugerimos utilizar el sitio web "predict-price", que ofrece predicciones tanto a corto como a largo plazo de forma gratuita. Esto puede ayudarle a tomar decisiones más informadas sobre sus **Red Akash (AKT)** inversiones.
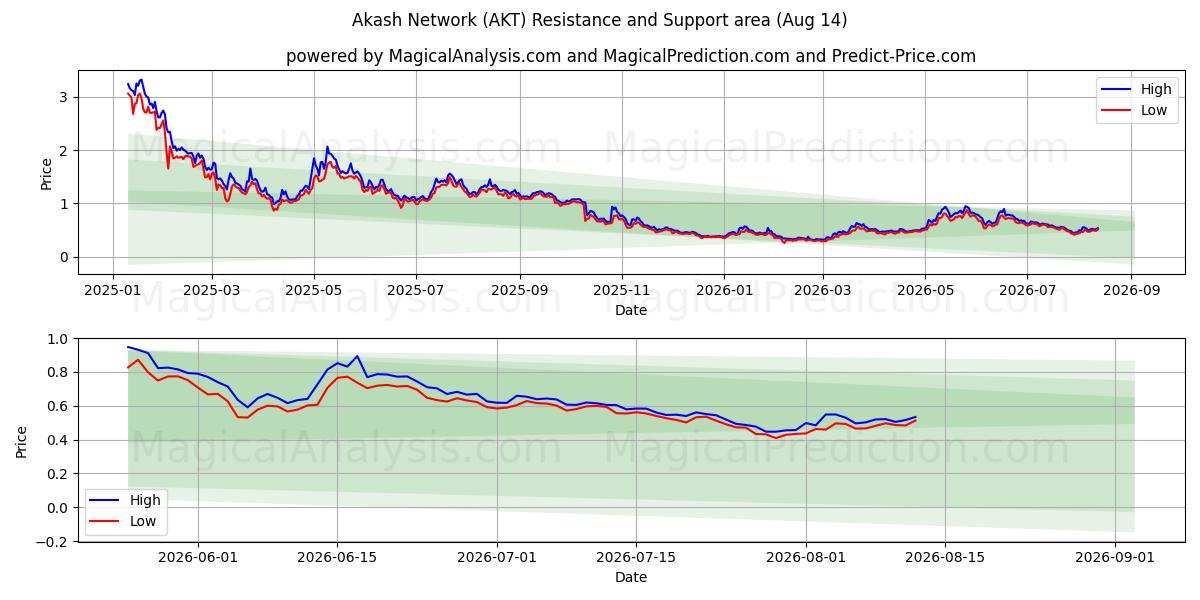
Red Akash (AKT) Análisis de precios y niveles de resistencia:
Dado nuestra posición larga actual en Red Akash (AKT), analizar los niveles clave de resistencia es crucial para comprender mejor su movimiento de precios. Estos niveles son puntos de referencia importantes para nuestra estrategia y exploraremos múltiples escenarios para proporcionar una perspectiva integral.Primer nivel de resistencia (0.733): El principal obstáculo que enfrentamos es el nivel de precio 0.733. Si la tendencia actual se mantiene sin cambios, Red Akash (AKT) podría romper por encima de este nivel, señalando su fortaleza y potencial para un mayor crecimiento.
Segundo nivel de resistencia (0.914): Si la tendencia ascendente continúa con fuerza significativa, podríamos ver a Red Akash (AKT) cruzar el segundo nivel de resistencia en 0.914, indicando un gran movimiento al alza y una dirección prometedora para nuestra posición.
Tercer nivel de resistencia (0.934): Para un análisis más completo, considere un escenario en el que Red Akash (AKT) no solo rompa el segundo nivel de resistencia, sino que mantenga su precio por encima de este punto. Si esta tendencia continúa en los próximos días, Red Akash (AKT) podría potencialmente alcanzar el tercer nivel de resistencia de 0.934.
Es esencial monitorear de cerca estos niveles de resistencia y considerarlos en el contexto más amplio de las tendencias e indicadores del mercado. Para tomar decisiones informadas al negociar Red Akash (AKT), manténgase alerta y analice continuamente el mercado. Al centrarse en estos niveles de resistencia y considerar las dinámicas del mercado más amplias, puede tomar decisiones de trading más inteligentes y adaptarse a este mercado dinámico.
Red Akash (AKT) gráfico de análisis técnico
Red Akash (AKT) niveles de soporte y resistencia
| Nombre | Level1 | Level2 | Level3 | Level4 | Level5 |
|---|---|---|---|---|---|
| Resistencia | 0.733 | 0.914 | 0.934 | 1.557 | -- |
| Soporte | 0.345 | 0.255 | -- | -- | -- |
Red Akash (AKT) lista de señales para 13 Aug
| Overall Signals |
|---|
Red Akash (AKT) patrones de velas en 13 Aug
Red Akash (AKT) análisis técnico en los últimos días
| # | Date | Overal Signals | ALL Signals |
|---|---|---|---|
| 1 | 13 Aug | B | DEMA 2DEMA 3KAMA 1KAMA 2KAMA 3KAMA 4MIDPOINT Slope 1MIDPOINT Slope 2T3 Slope 2TEMA Price 2TEMA Price 3TRIMA Slope 1AROONOSC 1AROONOSC 3ROCR Threshold 4WILLR Exit OverboughtBOP Smoothed ThresholdSTOCH Normal Zone CrossADXR with DI+/DI-Daily Pivot Point 1CMO Divergence 1 |
| 2 | 12 Aug | B | DEMA 3EMA Price Cross 1EMA Price Cross 2EMA Price Cross 3EMA Price Cross 4KAMA 1KAMA 2KAMA 3WMA Crossover 2MIDPOINT Slope 1MIDPOINT Slope 2MIDPOINT Slope 4T3 Slope 2TEMA Price 1TEMA Price 2TEMA Price 3TRIMA Slope 1TRIMA Slope 3ROCR Threshold 1BOP Smoothed ThresholdOBV CrossoverADXR with DI+/DI-Ichimoku 2Daily Pivot Point 1Vortex IndicatorCMO Divergence 1 |
| 3 | 11 Aug | B | DEMA 3EMA Price Cross 1EMA Price Cross 2EMA Price Cross 4KAMA 4WMA Crossover 2MIDPOINT Slope 3T3 Slope 2TEMA Price 2TRIMA Slope 3ROCR Threshold 1BOP Smoothed ThresholdSTOCH Normal Zone CrossStochastic RSI SignalOBV CrossoverADXR with DI+/DI-Ichimoku 1Ichimoku 2Daily Pivot Point 1Vortex Indicator |
| 4 | 10 Aug | S | DEMA 3EMA Price Cross 3T3 Slope 2TEMA Price 3TRIMA Slope 3STOCH Normal Zone CrossADXR with DI+/DI-Coppock Curve |
| 5 | 09 Aug | B | DEMA 3EMA Price Cross 3KAMA 1WMA Crossover 1MIDPOINT Slope 2TEMA Price 3TRIMA Slope 1TRIMA Slope 2MOM Crossover 2ROC Threshold 2ROCR Threshold 1ROCR Threshold 3BOP Smoothed ThresholdBBANDS Breakout 1OBV CrossoverIchimoku 2Rolling VWAPVortex IndicatorCMO Divergence 1 |
| 6 | 08 Aug | B | EMA Price Cross 1EMA Price Cross 2EMA Price Cross 4TEMA Price 3TRIMA Slope 2ROCR Threshold 1ADXR with DI+/DI- |
| 7 | 07 Aug | B | EMA Price Cross 1EMA Price Cross 2EMA Price Cross 4WMA Crossover 1WMA Crossover 3MIDPOINT Slope 1TEMA Price 1TEMA Price 2TRIMA Slope 2AROONOSC 2ADX +DI/-DI CrossoverROCR Threshold 1BOP Smoothed ThresholdBBANDS Breakout 1Ichimoku 3Daily Pivot Point 1Rolling VWAPVortex Indicator |
| 8 | 06 Aug | S | MIDPOINT Slope 2T3 Slope 1TEMA Price 1TEMA Price 3TRIMA Slope 1TRIMA Slope 2BOP Smoothed ThresholdSTOCH Normal Zone CrossPercentage Price OscillatorOBV CrossoverChaikin AD CrossoverChaikin ADOSC Zero CrossIchimoku 3 |
| 9 | 05 Aug | N | DEMA 3EMA Price Cross 3MIDPOINT Slope 4T3 Slope 1TEMA Price 1TEMA Price 3TRIMA Slope 1ROC Threshold 2ROCR Threshold 3TRIX Crossover 2BOP Smoothed ThresholdStochastic RSI SignalVolume SpikeIchimoku 2 |
| 10 | 04 Aug | S | DEMA 1DEMA 2DEMA 3EMA Price Cross 1EMA Price Cross 2EMA Price Cross 3KAMA 1KAMA 2EMA Crossover 2MIDPOINT Slope 1MIDPOINT Slope 2MIDPOINT Slope 3TEMA Price 1TEMA Price 2TEMA Price 3TRIMA Slope 1TRIMA Slope 3AROONOSC 3MOM Crossover 1ADX +DI/-DI CrossoverPLUS_DI Threshold 1ROC Threshold 1ROCR Threshold 2TRIX Crossover 1WILLR Exit OversoldWILLR Exit OverboughtBOP Smoothed ThresholdBBANDS Breakout 1Volume SpikeIchimoku 2Daily Pivot Point 1Rolling VWAPVortex IndicatorCMO Divergence 1 |
| 11 | 03 Aug | B | DEMA 2EMA Price Cross 1EMA Price Cross 2KAMA 4WMA Crossover 2TEMA Price 2TEMA Price 3TRIMA Slope 1TRIMA Slope 2TRIMA Slope 3PLUS_DI Threshold 1PLUS_DI Threshold 2BOP Smoothed ThresholdMACD Crossover 2ADXR with DI+/DI- |
| 12 | 02 Aug | S | DEMA 1DEMA 2DEMA 3EMA Price Cross 1EMA Price Cross 2EMA Price Cross 4KAMA 1KAMA 4EMA Crossover 1WMA Crossover 1MIDPOINT Slope 1MIDPOINT Slope 2MIDPOINT Slope 3TEMA Price 1TEMA Price 2TEMA Price 3TRIMA Slope 2TRIMA Slope 3SAR CrossoverAROONOSC 1CCI Crossover 2PLUS_DI Threshold 1PLUS_DI Threshold 2ROCR Threshold 1RSI Exit OversoldRSI Exit OverboughtBOP Smoothed ThresholdMoney Flow IndexOBV CrossoverChaikin AD CrossoverChaikin ADOSC Zero CrossVolume SpikeADXR with DI+/DI-Daily Pivot Point 1Elder's Force IndexCMO Divergence 1CMO Divergence 2 |
| 13 | 01 Aug | B | KAMA 1KAMA 2KAMA 3KAMA 4TRIMA Slope 2TRIMA Slope 3PLUS_DI Threshold 1PLUS_DI Threshold 2WILLR Exit OversoldWILLR Exit OverboughtBOP Smoothed ThresholdMACD Crossover 1Stochastic RSI SignalADXR with DI+/DI- |
| 14 | 31 Jul | S | DEMA 1KAMA 2KAMA 3KAMA 4TEMA Price 2TRIMA Slope 2TRIMA Slope 3CCI Crossover 1CCI Crossover 3PLUS_DI Threshold 1PLUS_DI Threshold 2BOP Smoothed ThresholdStochastic RSI SignalADXR with DI+/DI-CMO Divergence 1 |
| 15 | 30 Jul | N | DEMA 3KAMA 1KAMA 2KAMA 3KAMA 4EMA Crossover 5MIDPOINT Slope 1TRIMA Slope 1TRIMA Slope 2TRIMA Slope 3CMO Crossover 2PLUS_DI Threshold 1PLUS_DI Threshold 2BOP Smoothed ThresholdUltimate OscillatorDEMA with ATR 3Golden/Death Cross (EMA50/EMA200)ADXR with DI+/DI-Donchian ChannelDaily Pivot Point 1CMO Divergence 1 |
| 16 | 29 Jul | S | DEMA 3KAMA 1KAMA 2KAMA 3KAMA 4T3 Slope 1TRIMA Slope 1TRIMA Slope 2TRIMA Slope 3PLUS_DI Threshold 1PLUS_DI Threshold 2BOP Smoothed ThresholdBBANDS Breakout 2Stochastic RSI SignalDEMA with ATR 3ADXR with DI+/DI- |
| 17 | 28 Jul | S | DEMA 1DEMA 2DEMA 3KAMA 1KAMA 2KAMA 3KAMA 4MIDPOINT Slope 1MIDPOINT Slope 2MIDPOINT Slope 3MIDPOINT Slope 4T3 Slope 1TEMA Price 2TEMA Price 3TRIMA Slope 1TRIMA Slope 2PLUS_DI Threshold 1PLUS_DI Threshold 2BOP Smoothed ThresholdDEMA with ATR 2DEMA with ATR 3Volume SpikeKeltner Channel 1Donchian ChannelDaily Pivot Point 1CMO Divergence 1 |
| 18 | 27 Jul | S | DEMA 3KAMA 1KAMA 2KAMA 3KAMA 4WMA Crossover 5MIDPOINT Slope 4T3 Slope 1TRIMA Slope 1TRIMA Slope 2TRIMA Slope 3PLUS_DI Threshold 1PLUS_DI Threshold 2BOP Smoothed ThresholdBBANDS Breakout 2CMO Divergence 2 |
| 19 | 26 Jul | S | DEMA 1DEMA 2DEMA 3KAMA 1KAMA 2KAMA 3KAMA 4MIDPOINT Slope 1MIDPOINT Slope 3MIDPOINT Slope 4T3 Slope 1TEMA Price 2TEMA Price 3TRIMA Slope 1TRIMA Slope 2TRIMA Slope 3AROONOSC 3CMO Crossover 1PLUS_DI Threshold 1PLUS_DI Threshold 2BOP Smoothed ThresholdKeltner Channel 1Donchian ChannelDaily Pivot Point 1CMO Divergence 1 |
| 20 | 25 Jul | S | DEMA 1DEMA 2DEMA 3KAMA 1KAMA 2KAMA 3KAMA 4MIDPOINT Slope 1MIDPOINT Slope 3MIDPOINT Slope 4TEMA Price 1TEMA Price 2TEMA Price 3TRIMA Slope 1TRIMA Slope 2TRIMA Slope 3SAR CrossoverPLUS_DI Threshold 1PLUS_DI Threshold 2BOP Smoothed ThresholdMACD Crossover 1STOCH Normal Zone CrossDonchian ChannelDaily Pivot Point 1CMO Divergence 1 |
| 21 | 24 Jul | S | DEMA 1DEMA 3KAMA 1KAMA 2KAMA 3KAMA 4WMA Crossover 1MIDPOINT Slope 1TEMA Price 1TEMA Price 2TRIMA Slope 2TRIMA Slope 3PLUS_DI Threshold 1PLUS_DI Threshold 2ROCR Threshold 1WILLR Exit OversoldWILLR Exit OverboughtBOP Smoothed ThresholdStochastic RSI SignalDaily Pivot Point 1CMO Divergence 1 |
| 22 | 23 Jul | S | EMA Price Cross 4KAMA 2KAMA 3KAMA 4MIDPOINT Slope 3TEMA Price 2TEMA Price 3TRIMA Slope 2TRIMA Slope 3PLUS_DI Threshold 1PLUS_DI Threshold 2BOP Smoothed ThresholdPercentage Price Oscillator |
| 23 | 22 Jul | S | DEMA 1DEMA 2EMA Price Cross 4KAMA 2KAMA 3KAMA 4WMA Crossover 1TEMA Price 1TEMA Price 2TEMA Price 3TRIMA Slope 1TRIMA Slope 2TRIMA Slope 3SAR CrossoverCCI Crossover 1CCI Crossover 2CCI Crossover 3PLUS_DI Threshold 1PLUS_DI Threshold 2BOP Smoothed ThresholdMACD Crossover 1CMO Divergence 1 |
| 24 | 21 Jul | B | DEMA 1KAMA 2KAMA 3KAMA 4MIDPOINT Slope 2TEMA Price 2TRIMA Slope 1TRIMA Slope 2TRIMA Slope 3PLUS_DI Threshold 1PLUS_DI Threshold 2RSI Exit OversoldBOP Smoothed ThresholdBBANDS Breakout 2Stochastic RSI Signal |
| 25 | 20 Jul | S | DEMA 1DEMA 2DEMA 3KAMA 1KAMA 2KAMA 3KAMA 4MIDPOINT Slope 1MIDPOINT Slope 2MIDPOINT Slope 3TEMA Price 2TEMA Price 3TRIMA Slope 1TRIMA Slope 2TRIMA Slope 3CMO Crossover 1PLUS_DI Threshold 1PLUS_DI Threshold 2BOP Smoothed ThresholdDonchian ChannelDaily Pivot Point 1CMO Divergence 1 |
| 26 | 19 Jul | S | DEMA 3KAMA 1KAMA 2KAMA 3KAMA 4MIDPOINT Slope 1TRIMA Slope 1TRIMA Slope 2TRIMA Slope 3PLUS_DI Threshold 1PLUS_DI Threshold 2BOP Smoothed ThresholdHammer / Hanging ManCMO Divergence 1 |
| 27 | 18 Jul | S | DEMA 3KAMA 1KAMA 2KAMA 3KAMA 4MIDPOINT Slope 2TRIMA Slope 1TRIMA Slope 2TRIMA Slope 3PLUS_DI Threshold 1PLUS_DI Threshold 2BOP Smoothed ThresholdDonchian ChannelCMO Divergence 1 |
| 28 | 17 Jul | S | DEMA 3KAMA 1KAMA 2KAMA 3KAMA 4MIDPOINT Slope 3TRIMA Slope 1TRIMA Slope 2TRIMA Slope 3PLUS_DI Threshold 1PLUS_DI Threshold 2WILLR Exit OversoldWILLR Exit OverboughtBOP Smoothed ThresholdDaily Pivot Point 1CMO Divergence 1 |
| 29 | 16 Jul | S | KAMA 2KAMA 3KAMA 4MIDPOINT Slope 1TEMA Price 2TEMA Price 3TRIMA Slope 1TRIMA Slope 2CCI Crossover 3PLUS_DI Threshold 1PLUS_DI Threshold 2BOP Smoothed Threshold |
| 30 | 15 Jul | S | KAMA 1KAMA 2KAMA 3KAMA 4MIDPOINT Slope 4T3 Slope 1TRIMA Slope 1TRIMA Slope 2PLUS_DI Threshold 1PLUS_DI Threshold 2RSI Exit OversoldBBANDS Breakout 2Stochastic RSI Signal |
Pronósticos de usuarios para Red Akash (AKT)
¿Cuál es tu predicción?
In this section, you can easily predict without user registration. See also other users predictions.
