Señales de Análisis Técnico Euwax AG (EUX) Gratis
Euwax AG (EUX) señal con análisis técnico sobre 29 Jul
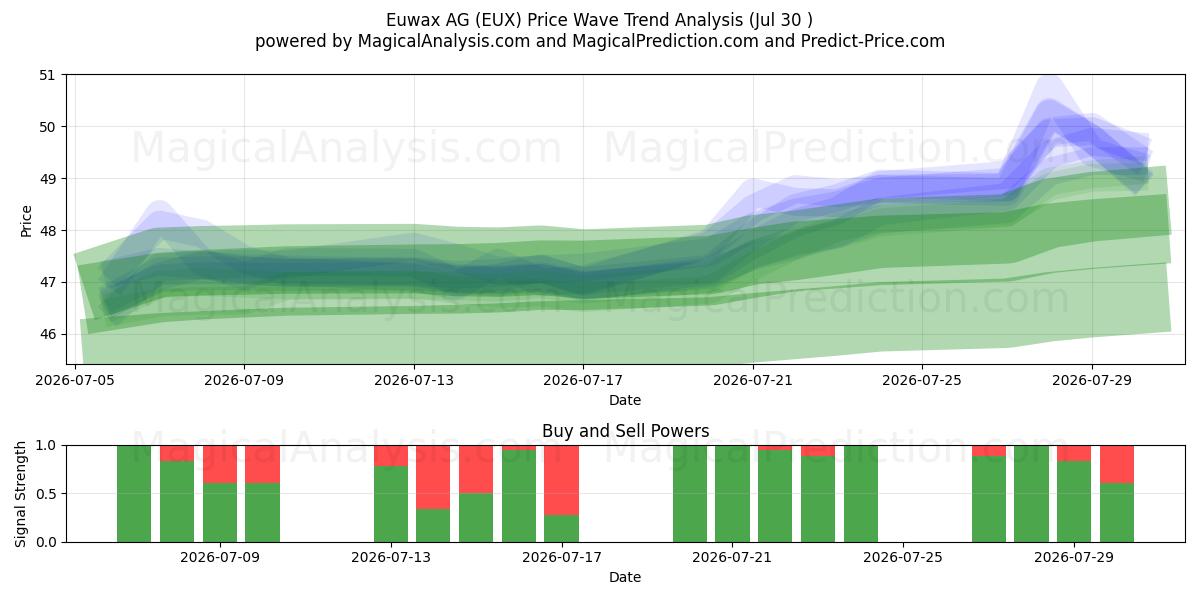
Las 256 señales se categorizaron en cuatro estrategias distintas, cada una compuesta por 64 señales. Vamos a profundizar en los detalles de cada estrategia:
Estrategia 1:
Señales de Compra:
Señales de Venta:
Señales Neutrales:
Resultado: Esta estrategia lleva a una posición de .
Estrategia 2:
Señales de Compra:
Señales de Venta:
Señales Neutrales:
Resultado: Esta estrategia lleva a una posición de .
Estrategia 3:
Señales de Compra:
Señales de Venta:
Señales Neutrales:
Resultado: Esta estrategia lleva a una posición de .
Estrategia 4:
Señales de Compra:
Señales de Venta:
Señales Neutrales:
Resultado: Esta estrategia lleva a una posición de .
Estrategia General:
Señales de Compra: 9
Señales de Venta: 13
Señales Neutrales: 77
Resultado: Esta estrategia lleva a una posición de Vender.
¡Aviso! Por favor, ejerza precaución y considere cuidadosamente antes de tomar decisiones financieras. Es importante tener en cuenta que nuestras señales se basan únicamente en cambios diarios de precios y no toman en cuenta factores externos como noticias, sentimiento del mercado o desarrollos de la empresa. Recomendamos encarecidamente considerar todos los factores relevantes y realizar su propia investigación.
Consejos Útiles: Para tomar decisiones más informadas sobre sus inversiones en Euwax AG (EUX), le recomendamos visitar el sitio web de señales de modelos de IA "magicalprediction". Proporcionan señales gratuitas, y si una coincide con la nuestra, es probable que sea un indicador confiable, como hemos observado a lo largo del tiempo.
Resultado: Al observar el análisis técnico para Euwax AG (EUX) en , hay una tendencia hacia una señal de venta basada en datos históricos y análisis. Sin embargo, es crucial recordar que estas señales no son garantías. Asegúrese de considerar cuidadosamente las condiciones generales del mercado y alinear sus decisiones con sus objetivos de inversión específicos.
Basado en las señales y pronósticos anteriores, recomendamos las siguientes estrategias:
Euwax AG (EUX) estrategia de trading para aquellos en posiciones de compra (posiciones largas): Si actualmente está en una posición de compra (larga), es aconsejable identificar el momento óptimo para salir de su posición basado en una combinación de señales técnicas. Aquellos con una alta tolerancia al riesgo pueden optar por esperar y observar los movimientos del mercado en los próximos días.
Euwax AG (EUX) estrategia de trading para aquellos en posiciones de venta (posiciones cortas): Si está en una posición de venta (corta), mantener su posición puede ser la estrategia correcta, como lo indica el consenso de nuestro análisis técnico. Sin embargo, tenga cuidado y supervise de cerca los desarrollos del mercado.
Para nuevas posiciones: Si no está actualmente invertido o considerando cambiar a una posición de venta (corta), se recomienda evaluar la posible caída de 19.24% basada en el rango de precio más bajo esperado. Asegúrese de que esto esté alineado con su tolerancia al riesgo y objetivos, realizando una investigación exhaustiva antes de entrar en una posición corta.
En todos los escenarios de trading, una estrategia de stop-loss bien definida es crítica para gestionar eficazmente los posibles riesgos a la baja.
Consejo Útil: Para pronósticos a largo plazo, recomendamos utilizar el sitio web "Predict-price", que ofrece tanto predicciones a corto como a largo plazo sin costo alguno. Este recurso puede apoyar la toma de decisiones informadas respecto a sus **Euwax AG (EUX)** inversiones.
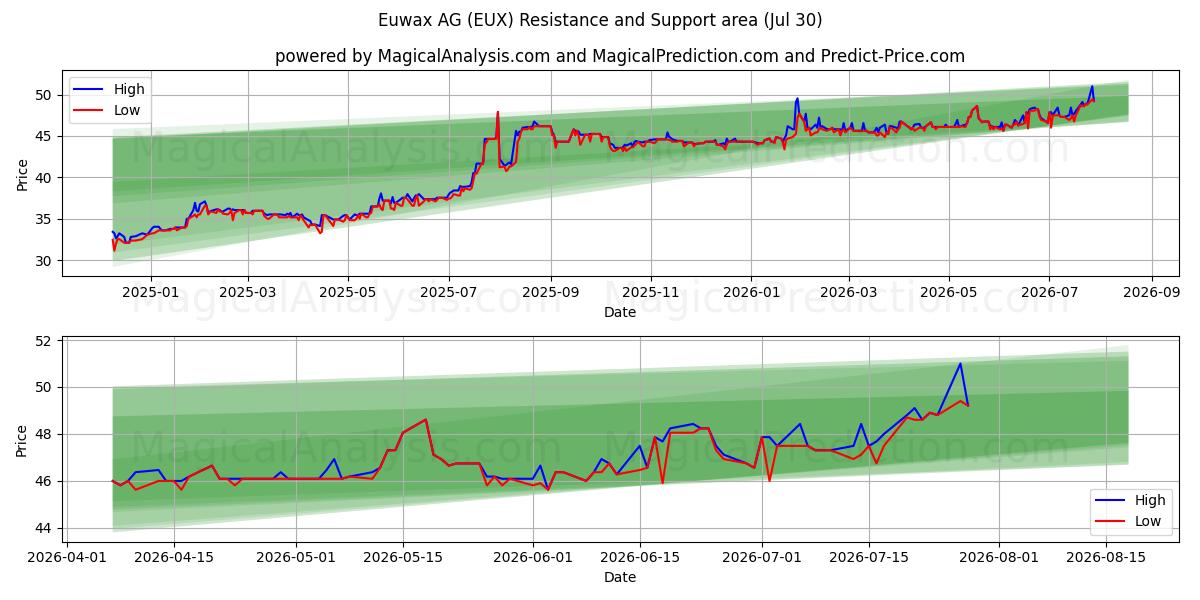
Análisis de Precios y Niveles de Soporte para Euwax AG (EUX):
En nuestra posición actual de Euwax AG (EUX), nos encontramos en una posición corta, anticipando una posible tendencia a la baja. Comprender los niveles clave de soporte es esencial, ya que estos sirven como puntos de referencia críticos para que los traders e inversores tomen decisiones informadas.Primer Nivel de Soporte: 47.909
Estamos monitoreando de cerca el precio en 47.909, el primer nivel de soporte. Si la tendencia a la baja continúa, romper este nivel señalaría una fuerte presión de venta, sugiriendo la posibilidad de una mayor depreciación del precio.
Segundo Nivel de Soporte: 40.757
Si se rompe el primer nivel de soporte, el segundo nivel de soporte en 40.757 se vuelve crucial. Una ruptura aquí indicaría un impulso descendente más fuerte, probablemente impulsado por el sentimiento del mercado o factores externos.
Estos niveles de soporte deben considerarse cuidadosamente en el contexto de las tendencias e indicadores más amplios del mercado. Al mantenerse alerta y analizar constantemente el mercado, puede tomar decisiones bien informadas al operar Euwax AG (EUX). Tener en cuenta estos niveles de soporte le ayudará a adaptarse a la naturaleza dinámica del mercado y a tomar decisiones de trading más inteligentes.
Euwax AG (EUX) gráfico de análisis técnico
Euwax AG (EUX) niveles de soporte y resistencia
| Nombre | Level1 | Level2 | Level3 | Level4 | Level5 |
|---|---|---|---|---|---|
| Resistencia | 48.61 | 49.544 | -- | -- | -- |
| Soporte | 47.909 | 40.757 | -- | -- | -- |
Euwax AG (EUX) lista de señales para 29 Jul
| Overall Signals |
|---|
Euwax AG (EUX) patrones de velas en 29 Jul
Euwax AG (EUX) análisis técnico en los últimos días
| # | Date | Overal Signals | ALL Signals |
|---|---|---|---|
| 1 | 29 Jul | S | DEMA 1EMA Price Cross 4KAMA 2KAMA 3KAMA 4T3 Slope 2TEMA Price 1TEMA Price 2TRIMA Slope 1TRIMA Slope 2TRIMA Slope 3CCI Crossover 1CCI Crossover 3PLUS_DI Threshold 1PLUS_DI Threshold 2RSI Exit OversoldBOP Smoothed ThresholdBBANDS Breakout 2Stochastic RSI SignalUltimate OscillatorCMO Divergence 1 |
| 2 | 28 Jul | N | DEMA 1DEMA 2DEMA 3KAMA 1KAMA 2KAMA 3KAMA 4MIDPOINT Slope 1MIDPOINT Slope 2MIDPOINT Slope 3MIDPOINT Slope 4T3 Slope 1T3 Slope 2TEMA Price 1TEMA Price 2TEMA Price 3TRIMA Slope 1TRIMA Slope 2AROONOSC 2AROONOSC 3CMO Crossover 1PLUS_DI Threshold 1PLUS_DI Threshold 2ROC Threshold 2ROCR Threshold 3BOP Smoothed ThresholdChaikin ADOSC Zero CrossDEMA with ATR 1DEMA with ATR 2DEMA with ATR 3Volume SpikeKeltner Channel 1Donchian ChannelCMO Divergence 1CMO Divergence 2 |
| 3 | 27 Jul | B | KAMA 1KAMA 2KAMA 3KAMA 4MIDPOINT Slope 2T3 Slope 2TRIMA Slope 2CCI Crossover 1CCI Crossover 3PLUS_DI Threshold 1PLUS_DI Threshold 2BOP Smoothed ThresholdSTOCH Normal Zone CrossStochastic RSI SignalCMO Divergence 2 |
| 4 | 24 Jul | B | DEMA 3KAMA 1KAMA 2KAMA 3KAMA 4MIDPOINT Slope 2MIDPOINT Slope 4T3 Slope 1T3 Slope 2TEMA Price 3TRIMA Slope 1TRIMA Slope 2PLUS_DI Threshold 1PLUS_DI Threshold 2ROCR Threshold 4WILLR Exit OversoldWILLR Exit OverboughtBOP Smoothed ThresholdPercentage Price OscillatorMass Index BreakoutCMO Divergence 1 |
| 5 | 23 Jul | B | DEMA 3KAMA 1KAMA 2KAMA 3KAMA 4MIDPOINT Slope 1T3 Slope 1T3 Slope 2TEMA Price 3TRIMA Slope 1TRIMA Slope 2CCI Crossover 3PLUS_DI Threshold 1PLUS_DI Threshold 2ROC Threshold 2BOP Smoothed ThresholdPercentage Price Oscillator |
| 6 | 22 Jul | B | DEMA 2DEMA 3KAMA 1KAMA 2KAMA 3KAMA 4MIDPOINT Slope 1T3 Slope 1T3 Slope 2TEMA Price 2TEMA Price 3TRIMA Slope 1AROONOSC 1PLUS_DI Threshold 1PLUS_DI Threshold 2ROC Threshold 1ROCR Threshold 2TRIX Crossover 2BOP Smoothed ThresholdDaily Pivot Point 1 |
| 7 | 21 Jul | B | DEMA 1DEMA 2DEMA 3KAMA 1KAMA 2KAMA 3KAMA 4MIDPOINT Slope 1MIDPOINT Slope 2MIDPOINT Slope 3MIDPOINT Slope 4T3 Slope 1T3 Slope 2TEMA Price 1TEMA Price 2TEMA Price 3TRIMA Slope 1AROONOSC 2AROONOSC 4PLUS_DI Threshold 1PLUS_DI Threshold 2ROCR Threshold 4TRIX Crossover 1WILLR Exit OversoldBOP Smoothed ThresholdMACD Crossover 2Percentage Price OscillatorDonchian ChannelVortex IndicatorCMO Divergence 1 |
| 8 | 20 Jul | B | DEMA 1DEMA 2DEMA 3EMA Price Cross 1EMA Price Cross 2EMA Price Cross 3EMA Price Cross 4KAMA 1KAMA 2KAMA 3KAMA 4EMA Crossover 1EMA Crossover 2WMA Crossover 1WMA Crossover 2WMA Crossover 3MIDPOINT Slope 1MIDPOINT Slope 2T3 Slope 2TEMA Price 1TEMA Price 2TEMA Price 3MOM Crossover 2PLUS_DI Threshold 1PLUS_DI Threshold 2ROC Threshold 2ROCR Threshold 1ROCR Threshold 3WILLR Exit OverboughtMACD Crossover 1STOCH Normal Zone CrossBBANDS Breakout 1Stochastic RSI SignalUltimate OscillatorOBV CrossoverChaikin AD CrossoverDEMA with ATR 2DEMA with ATR 3Volume SpikeIchimoku 2Ichimoku 3Rolling VWAPElder's Force IndexCMO Divergence 1CMO Divergence 2Coppock Curve |
| 9 | 17 Jul | B | DEMA 2DEMA 3EMA Price Cross 1EMA Price Cross 2EMA Price Cross 3EMA Price Cross 4EMA Crossover 1EMA Crossover 2WMA Crossover 1WMA Crossover 3MIDPOINT Slope 3MIDPOINT Slope 4T3 Slope 2TEMA Price 1TEMA Price 2TEMA Price 3MOM Crossover 1MOM Crossover 2PLUS_DI Threshold 1PLUS_DI Threshold 2ROCR Threshold 1ROCR Threshold 2ROCR Threshold 4WILLR Exit OversoldBOP Smoothed ThresholdBBANDS Breakout 1Stochastic RSI SignalEngulfing PatternIchimoku 2Ichimoku 3Daily Pivot Point 1Rolling VWAPVortex IndicatorCMO Divergence 1 |
| 10 | 16 Jul | S | EMA Price Cross 1EMA Price Cross 2EMA Price Cross 3EMA Price Cross 4KAMA 3KAMA 4EMA Crossover 1EMA Crossover 2WMA Crossover 1WMA Crossover 3T3 Slope 2TEMA Price 2MOM Crossover 1MOM Crossover 2PLUS_DI Threshold 1PLUS_DI Threshold 2BOP Smoothed ThresholdBBANDS Breakout 1Ichimoku 2Ichimoku 3Rolling VWAPCMO Divergence 1 |
| 11 | 15 Jul | B | KAMA 4T3 Slope 1T3 Slope 2TEMA Price 3AROONOSC 1AROONOSC 3PLUS_DI Threshold 1PLUS_DI Threshold 2ROCR Threshold 2BOP Smoothed ThresholdStochastic RSI SignalMoney Flow IndexVolume SpikeVortex Indicator |
| 12 | 14 Jul | N | EMA Price Cross 3EMA Crossover 2WMA Crossover 2WMA Crossover 3MIDPOINT Slope 2TEMA Price 2TEMA Price 3TRIMA Slope 1PLUS_DI Threshold 1PLUS_DI Threshold 2ROC Threshold 2ROCR Threshold 1BOP Smoothed ThresholdEngulfing PatternVolume SpikeIchimoku 2Ichimoku 3Daily Pivot Point 1Rolling VWAPCMO Divergence 1Coppock Curve |
| 13 | 13 Jul | S | KAMA 4TRIMA Slope 1MOM Crossover 1PLUS_DI Threshold 1PLUS_DI Threshold 2BBANDS Breakout 1CMO Divergence 1 |
| 14 | 10 Jul | N | KAMA 4EMA Crossover 1WMA Crossover 1WMA Crossover 3MIDPOINT Slope 1MIDPOINT Slope 2MOM Crossover 2PLUS_DI Threshold 1PLUS_DI Threshold 2ROCR Threshold 1ROCR Threshold 3ROCR Threshold 4MACD Crossover 1MACD Crossover 2STOCH Normal Zone CrossCMO Divergence 1 |
| 15 | 09 Jul | N | EMA Price Cross 1EMA Price Cross 2KAMA 4WMA Crossover 3TEMA Price 3TRIMA Slope 1MOM Crossover 2PLUS_DI Threshold 1PLUS_DI Threshold 2ROC Threshold 2ROCR Threshold 1ROCR Threshold 3BOP Smoothed ThresholdPercentage Price OscillatorCMO Divergence 2 |
| 16 | 08 Jul | N | EMA Price Cross 4KAMA 3KAMA 4MIDPOINT Slope 1TEMA Price 1TRIMA Slope 1MOM Crossover 1MOM Crossover 2PLUS_DI Threshold 1PLUS_DI Threshold 2ROCR Threshold 2BOP Smoothed ThresholdStochastic RSI Signal |
| 17 | 07 Jul | N | DEMA 1DEMA 2DEMA 3KAMA 1KAMA 2KAMA 3KAMA 4EMA Crossover 2WMA Crossover 2WMA Crossover 3MIDPOINT Slope 1MIDPOINT Slope 2MIDPOINT Slope 3MIDPOINT Slope 4TEMA Price 1TEMA Price 2TEMA Price 3SAR CrossoverAROONOSC 2AROONOSC 4MOM Crossover 1PLUS_DI Threshold 1PLUS_DI Threshold 2WILLR Exit OversoldWILLR Exit OverboughtBOP Smoothed ThresholdMACD Crossover 1MACD Crossover 2Money Flow IndexDEMA with ATR 1DEMA with ATR 2DEMA with ATR 3Volume SpikeDaily Pivot Point 1CMO Divergence 1CMO Divergence 2 |
| 18 | 06 Jul | B | DEMA 1EMA Price Cross 1EMA Price Cross 2EMA Price Cross 3EMA Price Cross 4KAMA 3KAMA 4EMA Crossover 1WMA Crossover 1TEMA Price 1TEMA Price 2TEMA Price 3TRIMA Slope 2MOM Crossover 1MOM Crossover 2PLUS_DI Threshold 1PLUS_DI Threshold 2ROC Threshold 2ROCR Threshold 1ROCR Threshold 2ROCR Threshold 3ROCR Threshold 4TRIX Crossover 2BOP Smoothed ThresholdSTOCH Normal Zone CrossBBANDS Breakout 1Stochastic RSI SignalIchimoku 2Ichimoku 3Rolling VWAP |
| 19 | 03 Jul | B | DEMA 1DEMA 2DEMA 3EMA Price Cross 1EMA Price Cross 2EMA Price Cross 3EMA Price Cross 4KAMA 1KAMA 2EMA Crossover 1EMA Crossover 2WMA Crossover 1WMA Crossover 3MIDPOINT Slope 1MIDPOINT Slope 2MIDPOINT Slope 3T3 Slope 1TEMA Price 1TEMA Price 2TEMA Price 3MOM Crossover 1MOM Crossover 2PLUS_DI Threshold 1PLUS_DI Threshold 2ROCR Threshold 1WILLR Exit OversoldWILLR Exit OverboughtBOP Smoothed ThresholdSTOCH Normal Zone CrossBBANDS Breakout 1Stochastic RSI SignalVolume SpikeIchimoku 2Ichimoku 3Daily Pivot Point 1Rolling VWAPVortex IndicatorCMO Divergence 1CMO Divergence 2 |
| 20 | 02 Jul | S | DEMA 1EMA Price Cross 1EMA Price Cross 2EMA Price Cross 3EMA Price Cross 4KAMA 1KAMA 2KAMA 3KAMA 4EMA Crossover 1EMA Crossover 2WMA Crossover 1MIDPOINT Slope 1MIDPOINT Slope 2MIDPOINT Slope 4TEMA Price 1TEMA Price 2TEMA Price 3MOM Crossover 2PLUS_DI Threshold 1PLUS_DI Threshold 2ROC Threshold 2ROCR Threshold 3ROCR Threshold 4TRIX Crossover 1BOP Smoothed ThresholdSTOCH Normal Zone CrossBBANDS Breakout 1Stochastic RSI SignalUltimate OscillatorIchimoku 2Ichimoku 3Rolling VWAPVortex IndicatorCMO Divergence 1 |
| 21 | 01 Jul | B | MIDPOINT Slope 1T3 Slope 1TEMA Price 2TEMA Price 3TRIMA Slope 1AROONOSC 1AROONOSC 3MOM Crossover 2PLUS_DI Threshold 1PLUS_DI Threshold 2BOP Smoothed ThresholdMACD Crossover 2CMO Divergence 1 |
| 22 | 30 Jun | S | EMA Crossover 2WMA Crossover 2MIDPOINT Slope 1TEMA Price 2TEMA Price 3TRIMA Slope 1SAR CrossoverPLUS_DI Threshold 1PLUS_DI Threshold 2BOP Smoothed ThresholdBBANDS Breakout 1CMO Divergence 1 |
| 23 | 29 Jun | S | DEMA 2EMA Price Cross 3EMA Crossover 1MIDPOINT Slope 2TEMA Price 2TEMA Price 3TRIMA Slope 1TRIMA Slope 2PLUS_DI Threshold 1PLUS_DI Threshold 2ROCR Threshold 1BOP Smoothed ThresholdIchimoku 2Ichimoku 3Rolling VWAPCMO Divergence 1 |
| 24 | 26 Jun | S | DEMA 1EMA Price Cross 1EMA Price Cross 2EMA Price Cross 4KAMA 4WMA Crossover 1MIDPOINT Slope 1MIDPOINT Slope 2T3 Slope 2TEMA Price 1TEMA Price 2TEMA Price 3TRIMA Slope 1TRIMA Slope 2CCI Crossover 1CCI Crossover 2PLUS_DI Threshold 1PLUS_DI Threshold 2ROCR Threshold 1BOP Smoothed ThresholdMACD Crossover 1Stochastic RSI SignalVolume SpikeVortex IndicatorCMO Divergence 1 |
| 25 | 25 Jun | S | DEMA 3KAMA 2KAMA 3KAMA 4T3 Slope 1T3 Slope 2TEMA Price 3TRIMA Slope 1CCI Crossover 3PLUS_DI Threshold 1PLUS_DI Threshold 2BOP Smoothed ThresholdBBANDS Breakout 2CMO Divergence 1 |
| 26 | 24 Jun | B | DEMA 3KAMA 2KAMA 3KAMA 4MIDPOINT Slope 1T3 Slope 1T3 Slope 2TEMA Price 3TRIMA Slope 1TRIMA Slope 2PLUS_DI Threshold 1PLUS_DI Threshold 2BOP Smoothed ThresholdKeltner Channel 1CMO Divergence 1Schaff Trend Cycle |
| 27 | 23 Jun | B | DEMA 2DEMA 3KAMA 1KAMA 2KAMA 3KAMA 4T3 Slope 1T3 Slope 2TEMA Price 2TEMA Price 3PLUS_DI Threshold 1PLUS_DI Threshold 2BOP Smoothed ThresholdDEMA with ATR 2DEMA with ATR 3Ichimoku 1CMO Divergence 1 |
| 28 | 22 Jun | B | DEMA 1DEMA 2DEMA 3EMA Price Cross 1EMA Price Cross 2EMA Price Cross 3EMA Price Cross 4KAMA 1KAMA 2KAMA 3KAMA 4EMA Crossover 1WMA Crossover 4T3 Slope 1T3 Slope 2TEMA Price 1TEMA Price 2TEMA Price 3TRIMA Slope 1MOM Crossover 1MOM Crossover 2PLUS_DI Threshold 1PLUS_DI Threshold 2ROC Threshold 1ROC Threshold 2ROCR Threshold 1ROCR Threshold 2ROCR Threshold 3ROCR Threshold 4WILLR Exit OversoldWILLR Exit OverboughtBOP Smoothed ThresholdMACD Crossover 1STOCH Normal Zone CrossBBANDS Breakout 1Stochastic RSI SignalKeltner Channel 1Donchian ChannelIchimoku 2Ichimoku 3Rolling VWAPCMO Divergence 1 |
| 29 | 19 Jun | B | DEMA 1DEMA 2DEMA 3EMA Price Cross 1EMA Price Cross 2EMA Price Cross 3EMA Price Cross 4KAMA 1KAMA 2KAMA 3EMA Crossover 1MIDPOINT Slope 1MIDPOINT Slope 2T3 Slope 2TEMA Price 1TEMA Price 2TEMA Price 3CCI Crossover 1CCI Crossover 2CCI Crossover 3MOM Crossover 1MOM Crossover 2PLUS_DI Threshold 1PLUS_DI Threshold 2ROCR Threshold 1ROCR Threshold 2ROCR Threshold 4RSI Exit OversoldWILLR Exit OversoldWILLR Exit OverboughtBOP Smoothed ThresholdMACD Crossover 1STOCH Normal Zone CrossBBANDS Breakout 1BBANDS Breakout 2Stochastic RSI SignalMoney Flow IndexOBV CrossoverChaikin AD CrossoverChaikin ADOSC Zero CrossVolume SpikeIchimoku 2Ichimoku 3Rolling VWAPElder's Force IndexCMO Divergence 1 |
| 30 | 18 Jun | S | DEMA 1DEMA 2DEMA 3KAMA 1KAMA 2KAMA 3KAMA 4WMA Crossover 1MIDPOINT Slope 1MIDPOINT Slope 2MIDPOINT Slope 3MIDPOINT Slope 4T3 Slope 1T3 Slope 2TEMA Price 1TEMA Price 2TEMA Price 3TRIMA Slope 1TRIMA Slope 2MOM Crossover 1PLUS_DI Threshold 1PLUS_DI Threshold 2ROC Threshold 1ROC Threshold 2ROCR Threshold 1ROCR Threshold 2ROCR Threshold 3ROCR Threshold 4WILLR Exit OversoldWILLR Exit OverboughtBOP Smoothed ThresholdSTOCH Normal Zone CrossPercentage Price OscillatorKeltner Channel 1Donchian ChannelIchimoku 2Ichimoku 3CMO Divergence 1 |
Pronósticos de usuarios para Euwax AG (EUX)
¿Cuál es tu predicción?
In this section, you can easily predict without user registration. See also other users predictions.
